

How to Multiply Strawberries from Runners (Free Plants Forever)
A few of the product links in this guide are affiliate links. If you buy through one, Ambitious Harvest may earn a small commission at no extra cost to you, which helps keep these guides free. We only point to gear we would use in our own Santa Cruz garden. As an Amazon Associate, we earn from Read our full disclosure.
One strawberry plant can become dozens, and those dozens can become hundreds, all without spending another dollar. The secret is runners: those long stems with baby plants attached that strawberries produce naturally. Learn to work with runners instead of fighting them, and you'll never need to buy strawberry plants again.
What Are Runners (And Why Do Strawberries Make Them)?
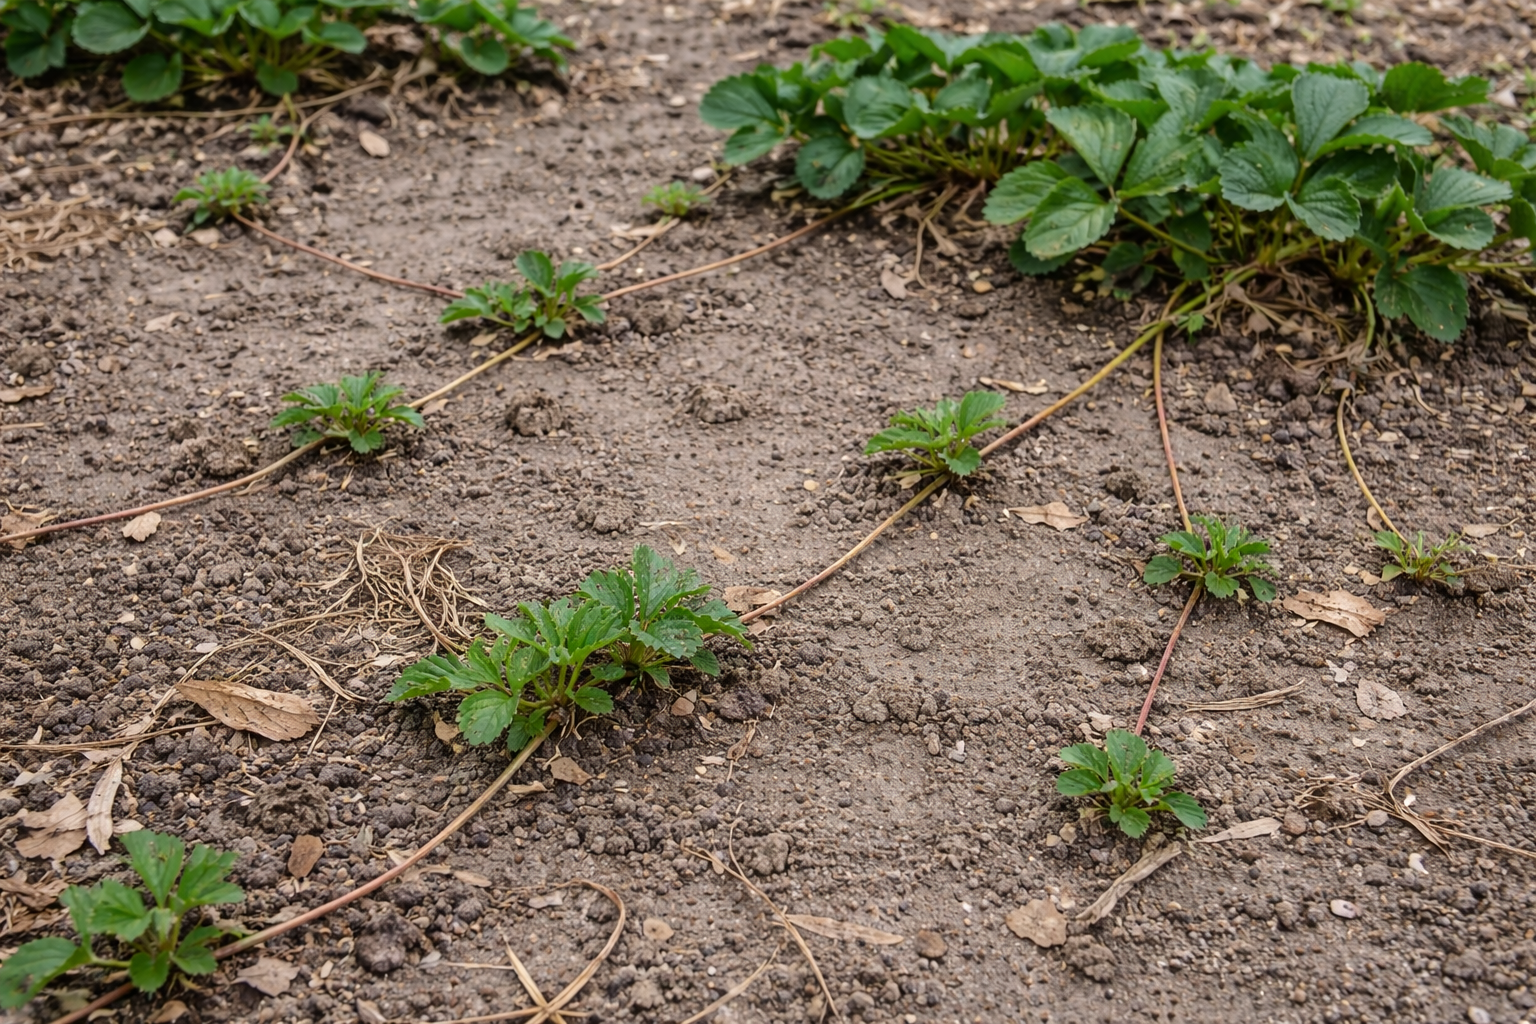
According to UC Davis strawberry researchers, runners (botanically called stolons) are horizontal stems that grow outward from the mother plant. At intervals along each runner, small plantlets develop. When these plantlets contact soil, they root and become independent plants genetically identical to the mother.
This vegetative reproduction is the strawberry's primary spreading strategy. While strawberries also produce seeds (those little specks on the outside of the fruit), seed-grown plants are variable and slow to mature. Runner propagation is fast, reliable, and produces plants identical to the parent.
For gardeners, runners are a free plant factory. One healthy mother plant can produce 10 to 30 runners per season, each capable of becoming a productive plant.
What Are the Economics of Runner Propagation?
Let's do the math. A bare-root strawberry plant costs $1 to $3 from mail-order sources, or $4 to $8 for a potted plant at a local nursery. If you want 25 plants for a productive patch, you're looking at $25 to $200.
With runner propagation:
Year 1: Buy 6 plants ($15 to $50). Allow each to produce 5 runners. End year with 36 plants.
Year 2: Take 5 runners from each of 10 plants. Add 50 new plants. Retire original 6 aging plants. Productive patch plus extras to share.
Year 3 and beyond: Perpetual replacement from your own stock. Cost: $0.
The only ongoing investment is your time, and runner rooting takes minutes per plant.
When Do Strawberry Runners Appear?
In Santa Cruz County, expect runner production:
June-bearing varieties: Heavy runner production after the main harvest (June through August), continuing into fall.
Day-neutral varieties: Lighter but more continuous runner production throughout the growing season, often starting in late spring.
Runner production is influenced by:
Day length: Longer days stimulate runner production
Plant age: First-year plants produce fewer runners; second-year plants produce the most
Nitrogen: Higher nitrogen encourages runner production (but may reduce fruiting)
Variety: June-bearing types typically produce more runners than day-neutral types
How Do You Select the Best Runners to Root?
Not all runners are equal. Choose runners from:
Healthy mother plants: UC IPM stresses the importance of propagating only from plants that are vigorous, disease-free, and produce well. Weak or diseased mothers produce weak or diseased offspring.
Early runners: The first runners of the season are typically strongest. Later runners may be smaller and establish more slowly.
First plantlets: Each runner can produce multiple plantlets (the mother, daughter, granddaughter pattern). The first plantlet (closest to mother) is usually strongest. Remove subsequent plantlets to concentrate energy.
What to Avoid
Runners from plants showing virus symptoms (stunted growth, distorted leaves, poor fruit)
Runners from plants with crown rot or root disease
Weak, spindly runners with small plantlets
Very late-season runners that won't establish before winter
| Method | Effort/Yield | How To Do It | Best For |
|---|---|---|---|
| Root in PlaceLet runners root directly in garden soil | Low EffortMed Yield |
|
Casual gardeners expanding an existing patch. Low maintenance. Works well when you have space adjacent to current plants. |
| Root in PotsRoot into small containers while attached | Med EffortMed Yield |
|
Gardeners who want to share plants or transplant elsewhere. Easy to give away or sell. Better root development control. |
| Propagation BedDedicated bed for maximum production | High EffortHigh Yield |
|
Serious gardeners wanting 50-100+ plants/year. Complete patch renewal. Sharing with community gardens or plant swaps. |
How Do You Root Runners in Place?
The simplest method. Allow runners to root directly into the soil of your strawberry bed or adjacent prepared ground.
Step-by-Step
Prepare the rooting area. Loosen soil where you want new plants. Add compost if soil is poor.
Guide the runner. Position the plantlet where you want a new plant. The spacing should be 12 to 18 inches from other plants.
Pin the plantlet down. Use a landscape staple, bent wire, or small stone to hold the plantlet in contact with soil. The plantlet needs direct soil contact to root.
Keep moist. Water the rooting area regularly. Roots typically form within 2 to 4 weeks.
Sever from mother. Once the plantlet is clearly rooted (give it a gentle tug; it should resist), cut the runner connecting it to the mother plant. The new plant is now independent.
Transplant if needed. Rooted plantlets can be dug and moved to a new location if desired.
Pros and Cons
Pros: Minimal effort; plantlets receive water and some nutrients from mother while rooting
Cons: Less control over placement; can result in crowded patches if not managed
How Do You Root Runners in Pots?
For more control and easier transplanting, root runners into small pots while still attached to the mother plant.
Step-by-Step
Prepare small pots. Fill 3- to 4-inch pots with quality potting mix. Moisten the mix.
Position pots. Set pots on the ground near the mother plant, where runners can reach.
Pin plantlets into pots. Guide each runner so its plantlet sits on the pot surface. Pin down with a staple or small wire.
Keep pots moist. Check daily in warm weather. Potting mix dries faster than garden soil.
Sever and grow on. Once rooted (2 to 4 weeks), cut the runner. Keep potted plants watered for another week or two before transplanting.
Transplant or share. Plant into your garden, give to friends, or (if you're ambitious) sell at a plant swap.
Pros and Cons
Pros: Easy transplanting; perfect for sharing; better control of root development
Cons: More work; requires daily watering of pots
How Do You Set Up a Dedicated Propagation Bed?
For serious multiplication, create a dedicated bed just for runner production.
Setting Up a Propagation Bed
Choose your best mother plants. Dig and transplant 3 to 6 of your healthiest, most productive plants into the propagation bed.
Space widely. Set mothers 2 to 3 feet apart to give runners room to spread.
Remove all flowers. Don't let propagation mothers produce fruit. This directs all energy into runner production.
Fertilize for growth. A propagation bed can handle more nitrogen since you want vegetative growth, not fruit.
Allow runners to root. Let runners fill the bed naturally, or pin down plantlets in organized rows.
Harvest new plants. In fall or the following spring, dig rooted plantlets and transplant to your production beds.
Yield Expectations
A well-managed propagation bed with 4 to 6 mother plants can produce 50 to 100 new plants per season, enough to replant your entire patch and share with neighbors.
When Should You Propagate Runners in Santa Cruz County?
Spring Propagation (March through May)
Best for: Getting a head start on the season; runners from overwintered plants
Runners rooted in spring establish quickly in warming soil and may produce some fruit by fall (day-neutral varieties) or the following spring (June-bearing).
Summer Propagation (June through August)
Best for: Peak runner production; largest selection of runners to choose from
This is prime propagation season. Runners are abundant and root quickly in warm soil. Allow 6 to 8 weeks for establishment before fall.
Fall Propagation (September through October)
Best for: Last chance for the season; expanding your patch before winter
Late-rooted runners may be smaller but will establish over winter and produce well the following year. In San Lorenzo Valley and other frost-prone areas, mulch fall-rooted plants well.
What to Avoid
Very late fall propagation (November and later): Plants may not establish before winter
Propagating during drought or heat waves: Stress reduces rooting success
How Do You Care for Newly Rooted Plants?
Once severed from the mother, runner plantlets are essentially bare-root plants. They need careful attention for the first few weeks.
Immediate Care
Water thoroughly after severing. The small root system can't access deep moisture yet.
Mulch around plants to conserve moisture and moderate soil temperature.
Provide some shade if transplanting during hot weather. A few days under shade cloth or row cover helps establishment.
First Month
Water regularly. Keep soil consistently moist but not waterlogged.
Don't fertilize immediately. Wait 2 to 3 weeks, then feed lightly.
Remove any flowers. Let plants focus on root development, not fruit production.
Remove any runners the new plants produce. They're not ready to support offspring yet.
Long-Term Success
Runner-propagated plants are identical to their mothers and will produce fruit of the same quality. With good care, expect:
Fall-rooted plants: Full production the following spring/summer
Spring-rooted plants: Partial production same year (day-neutral) or full production the following year (June-bearing)
How Do You Create a Perpetual Strawberry Patch?
The goal of runner propagation isn't just free plants; it's a self-sustaining strawberry system that renews itself indefinitely.
The Rotation System
| Year | Plant Status | What's Happening | Your Tasks |
|---|---|---|---|
1 |
Establishing | New plants (purchased or from runners) focus on root development. Light or no harvest. Runner production begins late season. |
|
2 |
Peak Production | Plants hit their stride. Maximum fruit production. Vigorous runner output. This is your best harvest year. |
|
3 |
Declining | Production drops noticeably. Smaller berries. More disease susceptibility. Plants are "tired." |
|
4 |
Remove + Replace | Original plants removed. Year 2 runners (now in their Year 2) are peak producers. Cycle continues. |
|
The Math: One-Time Investment, Lifetime Returns
Start: 6 plants ($15-30) → Year 2: 36 plants → Year 3: 50+ plants → Forever: Self-sustaining patch at $0 ongoing cost. Always propagate from your best second-year plants to maintain quality.
UC Master Gardeners recommend replacing strawberry plants every 2 to 3 years, as they decline in production after that period, a perpetual patch requires continuous renewal:
Year 1: Plant new (purchased or runner-propagated) strawberries. Remove flowers to establish strong plants. Allow some runners to root.
Year 2: Harvest fruit. Continue runner propagation. Rooted runners become next year's producers.
Year 3: Harvest from Year 1 plants (now declining) and Year 2 plants (peak production). Root runners from Year 2 plants.
Year 4: Remove exhausted Year 1 plants. Year 2 plants are now primary producers. Year 3 runners become new stock.
Repeat this cycle indefinitely, always propagating from your best second-year plants and retiring plants after their third year.
The Matted Row System
Traditional commercial strawberry production uses a "matted row" system:
Plant strawberries in rows 3 to 4 feet apart
Allow runners to fill in the space between rows
After harvest, narrow the rows by removing plants from the edges
Let runners refill the rows
Repeat annually
This system is productive but can lead to crowding and disease. For home gardens, the rotation system is usually better.
What Are the Most Common Runner Propagation Problems?
Problem: Mother Plant Produces Few or No Runners
Causes: Variety characteristics (some produce few runners); plant is too young (first year); excessive fruit production diverting energy; plant is stressed or diseased
Solutions: Choose high-runner varieties for propagation; wait until second year; remove flowers from propagation mothers; address plant health issues
Problem: Runners Won't Root
Causes: Soil too dry; plantlet not in contact with soil; hot weather drying out before roots form
Solutions: Water rooting area consistently; pin plantlets firmly to soil; propagate during cooler weather or provide shade
Problem: Rooted Runners Die After Severing
Causes: Severed too soon (roots not established); transplant shock; underwatering after separation
Solutions: Wait until plantlet resists gentle tugging before severing; water immediately and thoroughly; provide shade for transplants
Problem: New Plants Are Weak or Diseased
Causes: Propagated from unhealthy mother; inherited virus or disease; stressed during establishment
Solutions: Only propagate from vigorous, disease-free mothers; discard suspicious plants; replace with clean nursery stock if disease is widespread
Frequently Asked Questions
How many runners does one strawberry plant produce?
A healthy second-year plant can produce 10 to 30 runners per season, depending on variety. June-bearing types typically produce more runners than day-neutral varieties.
When is the best time to root strawberry runners?
Summer (June through August) is peak season with the most runners available. Spring and early fall also work well. Avoid very late fall when plants can't establish before winter.
How long does it take for a runner to root?
Typically 2 to 4 weeks when kept moist and in good soil contact. Warmer temperatures speed rooting; cool weather slows it.
Should I let runners root or remove them?
For production plants focused on fruit, remove runners to direct energy into berries. For propagation, allow selected runners to root. Many gardeners do both: remove most runners but allow a few from their best plants to root.
Can I root runners in water?
Strawberry runners don't root well in water like some plants. They need soil or potting mix for successful rooting.
How do I know when a runner is ready to sever from the mother plant?
Give the plantlet a gentle tug. If it resists and doesn't pull out of the soil, it's rooted and ready to sever. If it lifts easily, it needs more time.
Will runner plants produce fruit the same year?
Day-neutral varieties rooted in spring may produce some fruit by fall of the same year. June-bearing varieties typically don't produce a full crop until the following year regardless of when rooted.
Can I sell or share runner plants?
Yes! Runner-propagated plants are perfect for plant swaps, giving to gardening friends, or selling at farmers' markets (check local regulations). They're genetically identical to the mother and will perform the same.
Your Free Plant Factory
Once you start thinking of runners as a resource rather than a nuisance, strawberry growing becomes remarkably economical. That initial investment of a few plants can supply your garden indefinitely, provide extras to share with neighbors, and even stock a community garden or school project. The key is being intentional: propagate from your healthiest second-year plants, give new plantlets the care they need to establish, and maintain the rotation that keeps your patch productive year after year. With a little attention to runner management, you'll never need to buy strawberry plants again. Ready to get started? Our Bare-Root Strawberry Planting Guide covers establishing your first plants, and our Best Strawberry Varieties for Santa Cruz County helps you choose the best mother plants for propagation.
Free Gardening Resources
Seasonal Tasks Checklist (PDF)
Find all our free guides in Your Garden Toolkit.
Where Can You Find More Strawberry Growing Guides?
Part of our Complete Strawberry Series for Santa Cruz County:
Growing Strawberries in Santa Cruz County: A Local Guide to Sweet Success - Everything you need to know about growing strawberries in our coastal climate
Best Strawberry Varieties for Santa Cruz County - Which varieties thrive here and where to find them locally
Planting Bare-Root Strawberries: A Santa Cruz Guide - Step-by-step instructions for bare-root planting success
Growing Strawberries: In the Ground vs. Raised Beds vs. Containers - Compare your planting options and find the best fit for your space
Understanding Strawberry Growth Stages in Your Santa Cruz Garden - What to expect from dormancy through harvest
Top Strawberry Mistakes New Gardeners Make (And How to Avoid Them) - Common pitfalls and how to sidestep them
Strawberry Troubleshooting Guide - Identify and solve pests, diseases, and growing problems
Reviving Your Strawberry Patch After Harsh Weather - Recovery strategies for storm or heat-damaged plants