

Lasagna Gardening: Layering Your Way to a Fertile Garden
What Is Lasagna Gardening and How Does It Build Fertile Soil?
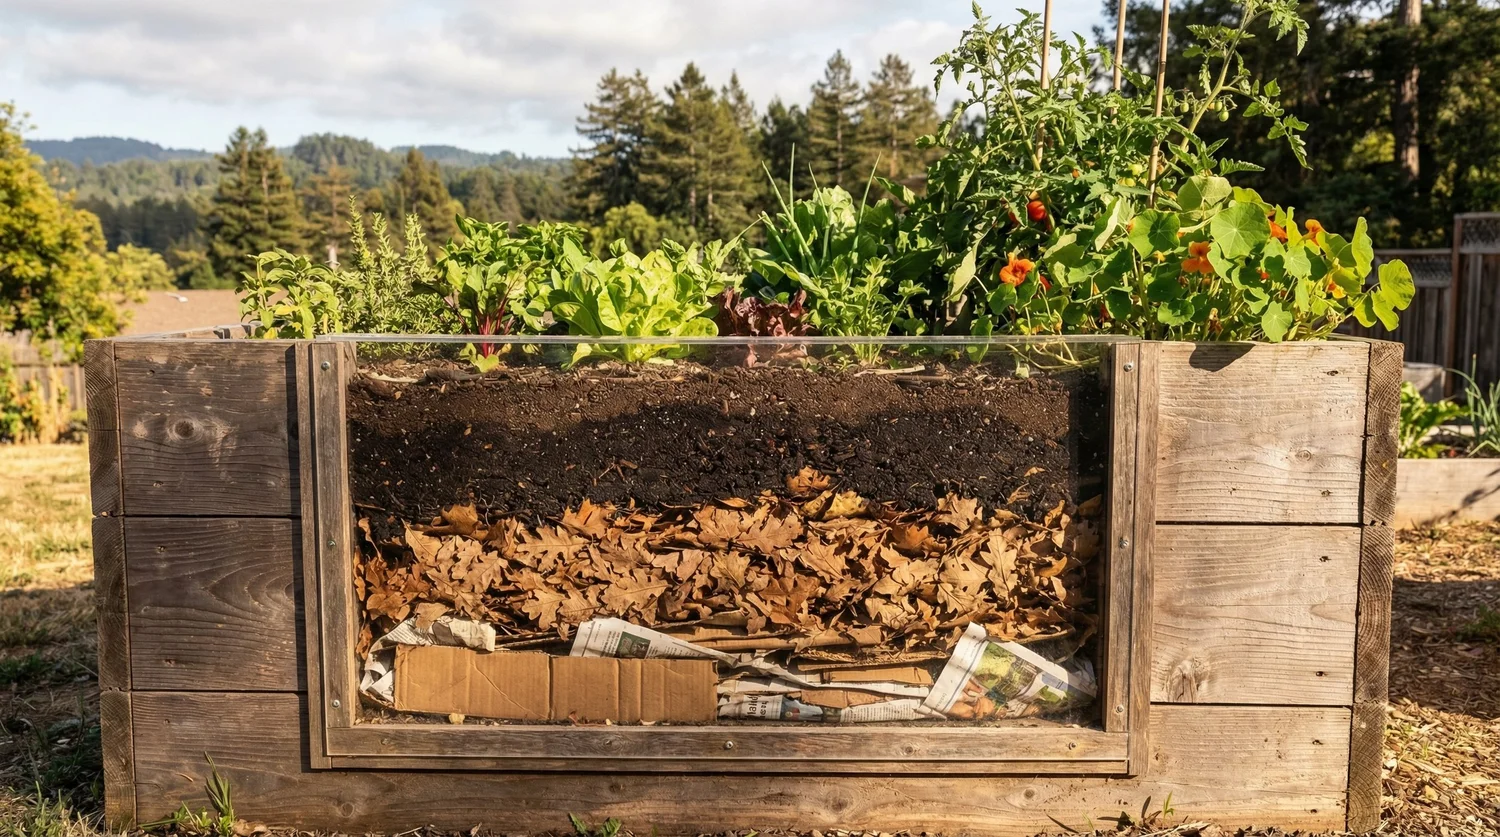
Lasagna gardening is a no-dig bed-building method that stacks alternating layers of carbon-rich and nitrogen-rich organic materials directly on existing ground, creating nutrient-dense planting soil as the layers decompose. According to UC Agriculture and Natural Resources, layered organic mulch systems can increase soil organic matter by 2 to 4 percent within a single season while suppressing weeds without herbicides or tillage. In Santa Cruz County, where many gardeners inherit compacted clay, rocky hillside soils, or weed-choked lawns, lasagna gardening offers a way to create productive growing beds without removing a single shovel of existing soil.
The name comes from the layered approach, not from growing Italian ingredients (though you certainly can). Just as a lasagna alternates noodles with filling, this method alternates "brown" carbon layers (dried leaves, cardboard, straw) with "green" nitrogen layers (grass clippings, kitchen scraps, fresh plant trimmings). Over weeks to months, these layers decompose into dark, crumbly, worm-rich soil that plants thrive in. The method is forgiving, adaptable to any bed shape, and uses materials that are free or inexpensive throughout Santa Cruz County.
Why Does the Layering Method Work So Well?
Lasagna gardening works because it mimics the natural process that builds forest soil. In nature, leaves, branches, and organic debris fall to the ground and decompose in place, creating rich topsoil over time. Lasagna gardening accelerates this process by organizing materials in optimal proportions for fast decomposition.
The key is the carbon-to-nitrogen ratio. Soil microbes and decomposer organisms need both carbon (for energy) and nitrogen (for protein synthesis) to break down organic matter efficiently. When you stack brown and green layers in roughly a 3-to-1 ratio (three parts brown to one part green by volume), you create conditions that favor rapid, aerobic decomposition.
Brown (carbon-rich) materials include dried leaves, straw, cardboard, newspaper, wood chips, dried grass, and pine needles. These materials provide structure and air pockets in the bed. They decompose slowly, providing long-term organic matter.
Green (nitrogen-rich) materials include fresh grass clippings, kitchen vegetable scraps, coffee grounds, fresh plant trimmings, and manure from herbivores (horse, cow, chicken, rabbit). These materials decompose quickly and provide the nitrogen that drives microbial activity.
When layered properly, the bed heats up slightly as microbes go to work (though not as hot as a traditional compost pile). Within a few weeks, you can see the layers beginning to merge as earthworms and other organisms move through the bed, mixing and processing the materials. Within three to six months in Santa Cruz County's mild climate, a well-built lasagna bed transforms into uniform, plantable soil.
What Materials Are Available Locally in Santa Cruz County?
One of lasagna gardening's biggest advantages is that the materials are abundant, local, and often free. Santa Cruz County offers excellent sourcing options for both brown and green layers.
Dried leaves are the gold standard for brown layers. Oaks, maples, and other deciduous trees shed massive quantities of leaves each fall. Many neighbors are happy to have someone haul away their raked leaves. Municipal leaf collection during November and December is another source. Avoid eucalyptus leaves, which contain oils that slow decomposition and can inhibit plant growth.
Cardboard is the most accessible brown material and doubles as a weed-suppressing base layer. Flatten boxes, remove tape and staples, and use them as the first layer directly on grass or weeds. Most Santa Cruz residents receive enough delivery boxes to supply a small garden bed. Larger quantities are available from appliance stores and grocery stores.
Straw (not hay, which contains weed seeds) is available from feed stores and garden centers in the Santa Cruz area. Straw bales are inexpensive and a single bale provides enough material for several garden beds. After Halloween and fall festivals, decorative straw bales are often available at steep discounts or free.
Wood chips from local arborists are often available free for the asking. Tree service companies in Santa Cruz County regularly need to dispose of chipped material and will sometimes deliver a load at no cost. Websites and apps that connect arborists with gardeners seeking free wood chips are active in our area. Use wood chips for the bottom layers only, as fresh chips can temporarily tie up nitrogen near the soil surface.
Grass clippings from your own lawn or a neighbor's provide nitrogen-rich green material. Apply them in thin layers (2 to 3 inches) to prevent matting, which creates anaerobic conditions and foul odors. If your neighbor does not use herbicides on their lawn, their clippings are a safe and plentiful nitrogen source.
Coffee grounds from local coffee shops are an excellent green layer ingredient. Many cafes and roasters in Santa Cruz and Capitola set aside used grounds for gardeners. Coffee grounds are roughly 2 percent nitrogen and also improve soil structure. Ask at your favorite coffee shop; many participate informally in this kind of sharing.
Seaweed collected from local beaches (where permitted) adds minerals and trace elements that are often missing from inland soil amendments. Rinse it lightly to remove excess salt, or let rain wash it if you are building your bed in fall or winter. Seaweed breaks down quickly and contributes potassium and micronutrients.
Horse manure is readily available from stables and equestrian facilities in the Santa Cruz Mountains and Watsonville area. Aged manure is preferable to fresh, as fresh manure can burn plant roots. Horse manure is an excellent nitrogen source and also contributes beneficial microbes to the decomposing bed.
When Is the Best Time to Build a Lasagna Bed in Santa Cruz?
Timing your lasagna bed build is important because the layers need time to decompose before you plant. In Santa Cruz County, two windows work best.
Fall (October through December) is the ideal time to build. Materials are abundant: leaves are falling, the last garden cleanout provides green material, and straw is available from fall decorations. A bed built in October or November has four to six months to decompose before spring planting. Winter rains soak the layers and accelerate decomposition without any effort on your part. By March or April, your bed will have settled and transformed into dark, plantable soil.
A fall-built bed in Santa Cruz benefits from our wet season in multiple ways. Rainfall eliminates the need to manually water the decomposing layers. Cool but rarely freezing temperatures keep microbial activity going through winter, unlike cold-climate regions where decomposition halts for months. Earthworms remain active in our soils year-round and will colonize a new lasagna bed within weeks.
Late winter (January through February) is the second-best window. You have less time before spring planting, but our mild February and March temperatures start decomposition quickly. A bed built in January can be planted with transplants (not seeds) by April if the layers are thin enough. Use finely chopped materials to speed decomposition and top the bed with 4 to 6 inches of finished compost to give transplants immediate access to good growing medium.
Planting immediately is possible if you cannot wait. Top your freshly built lasagna bed with 6 to 8 inches of quality garden soil or compost. Plant transplants directly into this top layer while the lower layers decompose beneath them. Roots will grow down into the decomposing material as it becomes available. This "plant now" approach works well for transplants but not for direct-seeded crops, which need uniform soil to germinate.
Avoid building in summer if you can. Our dry season means you will need to water the decomposing layers manually, and the dry conditions slow microbial activity significantly. If you must build in summer, soak each layer thoroughly as you add it and keep the bed moist with regular watering or a temporary tarp cover.
How Do You Build a Lasagna Garden Bed Step by Step?
Here is the complete process for building a lasagna bed suited to Santa Cruz County conditions.
Step 1: Choose and prepare the site. Select a spot with at least six hours of sunlight for vegetables. You do not need to remove grass, weeds, or existing vegetation. Simply mow or stomp down whatever is growing there. If you are building on a paved surface, balcony, or rooftop, lay down a border of boards, bricks, or stones to contain the layers.
Step 2: Lay the cardboard base. Cover the entire bed area with a layer of flattened cardboard, overlapping the edges by 4 to 6 inches to prevent weeds from finding gaps. Soak the cardboard thoroughly with water. This layer smothers existing grass and weeds while attracting earthworms that will work upward through the bed. Newspapers (8 to 10 sheets thick) work as a substitute.
Step 3: Add the first brown layer. Spread 4 to 6 inches of carbon-rich material over the cardboard. Dried leaves, straw, or wood chips all work well. This layer provides structure, air pockets for beneficial organisms, and a slow-release carbon source.
Step 4: Add the first green layer. Spread 2 to 3 inches of nitrogen-rich material. Fresh grass clippings, kitchen scraps, coffee grounds, or aged manure are good choices. Keep green layers thinner than brown layers to maintain the 3-to-1 ratio.
Step 5: Repeat the layers. Continue alternating brown and green layers until your bed is 18 to 24 inches tall. It will settle significantly as materials decompose, so build it higher than your target finished height. A bed built to 24 inches will settle to approximately 8 to 12 inches over several months.
Step 6: Top with compost and soil. Finish with 3 to 4 inches of finished compost or a compost-soil blend. This provides a finished surface for planting and introduces a healthy population of soil microbes to accelerate decomposition of the layers below.
Step 7: Water thoroughly. Soak the entire bed deeply. If building in fall, nature will handle subsequent watering through winter rains. If building at other times, keep the bed moist (not waterlogged) to support decomposition.
Step 8: Mulch and wait. Cover the surface with 2 to 3 inches of straw or leaf mulch to retain moisture and suppress weed seeds. If you built in fall, leave the bed alone until spring planting time. Check it periodically and add water during dry spells.
What Are the Pros and Cons of Lasagna Gardening?
Honest assessment helps you decide whether this method matches your goals and situation.
Pros:
- No digging required. You build on top of existing ground, avoiding the backbreaking work of breaking through clay, removing rocks, or fighting established weeds.
- Builds exceptional soil. Decomposed lasagna bed soil is typically richer in organic matter, better structured, and more biologically active than soil improved through conventional amendments.
- Suppresses weeds. The cardboard base layer and deep mulch layers smother existing weeds without herbicides. Weed pressure in established lasagna beds is remarkably low.
- Free or inexpensive. Most materials are available at no cost in Santa Cruz County. Leaves, cardboard, grass clippings, coffee grounds, and wood chips from arborists are all free.
- Improves any existing soil. Whether you are starting with clay, sand, rock, or compacted ground, the lasagna method builds quality growing soil above it while gradually improving what is below.
- Retains moisture well. The spongy organic material holds water much longer than mineral soil, reducing irrigation needs during our dry summers.
Cons:
- Takes time. A bed built from scratch needs three to six months to decompose into plantable soil. You cannot build and plant on the same day (without adding a thick compost topping).
- Settles dramatically. A 24-inch-tall freshly built bed may settle to 8 inches. This is normal but can be surprising if you are not expecting it. You will need to add more material over time.
- May attract pests initially. Fresh organic materials can attract slugs, earwigs, and rodents during the decomposition phase. In Santa Cruz's slug-friendly climate, monitor new beds closely.
- Nitrogen tie-up possible. If the carbon-to-nitrogen ratio is too high (too much brown, not enough green), microbes may temporarily lock up soil nitrogen as they decompose the carbon, leaving less available for plants. Adding extra nitrogen-rich material or fertilizer addresses this.
- Material sourcing takes effort. Collecting enough leaves, straw, and green materials for a large bed requires planning and sometimes multiple trips. Start collecting materials in advance.
- Not ideal for root crops initially. The first season's decomposing layers are too chunky and uneven for carrots, parsnips, and other root vegetables. Wait until the second season for these crops.
How Does Lasagna Gardening Compare to Other No-Dig Methods?
Several no-dig approaches share similarities with lasagna gardening. Sheet mulching is a simplified version using fewer, thicker layers (cardboard, compost, wood chips). It is faster to build but produces less immediately plantable soil. Back to Eden gardening uses wood chips as the primary mulch and soil builder. It relies on a single material rather than diverse layers, takes longer to mature, but requires very low maintenance once established. Hugelkultur buries logs and branches at the base of raised beds, creating a long-term moisture reservoir suited to the Santa Cruz Mountains where fallen timber is abundant.
Many experienced gardeners in Santa Cruz County combine elements of these methods. A common approach is to use lasagna layering inside raised bed frames, with logs at the bottom, classic lasagna layers in the middle, and a wood chip mulch on top. This hybrid method produces remarkable soil within a single season.
How Do You Maintain a Lasagna Bed Over Multiple Seasons?
A lasagna bed improves with age, but it does need some seasonal attention to stay productive.
Add new layers each fall. After clearing spent summer crops, add fresh brown and green layers on top of the existing bed. This replenishes the organic matter that has decomposed during the growing season and maintains bed height. Two to three inches of compost topped with straw or leaves is usually sufficient for an annual refresh.
Never till or turn the bed. The whole point of lasagna gardening is to let soil organisms do the mixing. Tilling destroys the fungal networks, earthworm channels, and soil structure that make the bed so productive. When planting, simply push aside the mulch, make a hole in the soil for your transplant or seeds, and replace the mulch around the plant.
Keep the surface mulched. A permanent mulch layer of straw, leaves, or wood chips protects the soil surface from drying, compacting, and eroding. In Santa Cruz County, a 2- to 3-inch mulch layer is appropriate. Pull mulch a few inches away from plant stems to prevent moisture-related rot.
Monitor for settling. Each year, the bed will be slightly lower as organic matter continues to decompose. Add new layers to maintain a comfortable working height. After three to four years, a well-maintained lasagna bed reaches a stable height as new additions roughly equal the rate of decomposition.
Rotate crops within the bed just as you would in any garden. Avoid planting the same crop family in the same spot year after year to prevent soilborne disease buildup and nutrient depletion. In a lasagna bed, this is especially easy because the rich soil supports a wide range of crops.
Test soil occasionally. After the first year, a simple soil test from your local UC Cooperative Extension office can tell you whether your lasagna bed's pH and nutrient levels are in the right range. Most lasagna beds test very well, but an occasional check ensures you are not developing any imbalances from your particular mix of materials.
Frequently Asked Questions
Can you plant immediately in a lasagna garden bed?
You can plant transplants immediately if you top the bed with 6 to 8 inches of finished compost or quality garden soil. Place transplants in this top layer while the lower layers decompose beneath them. Direct-seeded crops need more uniform soil to germinate, so wait until the layers have broken down (three to six months) before sowing seeds. Fall-built beds are ready for spring seed sowing.
Will lasagna gardening kill existing grass and weeds?
Yes. The cardboard or newspaper base layer blocks light and smothers existing vegetation. Most grasses and annual weeds die within four to six weeks under cardboard. Aggressive perennial weeds like bermuda grass may require a double layer of cardboard with overlapping seams. In Santa Cruz County, the wet winter conditions accelerate cardboard breakdown and weed death simultaneously.
How tall should a lasagna garden bed be?
Build your initial layers 18 to 24 inches tall. The bed will settle to roughly half that height as materials decompose. If you want a finished bed height of 12 inches, build to 24 inches initially. Taller beds are more accessible for gardeners with back or knee problems. There is no maximum height, but beds taller than 3 feet may dry out quickly and need more frequent watering.
Can you use pine needles in a lasagna bed?
Yes. Pine needles are an excellent brown layer material. Despite the common belief that they make soil too acidic, UC research shows that pine needle mulch has minimal effect on soil pH when used in garden beds. Their needle shape creates excellent air pockets for drainage and they decompose relatively slowly, providing long-term structure. Monterey pine needles are abundant and free in many Santa Cruz County neighborhoods.
Does lasagna gardening attract slugs in Santa Cruz?
The moist, organic-rich environment of a new lasagna bed can attract slugs and snails, which are already abundant in Santa Cruz County's coastal climate. Monitor new beds closely and use organic slug management: iron phosphate bait, copper tape around bed borders, hand picking in the evening, and encouraging predators like birds and ground beetles. As the bed matures and dries slightly on the surface, slug pressure typically decreases.
What should you NOT put in a lasagna bed?
Avoid diseased plant material, invasive weed roots (bermuda grass, oxalis bulbs), meat, dairy, pet waste, and glossy or coated paper products. Do not use walnut leaves or wood, which contain juglone that inhibits plant growth. Avoid using lawn clippings from lawns treated with herbicides, as some herbicides persist through composting and can damage vegetable plants.
How long does it take for a lasagna bed to be ready?
In Santa Cruz County's mild climate, a bed built in fall is typically ready for planting by spring (three to five months). A bed built in late winter may be ready in two to three months for transplants. Finely chopped materials decompose faster than whole leaves or large pieces. Keeping the bed moist and covering it with a tarp or plastic sheeting can accelerate decomposition by trapping heat and moisture.
Can you build a lasagna garden in a raised bed frame?
Absolutely. Building lasagna layers inside a raised bed frame is one of the most effective combinations. The frame contains the materials neatly, provides a finished appearance, and adds height for accessibility. Fill the frame with alternating brown and green layers exactly as you would a ground-level lasagna bed. This approach is especially popular in Santa Cruz yards where aesthetics matter alongside productivity.
Start Layering This Fall
Lasagna gardening turns yard waste, kitchen scraps, and free materials into the richest garden soil you have ever worked with. In Santa Cruz County, our mild winters and rainy season create ideal conditions for decomposition, making fall the perfect time to build a bed that will be ready for spring planting. Start collecting leaves, cardboard, and straw now, and you will have a productive new garden bed without ever picking up a shovel.
For research-based guidance on sheet composting and layered bed building, see UC Master Gardeners' Sheet Composting by Layering, Lasagna Composting, and UC IPM's composting resource page.
Visit Your Garden Toolkit for seasonal planting calendars, bed-building guides, and soil preparation resources tailored to Santa Cruz County gardeners.