

Growing Sprouts at Home Safely: Alfalfa, Mung Bean, and More
Home-grown sprouts are nutritious, crunchy, and ready to eat in 3 to 5 days, but they require careful attention to food safety because the warm, moist conditions that seeds need to sprout are also ideal for bacterial growth. The FDA has linked multiple foodborne illness outbreaks to raw sprouts, including E. coli and Salmonella contamination, and advises that children, the elderly, pregnant women, and immunocompromised individuals avoid eating raw sprouts entirely. With proper sanitation, quality seeds, and consistent rinsing, home sprouting can be done safely. This guide covers the process, the science behind the safety concerns, and practical steps to minimize risk.
What Are Sprouts and How Are They Different from Microgreens?
Sprouts and microgreens are often confused, but they are fundamentally different products with different growing methods and different risk profiles.
Sprouts are seeds that have been germinated in water, typically in an enclosed container like a mason jar or sprouting tray. The entire plant is eaten: root, stem, seed hull, and the very beginning of leaf development. Sprouts are never grown in soil. They are rinsed multiple times per day and are ready to eat within 2 to 6 days depending on the variety. Common examples include alfalfa sprouts, mung bean sprouts, and broccoli sprouts.
Microgreens are grown in soil or a soilless growing medium, exposed to light, and harvested by cutting the stem above the soil line. Only the stem and leaves are eaten. They take 7 to 14 days and are grown in open air with ventilation.
The critical difference from a food safety perspective is the growing environment. Sprouts germinate in enclosed, warm, humid conditions with no soil and no light. These conditions, while perfect for rapid germination, are also perfect for bacterial multiplication. The FDA and UC Davis Food Safety program both highlight this as a key risk factor.
This does not mean you should avoid growing sprouts at home. It means you should understand the risks and follow best practices to minimize them. Home sprouters actually have some advantages over commercial operations: smaller batches are easier to keep clean, and you have direct control over every step of the process.
Why Are Sprouts a Food Safety Concern?
The food safety issues with sprouts are well-documented and worth understanding in detail.
According to the FDA, sprouts have been associated with more than 50 foodborne illness outbreaks in the United States since 1996. The primary pathogens involved are Salmonella and E. coli O157:H7, though Listeria monocytogenes has also been found in sprout-related outbreaks.
The problem starts with the seeds themselves. Bacteria can be present on the seed surface from the field where they were grown, from contact with animal waste, contaminated water, or improper handling during harvest and storage. When those seeds are placed in the warm (70 to 80 degrees Fahrenheit), moist, nutrient-rich sprouting environment, any bacteria present can multiply rapidly. A single contaminated seed in a batch can inoculate the entire jar.
The UC ANR publication on growing seed sprouts at home notes that the sprouting process essentially creates an incubation environment. Within the 3 to 5 days of sprouting, bacterial populations can grow from undetectable levels to numbers capable of causing illness.
This is why seed quality and sanitation are so critical. You cannot see, smell, or taste bacterial contamination on sprouts. Contaminated sprouts often look and taste perfectly normal.
It is worth noting that cooking sprouts to at least 165 degrees Fahrenheit eliminates the bacterial risk. Mung bean sprouts used in stir-fries, for example, are significantly safer when cooked thoroughly.
How Do You Choose Safe Seeds for Sprouting?
Seed selection is your first and most important line of defense.
Buy seeds labeled specifically for sprouting. These seeds are handled and stored with food safety in mind. They should be untreated (no fungicide or pesticide coatings) and sourced from reputable suppliers. Do not sprout seeds from garden seed packets unless they are specifically labeled as untreated and suitable for sprouting.
Look for seeds tested for pathogens. Some sprouting seed suppliers test their seeds for Salmonella and E. coli before sale. While no testing method is 100% effective, tested seeds add a layer of safety. The California Department of Food and Agriculture has guidelines for commercial sprout seed testing.
Store seeds properly. Keep sprouting seeds in a cool, dry, dark location in airtight containers. Moisture and warmth during storage can promote bacterial growth before you even begin the sprouting process.
Consider seed sanitation. Some home sprouters sanitize their seeds before sprouting. The most common method recommended by food safety researchers is soaking seeds in a solution of calcium hypochlorite (not regular household bleach, which contains additives) at a concentration of about 20,000 ppm for 15 minutes, followed by thorough rinsing. This treatment can significantly reduce bacterial loads but does not guarantee elimination of all pathogens. UC ANR food safety guidelines and the FDA both note that no seed treatment has been proven to eliminate 100% of potential contamination.
For home sprouters in Santa Cruz, several California-based sprouting seed companies offer tested, food-grade seeds. Buying from reputable sources with clear quality standards is a practical and important step.
What Are the Best Sprouting Varieties for Home Growers?
Here are the most popular and accessible sprouting varieties, each with different flavors, textures, and growing characteristics.
Alfalfa
Days to sprout: 4 to 6 Flavor: Mild, grassy, slightly nutty Growing notes: Alfalfa is the classic American sprout, familiar from salad bars and sandwich shops. The seeds are tiny and produce delicate, thread-like sprouts. Alfalfa sprouts are among the varieties most commonly associated with foodborne illness outbreaks, so meticulous sanitation is especially important. Rinse at least twice daily and ensure thorough draining.
Mung Bean
Days to sprout: 3 to 5 Flavor: Mild, crisp, slightly sweet Growing notes: Mung bean sprouts are the thick, crunchy white sprouts familiar from Asian cooking. They are sturdier and faster-growing than alfalfa. For thicker, crunchier sprouts, keep them in the dark and apply gentle pressure (a weighted plate on top) during growing. Mung bean sprouts are excellent cooked in stir-fries, pad thai, and spring rolls, and cooking significantly reduces any food safety risk.
Lentil
Days to sprout: 3 to 4 Flavor: Earthy, mild, slightly peppery Growing notes: Lentils sprout quickly and are among the easiest seeds for beginners. Use whole, unprocessed green or brown lentils (not split lentils, which will not sprout). Lentil sprouts are hearty and work well in salads, grain bowls, and as a base for hummus variations. They are one of the most forgiving sprouting varieties.
Broccoli
Days to sprout: 3 to 5 Flavor: Mild, slightly peppery Growing notes: Broccoli sprouts gained significant attention after research at Johns Hopkins University highlighted their sulforaphane content. They are thin and delicate, similar to alfalfa sprouts, and require careful rinsing and draining to prevent excess moisture. Many health-focused sprouters grow broccoli sprouts specifically for their nutritional profile.
Clover
Days to sprout: 4 to 6 Flavor: Mild, slightly sweet Growing notes: Clover sprouts are very similar to alfalfa in appearance, flavor, and growing method. They produce small, delicate sprouts and are often grown as part of a mix with alfalfa and radish. Follow the same sanitation practices as alfalfa.
Radish
Days to sprout: 3 to 5 Flavor: Spicy, peppery, sharp Growing notes: Radish sprouts add a peppery kick to any dish. They sprout quickly and vigorously. The flavor is stronger than radish microgreens, with more concentrated heat. They work well mixed with milder sprouts like alfalfa or clover.
Sunflower (for sprouts)
Days to sprout: 2 to 3 (short sprout stage) Flavor: Mild, nutty Growing notes: Hulled sunflower seeds can be sprouted briefly (just until a small tail appears) for a crunchy, nutty addition to salads and trail mixes. They spoil faster than other sprouts, so eat them quickly after sprouting.
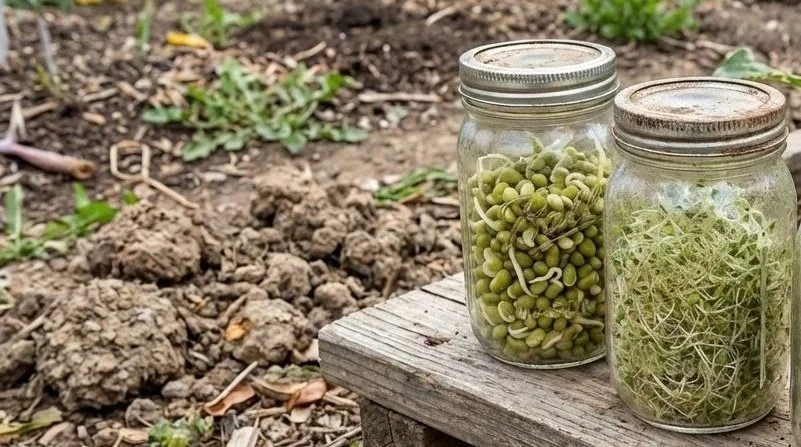
How Do You Grow Sprouts Using the Mason Jar Method?
The mason jar method is the simplest and most popular approach for home sprouting. Here is the step-by-step process.
Equipment needed: - Wide-mouth quart-size mason jar - Sprouting lid (mesh screen lid designed for sprouting) or cheesecloth secured with a rubber band - A bowl or dish rack to prop the jar at an angle for draining
Step-by-Step Process
1. Measure and rinse seeds. Start with 1 to 2 tablespoons of small seeds (alfalfa, broccoli, clover) or 1/4 to 1/3 cup of larger seeds (mung bean, lentil). Place seeds in your mason jar and rinse with cool water, swirling and draining through the mesh lid.
2. Soak seeds. Fill the jar with several inches of cool, clean water and let seeds soak for 8 to 12 hours (overnight). This initial soak activates the germination process. Use filtered or purified water if your tap water quality is a concern.
3. Drain thoroughly. After soaking, drain all water through the mesh lid. Shake the jar gently to remove as much water as possible. Incomplete draining is one of the most common causes of spoilage and mold.
4. Prop the jar at an angle. Place the jar upside down at a 45-degree angle in a bowl or on a dish rack, with the mesh lid facing down. This allows remaining water to drain out and air to circulate into the jar. Keep the jar out of direct sunlight but at room temperature (65 to 75 degrees Fahrenheit).
5. Rinse and drain twice daily. Every 8 to 12 hours, fill the jar with cool water through the mesh lid, swirl gently, and drain thoroughly. This rinse cycle serves two purposes: it provides moisture for the growing sprouts and flushes away metabolic byproducts that can encourage bacterial growth. Consistency matters. Do not skip rinses.
6. Watch for growth. Within 1 to 2 days, you should see tiny white tails emerging from the seeds. Over the next 2 to 4 days, sprouts will grow, lengthen, and (for varieties like alfalfa and clover) develop small green cotyledons if exposed to indirect light.
7. Green up (optional). For alfalfa, clover, and broccoli sprouts, on the last day before harvest you can place the jar in indirect light for several hours. This allows the tiny leaves to develop chlorophyll and turn green, which improves both appearance and nutritional content.
8. Final rinse and dry. Give sprouts a thorough final rinse. Drain as completely as possible and spread sprouts on a clean towel or paper towel to air-dry for 15 to 30 minutes. Excess moisture shortens shelf life.
9. Store and eat. Transfer dry sprouts to a clean container lined with a paper towel and refrigerate. Use within 3 to 5 days. If sprouts develop an off smell or slimy texture, discard them.
How Do You Grow Sprouts Using a Sprouting Tray?
Sprouting trays are stackable trays with drainage holes designed specifically for sprouting. They work well for growing larger quantities or multiple varieties simultaneously.
Advantages of sprouting trays: - Multiple levels let you grow several varieties at once - Better drainage than mason jars - More even air circulation - Easier to manage larger quantities (especially mung bean and lentil)
How to use them:
The process is nearly identical to the mason jar method. Soak seeds, spread them evenly in a single layer on the tray, and rinse by pouring water over the tray twice daily. The stacking design channels drainage from upper trays to lower ones. Rotate tray positions daily for even results.
For mung bean sprouts specifically, trays work better than jars because you can apply weight on top (a plate with a can on it) to encourage the thick, crunchy texture associated with restaurant-quality bean sprouts.
What Sanitation Practices Are Essential for Safe Sprouting?
Here are the non-negotiable sanitation steps for home sprouting:
Clean all equipment before each use. Wash mason jars, lids, trays, and any other equipment with hot, soapy water before starting a new batch. You can also sanitize jars by running them through a dishwasher on the hot cycle or rinsing with a dilute food-safe sanitizer.
Wash your hands. Every time you handle your sprouts or equipment, wash your hands thoroughly with soap and warm water for at least 20 seconds. This is simple but easy to forget.
Use clean water. If you have concerns about your tap water quality, use filtered or bottled water for rinsing. Water is the only input in sprouting, so its quality matters.
Keep the sprouting area clean. Do not sprout near pet areas, garbage, or raw meat preparation zones. The kitchen counter is fine as long as you maintain general kitchen cleanliness.
Do not let sprouts sit in standing water. Thorough draining after every rinse is critical. Standing water creates anaerobic conditions that promote bacterial growth and off-flavors.
Refrigerate promptly after harvest. Once sprouts reach your desired length, refrigerate them immediately. Cold temperatures slow bacterial growth significantly.
Trust your senses (but understand their limits). If sprouts smell sour, musty, or off, or if they are slimy, discard them. However, remember that contaminated sprouts can look and smell completely normal, which is why prevention through sanitation is more reliable than detection.
The UC Division of Agriculture and Natural Resources emphasizes that while home sprouters cannot achieve the level of pathogen testing available to commercial operations, the smaller batch sizes and direct control over the process provide meaningful safety advantages when proper techniques are followed consistently.
How Do Sprouts Compare to Microgreens Nutritionally?
Both sprouts and microgreens are nutritious, but they offer slightly different profiles.
Sprouts, because they are eaten whole (including the seed), tend to be higher in protein and fiber than microgreens. Mung bean sprouts and lentil sprouts, for example, provide meaningful plant protein.
Microgreens, because they are grown longer and in light, develop more chlorophyll and tend to have higher concentrations of vitamins and carotenoids. The University of Maryland/USDA research on microgreen nutrient density focused on the cotyledon leaves, which develop more fully in microgreens than in sprouts.
Broccoli sprouts are a special case. Research from Johns Hopkins University measured high levels of sulforaphane (and its precursor glucoraphanin) in broccoli sprouts, sometimes at higher concentrations than found in broccoli microgreens or mature broccoli. This is one reason broccoli sprouts remain popular despite the food safety considerations.
For home growers in Santa Cruz, growing both sprouts and microgreens gives you the broadest range of nutrients, textures, and culinary options.
Can You Cook with Sprouts to Reduce Food Safety Risk?
Yes, and cooking is the most reliable way to eliminate foodborne pathogens on sprouts. The FDA recommends cooking sprouts to at least 165 degrees Fahrenheit to kill harmful bacteria.
Mung bean sprouts are the most commonly cooked variety. They are a staple in stir-fries, soups, fried rice, and pad thai across Asian cuisines. Brief high-heat cooking preserves their crunch while making them safe.
Lentil sprouts can be added to soups, stews, and cooked grain dishes.
Even alfalfa and broccoli sprouts, typically eaten raw, can be stirred into hot dishes at the end of cooking. They will wilt but still add nutrition and flavor.
If you are growing sprouts for someone in a higher-risk group (young children, elderly family members, pregnant women, or anyone with a compromised immune system), the FDA advises serving sprouts only after thorough cooking.
Frequently Asked Questions
How do you know if your sprouts have gone bad?
Healthy sprouts should smell fresh and clean, with a slightly earthy or grassy scent. If your sprouts develop a sour, musty, or ammonia-like smell, or if they feel slimy rather than crisp, discard them immediately. Brown or dark discoloration (beyond the natural color of the seed hull) is another warning sign. When in doubt, throw them out. A new batch takes only a few days to grow, so it is never worth taking a chance.
Can you sprout seeds from the grocery store?
Some grocery store seeds work for sprouting, but with caveats. Dried lentils and mung beans from the bulk section often sprout well, as long as they have not been irradiated or excessively processed. Avoid split lentils or any beans that have been peeled. For smaller seeds like alfalfa and broccoli, purchase from a dedicated sprouting seed supplier, as these seeds are handled and tested with food safety in mind. Never sprout seeds that have been treated with fungicides or other chemicals.
Is it safe to eat sprouts during pregnancy?
The FDA advises pregnant women to avoid eating raw sprouts due to the risk of Listeria, Salmonella, and E. coli contamination. These pathogens can be particularly dangerous during pregnancy. If you enjoy sprouts while pregnant, cook them thoroughly to at least 165 degrees Fahrenheit before eating. Microgreens, grown in soil with better air circulation, are generally considered lower-risk, but consult your healthcare provider if you have specific concerns.
How often should you rinse sprouts during the growing process?
Rinse sprouts at least twice daily, approximately every 8 to 12 hours. Three times daily is even better, especially in warmer conditions. Each rinse serves a dual purpose: providing moisture and flushing away metabolic byproducts and potential bacterial buildup. Thorough draining after each rinse is just as important as the rinse itself. In Santa Cruz's mild climate, twice-daily rinsing is generally sufficient if your kitchen stays between 65 and 75 degrees Fahrenheit.
What is the white fuzzy growth on my sprouts?
Tiny white fuzz at the root zone of your sprouts is most likely root hairs, which are a normal part of healthy growth. Root hairs are fine, uniform filaments that appear along the root and will disappear or flatten when you rinse the sprouts. Actual mold, by contrast, tends to appear as irregularly shaped, cobweb-like growth, often with a musty smell, and does not disappear with rinsing. If you are unsure, mold typically appears on dead or stagnant seeds rather than on actively growing sprouts.
Can you sprout old seeds that did not germinate well in the garden?
You can try, but germination rates decline as seeds age. If seeds are more than a year or two old, you may see poor and uneven sprouting. For food safety, using fresh seeds from a reputable supplier is always preferable. Old seeds stored in less-than-ideal conditions (warm, humid, or exposed to light) may also have higher microbial loads. For the best results and safest sprouting, start with fresh, tested sprouting seeds each season.
Do home-grown sprouts need to be refrigerated?
Yes. Once your sprouts are fully grown and you have completed the final rinse and drain, refrigerate them promptly. Cold temperatures (below 40 degrees Fahrenheit) significantly slow bacterial growth. Store sprouts in a clean, loosely covered container lined with a dry paper towel to absorb excess moisture. Properly refrigerated sprouts should be consumed within 3 to 5 days. Do not leave harvested sprouts at room temperature for extended periods.
Growing sprouts at home is simple, fast, and rewarding when you follow proper food safety practices. For more indoor growing ideas tailored to Santa Cruz and coastal California, from windowsill herbs to year-round indoor growing, download our free California Growing Guide at ambitiousharvest.com/your-garden-toolkit.