

Pruning and Training Fruit Trees in Santa Cruz County: Shape Your Trees for Better Harvests

A few of the product links in this guide are affiliate links. If you buy through one, Ambitious Harvest may earn a small commission at no extra cost to you, which helps keep these guides free. We only point to gear we would use in our own Santa Cruz garden. As an Amazon Associate, we earn from Read our full disclosure.
A well-pruned fruit tree is easier to manage, produces higher-quality fruit, and fits better in a home garden. Yet pruning intimidates many gardeners, who fear they'll harm their trees or cut off next year's fruit. The good news: fruit trees are forgiving, and even imperfect pruning is better than no pruning at all. You learn to prune by pruning.
This guide covers everything you need to know about pruning and training fruit trees in Santa Cruz County, from basic concepts and timing to specific training systems including espalier. Whether you're shaping a newly planted bare-root tree or renovating a neglected backyard giant, understanding how and why we prune will help you grow more fruit in less space with less effort.
Why Do Pruning and Training Matter?
Fruit trees left unpruned become tall, dense, and difficult to manage. Fruit production shifts to the outer edges and top of the canopy, beyond easy reach. The interior becomes a tangle of crossing branches with poor air circulation and little productive wood. Spraying, thinning, and harvesting all require ladders. Quality suffers as shaded fruit develops poorly.
Oregon State University Extension summarizes why we train and prune:
Training develops structure:
Creates a strong framework of scaffold branches that can support heavy crops without breakage
Shapes young trees to bring them into production earlier
Establishes the tree's basic form for its productive life
Pruning maintains productivity:
Reduces overall tree size for easier management
Improves light penetration for better fruit color and quality
Stimulates new fruiting wood
Removes dead, diseased, and crossing branches
Balances vegetative growth with fruit production
In home gardens, keeping trees small through proper pruning has particular advantages. Dave Wilson Nursery's Backyard Orchard Culture emphasizes that small trees are much easier to spray, thin, prune, net, and harvest than large trees. If trees are kept small, you can plant more varieties in the same space, extending your harvest season.
A note on rootstock and vigor: Many gardeners assume that buying a tree on dwarfing rootstock will automatically keep it small. While rootstock affects vigor, tree size in a home orchard is mainly determined by pruning and training. Even semi-dwarf trees can grow quite large without regular pruning. As UC ANR's "The Backyard Orchard" notes, size control is ultimately the grower's responsibility.
How Do Fruit Trees Bear Fruit?
Before you prune, you need to understand where fruit develops on different tree types. Cutting the wrong wood removes next year's crop.
| Tree Type | Where Fruit Is Borne | Pruning Approach in Home Gardens | Supporting Resources |
|---|---|---|---|
| Apples, pears | On short-lived but persistent spurs | Preserve spurs; use moderate thinning and light heading to renew spur systems and keep the canopy open. | Illinois Extension: Training and Pruning Fruit Trees |
| Peaches, nectarines | On one-year-old shoots (last season’s growth) | Remove roughly 40 to 50% of last year’s growth annually; maintain an open-center form with abundant new shoots. | University of Georgia Extension: Home Garden Peaches |
| Japanese plums | On one-year-old shoots and short spurs | Moderate pruning: renew some shoots each year while retaining productive spur wood. | OSU Extension: Training and Pruning Your Home Orchard |
| European plums, apricots | Mostly on spurs | Similar to apples and pears: preserve spur systems and thin the canopy to improve light penetration. | Illinois Extension: Fruit Tree Training Guide |
| Sweet cherries | On spurs and some one-year-old wood | Light pruning only; thin for light and remove crossing or problem branches. | Virginia Tech Extension: Apple and Cherry Pruning Systems |
| Sour cherries | Mainly on one-year-old wood | Moderate renewal pruning to encourage fresh, productive shoots. | Home-orchard cherry guidance consistent with OSU PNW 400 |
| Figs | On current season’s growth and previous year’s wood | Light structural pruning and size control; avoid removing too much older fruiting wood. | UC ANR: The Backyard Orchard |
| Citrus | On current season’s growth | Minimal pruning: remove dead, diseased, or crossing branches and lightly shape as needed. | Californiatrees.org: When to Prune Citrus Trees in Northern California |
Understanding this determines your approach: peaches need aggressive annual pruning to produce new fruiting wood, while apples need gentler handling to preserve productive spurs that bear for years.
What Are the Basic Pruning Concepts?
Two Types of Cuts
All pruning involves just two types of cuts, each with different effects on the tree:
Thinning cuts remove an entire branch at its point of origin (back to the trunk or parent branch). OSU's PNW 400 explains that thinning opens the canopy and improves light penetration without stimulating vigorous regrowth. Use thinning cuts to remove crossing branches, open the center of the tree, and eliminate unwanted growth.
Heading cuts remove only part of a branch, cutting at some point along its length. Heading stimulates branching below the cut, creating denser growth. Use heading cuts to encourage branching on young trees, shorten overly long limbs, and control height.
Oregon State notes that thinning results in long, flexible limbs that may bend under fruit weight, while heading stiffens branches by causing lateral branching. Young trees often need heading to stimulate branching; mature trees need more thinning to maintain openness.
Where to Cut
For thinning cuts: Cut just outside the branch collar (the raised tissue at the base of every branch). The branch collar contains specialized cells that seal wounds and prevent decay. Don't leave stubs, but don't cut flush with the trunk either.
For heading cuts: Cut just above an outward-facing bud or side branch. This directs new growth outward rather than into the tree's center.
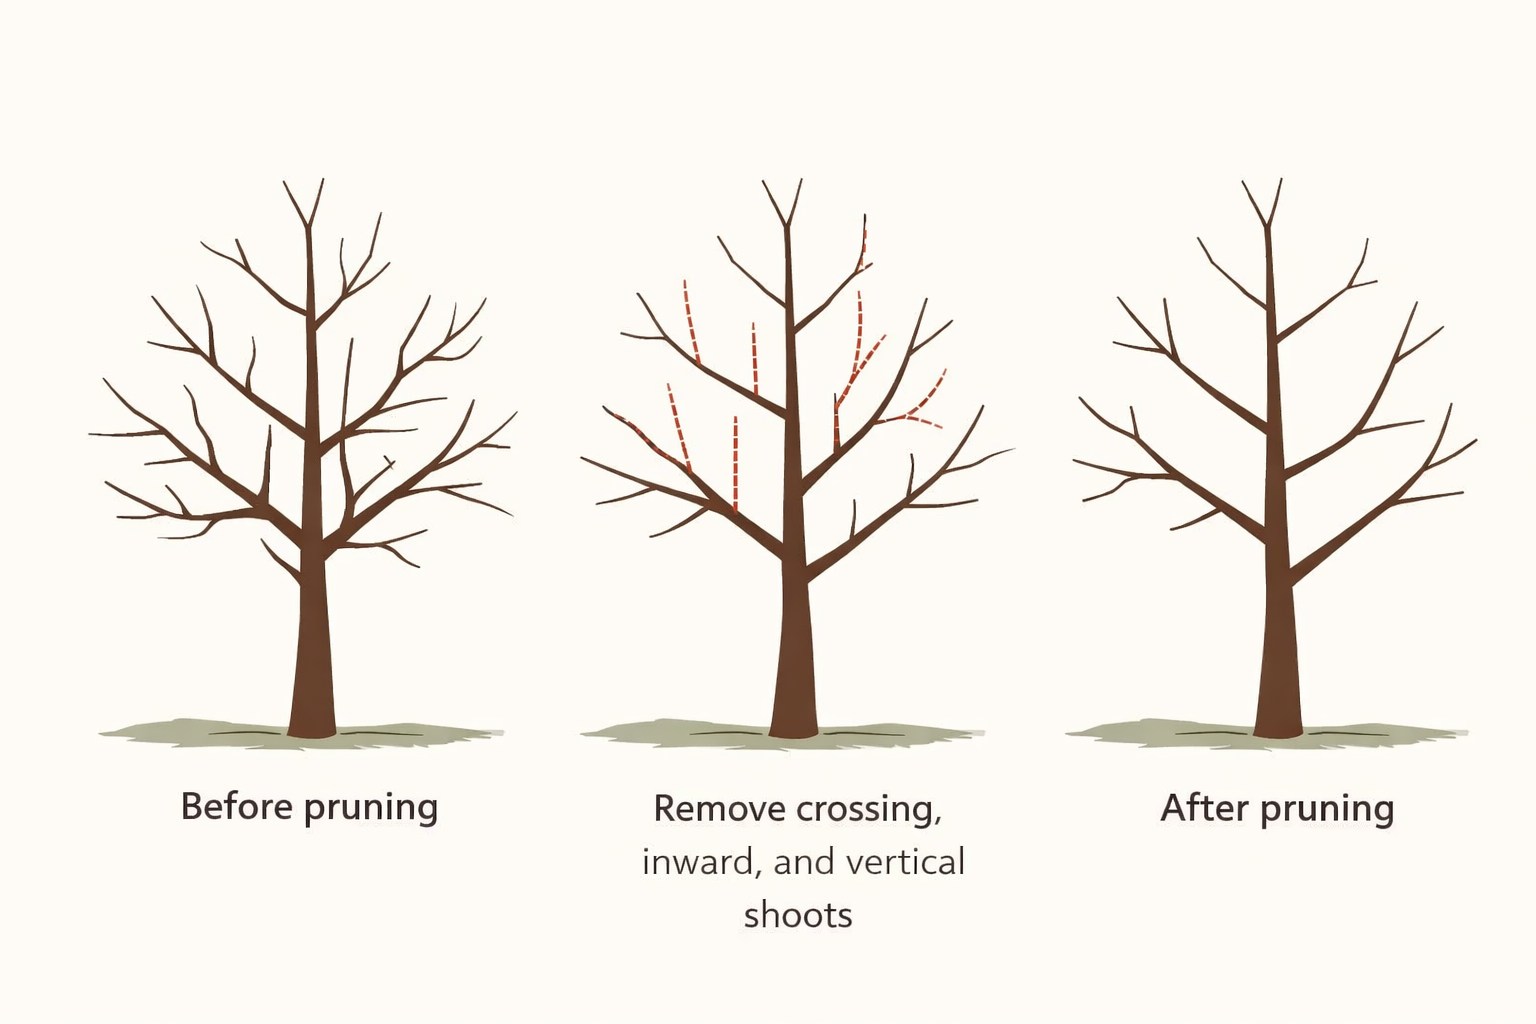
What to Remove First
Regardless of training system, start every pruning session by removing:
Dead, diseased, or damaged wood. Cut back to healthy tissue
Suckers. Vigorous shoots from the rootstock below the graft union
Water sprouts. Vigorous vertical shoots in the interior canopy
Crossing or rubbing branches. Remove the weaker or more poorly positioned one
Inward-growing branches. Keep growth directed outward
After this cleanup, you can address shaping and size control based on your chosen training system.
Crotch Angles
The angle between the trunk and a scaffold branch affects strength. Illinois Extension notes that the strongest crotch angle is 45 to 60 degrees. Narrow angles (less than 45 degrees) create weak attachments that can split under fruit weight. Very wide angles (nearly horizontal) produce weak, drooping branches.
On young trees, you can improve narrow angles by spreading branches with spacers, clothespins, or weights while wood is still flexible.
When Should You Prune in Santa Cruz County?
Our mild Mediterranean climate gives us more flexibility in pruning timing than colder regions, but timing still matters.
| Season / Month | Fruit Types | Key Tasks | Supporting Resources |
|---|---|---|---|
| Late winter (Jan to Feb) | Apples, pears, plums, cherries, figs (structural), established peaches and nectarines | Major structural pruning; remove dead or diseased wood; thin and head to shape trees. |
UC ANR The Backyard Orchard:
PDF guide
OSU Extension PNW 400: Training and Pruning Your Home Orchard |
| Late winter to early spring (Feb to Mar) | Citrus and evergreen fruit trees | Light structural work and clean-up after frost danger has passed. | California citrus pruning timing: Californiatrees.org |
| Late spring to early summer (May to Jun) | All deciduous fruit trees | Summer pruning for size control; remove water sprouts; ideal timing for Backyard Orchard Culture cuts. | Dave Wilson Nursery: Backyard Orchard Culture |
| After harvest (late summer to early fall) | Stone fruits (especially apricots, peaches, nectarines) and figs | Light shaping and removal of fruited wood where appropriate; avoid heavy cuts heading into winter. | University of Georgia Extension: Peach and Nectarine Pruning |
| Avoid heavy pruning in fall | All fruit tree types | Avoid stimulating tender growth before cold weather and avoid pruning during active wet disease periods. | General guidance from UC ANR and OSU Extension: UC ANR , OSU Extension |
Winter vs. Summer Pruning
Winter pruning (while dormant) stimulates vigorous growth. OSU and other western guides explain that the tree has all its stored energy ready to push new growth in spring, and removing branches concentrates that energy in fewer buds. Use winter pruning when you want to invigorate a tree or encourage growth in a young tree.
Summer pruning reduces vigor. The tree has already invested energy in the leaves you're removing, and it's too late in the season for much regrowth. Dave Wilson Nursery emphasizes that summer pruning is the most practical method for keeping fruit trees small. Cut back new growth by half in late spring or early summer, then again in late summer if needed.
For most home orchardists, a combination works best: winter pruning for major structural work and removal of dead or diseased wood, summer pruning for size control.
Which Training System Should You Choose?
Training refers to the overall form you give your tree. Different systems suit different fruits, spaces, and management goals.
| System | Best For | Space Needed | Difficulty |
|---|---|---|---|
| Open center (vase) | Peaches, nectarines, plums, apricots | 12 to 15 ft diameter | Easy to moderate |
| Central leader | Apples, pears, sweet cherries | 10 to 15 ft diameter | Moderate |
| Modified central leader | Apples, pears, stone fruits | 8 to 12 ft diameter | Easy to moderate |
| Espalier | Apples, pears, figs; stone fruits as fans | 2 ft deep × 8 to 15 ft wide | Moderate to difficult |
| Fan | Stone fruits, figs | 2 ft deep × 8 to 12 ft wide | Moderate |
| Cordon | Apples, pears | 2 ft wide × 6 to 8 ft tall | Moderate |
| Backyard Orchard Culture | All fruit types | Variable; as small as 6 to 8 ft | Easy |
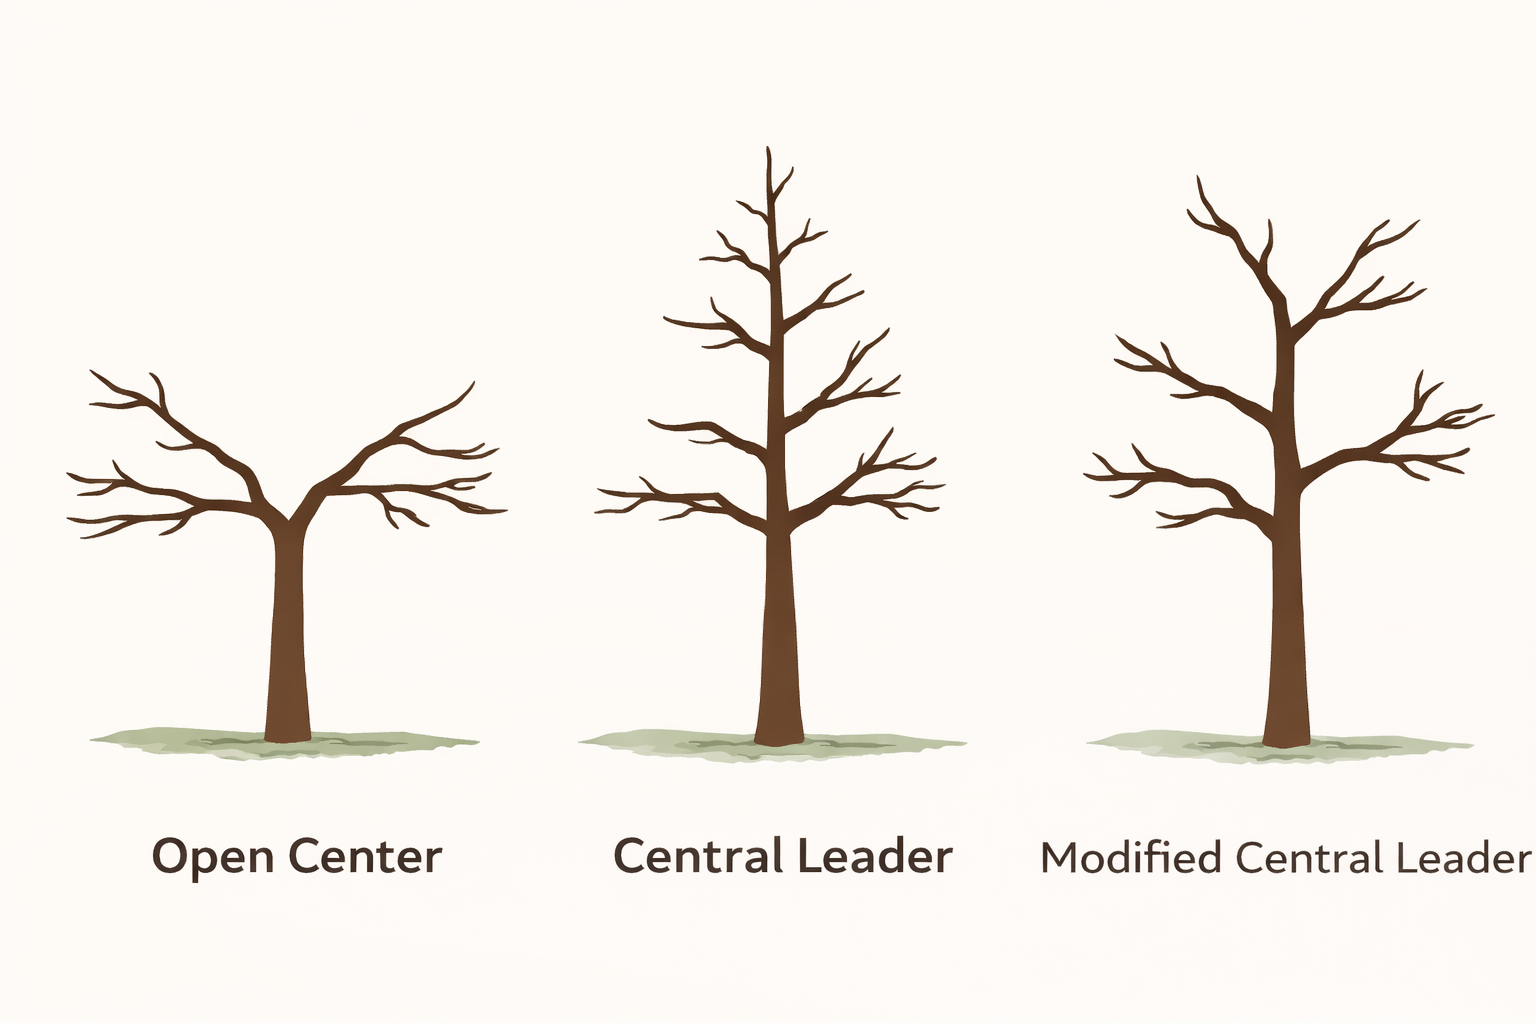
Open Center (Vase) Training
The open center system creates a vase-shaped tree with three to four main scaffold branches and no central leader. Light penetrates to all parts of the tree, and fruit develops at reachable heights.
Best for: Peaches, nectarines, Japanese plums, apricots. Illinois Extension recommends this system for stone fruits because they produce fruit on one-year-old wood that needs good light exposure.
How to develop:
Year 1 (at planting):
Head the central trunk at about 24 to 30 inches above ground
Select three to four well-spaced shoots to become scaffold branches
Remove or head back competing shoots
Year 2:
Select secondary branches on each scaffold
Remove inward-growing and crossing branches
Begin opening the center
Year 3 and beyond:
Maintain the open center by removing upright growth
Head back scaffolds to control height and spread
Thin to maintain light penetration
Central Leader Training
The central leader system maintains a single dominant trunk with tiers of scaffold branches arranged like a Christmas tree (wider at bottom, narrower at top). This creates a strong, orderly tree.
Best for: Apples, pears, sweet cherries, European plums. Virginia Tech Extension notes this is the most common commercial system for apples.
How to develop:
Year 1:
Head an unbranched whip at 30 to 36 inches to stimulate branching
If the tree has branches, select three to four well-spaced scaffolds and remove competing branches
Keep the central leader dominant
Years 2 through 4:
Develop additional tiers of scaffolds, vertically spaced 18 to 24 inches apart
Head the central leader each winter to stimulate new scaffold development
Keep lower tiers wider than upper tiers
Mature tree:
Thin to maintain light penetration
Head back overly vigorous growth
Maintain the pyramidal shape
Modified Central Leader
The modified central leader system combines the strength of a central leader with the openness of a vase. You develop a central trunk with tiered scaffolds (like central leader), then cut back the leader after three to four tiers to open the top and limit height.
Best for: Most home orchards. This flexible system works for apples, pears, and many stone fruits. It's easier to keep at a manageable height than a pure central leader.
Advantages:
Stronger than open center (has a trunk for support)
More open than central leader (better light in center)
Easier to maintain at a moderate height
Adaptable to various fruit types
Backyard Orchard Culture: Small Trees Through Summer Pruning
Dave Wilson Nursery developed Backyard Orchard Culture specifically for home gardeners who want lots of fruit from small spaces. The key insight: tree size is the grower's responsibility, controlled through summer pruning rather than relying solely on dwarfing rootstocks.
Core principles:
Choose a height and don't let the tree exceed it. Eight feet is a practical maximum for easy management without ladders.
Summer prune to control size. In late spring/early summer, cut back new growth by at least half. Repeat in late summer if needed. This redirects energy and prevents trees from outgrowing their space.
Plant multiple varieties for extended harvest. Instead of one large tree producing all its fruit in two weeks, plant several smaller trees with staggered ripening for months of fresh fruit.
High-density planting is possible. Trees can be planted as close as 18 inches apart (multiple trees in one hole) or 3 to 4 feet apart in hedgerows.
Summer pruning schedule:
Late May/early June: Cut back first flush of new growth by half
Late summer (August): Cut back any growth above your chosen height
Winter: Detail pruning for structure and removal of dead wood
This approach works with any training system. You can summer prune a vase-shaped peach or a central-leader apple to keep it at a manageable size.
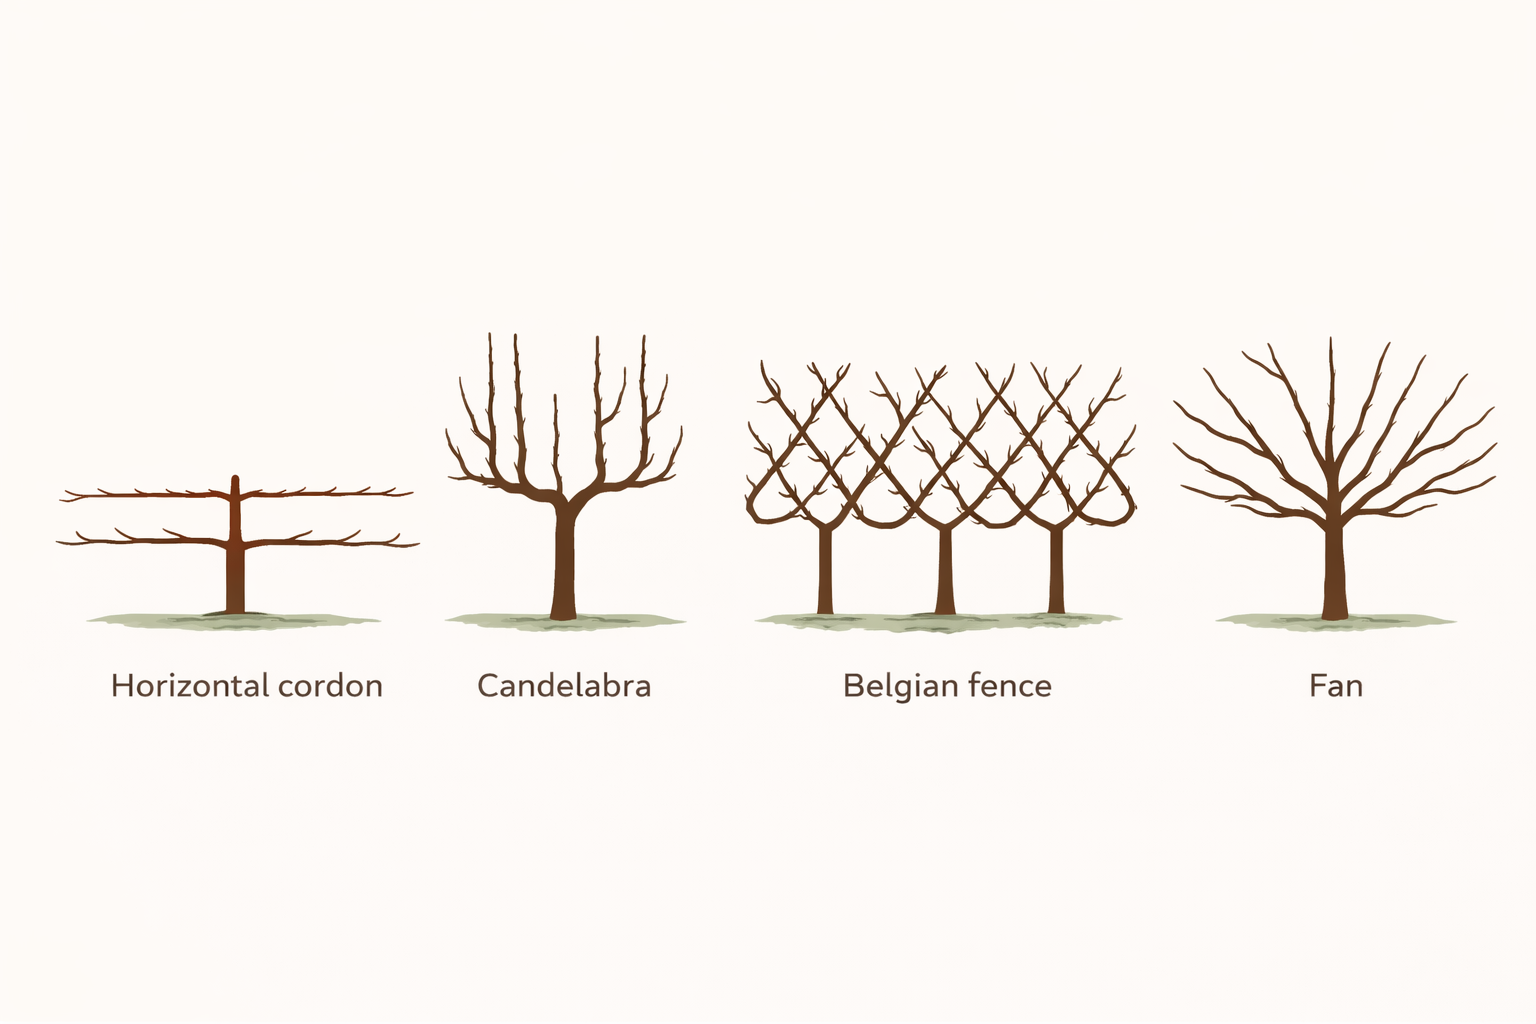
How Does Espalier and Flat Training Work?
Espalier is the art of training trees to grow flat against a wall, fence, or freestanding support. This ancient technique maximizes production in minimal space while creating beautiful living architecture.
Why Espalier?
Space efficiency: Wisconsin Horticulture notes that espaliered trees take up only a few inches of ground depth while spreading 8 to 15 feet wide. Perfect for narrow spaces, along walls, or as garden dividers.
Better fruit: The two-dimensional form exposes all fruit to sunlight, improving color and sweetness. Air circulation reduces disease. Everything is at picking height.
Microclimate advantages: A south-facing wall provides warmth that can extend the growing season or allow marginally hardy fruits to thrive.
Visual interest: Espaliered trees are architectural features, beautiful in all seasons: geometric branches in winter, blossoms in spring, fruit in summer and fall.
| Pattern | Description | Best Fruits | Difficulty |
|---|---|---|---|
| Horizontal cordon (tiered) | Central trunk with horizontal arms trained at regular intervals; the most classic espalier form. | Apples, pears | Moderate |
| Fan | Branches radiate from a low central point like a peacock’s tail. | Stone fruits, figs | Moderate |
| Belgian fence | Multiple V-shaped trees woven together into a decorative lattice. | Apples, pears | Difficult |
| Cordon (single stem) | Single stem trained at a 45° angle with fruiting spurs along the length. | Apples, pears | Easy |
| Stepover | Single horizontal tier just 12 to 18 inches high; often used as living edging. | Apples, pears | Easy |
| Candelabra | Multiple vertical branches rising from a low horizontal arm. | Apples, pears | Difficult |
| Informal | Trained flat against a support without a rigid geometric pattern. | Any fruit type | Easy |
Best Fruits for Espalier
Apples and pears are the traditional espalier subjects because their spurs produce fruit for many years and their branches are supple when young. They're ideal for formal patterns like horizontal cordons and Belgian fence.
Stone fruits (peaches, nectarines, apricots, plums, cherries) work best as fans rather than formal espaliers. BBC Gardeners' World explains that the fan shape accommodates their need for regular renewal of fruiting wood.
Figs are excellent for informal espalier or fans. They tolerate hard pruning, have attractive large leaves, and produce well when trained flat.
Citrus can be espaliered informally in frost-free locations.
How to Start an Espalier
Support structure: Install sturdy horizontal wires before planting. For wall mounting, use vine eyes or eye bolts with tensioners. For freestanding espalier, use heavy posts with wires strung between them. Space wires 12 to 18 inches apart vertically.
Plant selection: Start with a one-year-old whip (unbranched tree) or a partially trained espalier from a specialty nursery. Choose trees on dwarfing or semi-dwarfing rootstock for easier management.
First year (horizontal cordon):
Plant the tree 6 to 12 inches from the wall or support
Head the whip at the height of the first wire (typically 15 to 18 inches)
As shoots develop, select three: one to continue upward as the central leader, two to train horizontally along the first wire
Tie developing arms to the wire at 45 degrees initially, then lower to horizontal once they've hardened
Subsequent years:
Each winter, head the central leader at the next wire height
Select and train new horizontal arms at each tier
Summer prune: shorten side shoots from the horizontal arms to three to four leaves to encourage spur formation
Continue until you've filled your available space
Maintaining Espalier
The Royal Horticultural Society emphasizes that maintaining espalier shape is a long-term commitment. Without annual pruning, growth becomes overly long and the tree reverts toward its natural form.
Summer pruning (essential): In late summer, cut back all new side shoots from the main framework to three to four leaves. This encourages fruit spur formation and maintains the flat form.
Winter pruning: Thin out crowded spurs. Remove any shoots growing perpendicular to the wall. Maintain the framework.
Fan Training for Stone Fruits
Fans work better than formal espalier for peaches, nectarines, apricots, and plums because these fruits need regular renewal of fruiting wood.
Developing a fan:
Head a whip at about 15 inches
Select two shoots to form the main ribs of the fan, training them at 45-degree angles
The following year, select four to six shoots from each rib to fill out the fan shape
Continue filling in until the framework is complete
Annual maintenance:
After harvest, remove branches that fruited
Select and tie in new shoots to replace them
Maintain the fan shape with even coverage
How Should You Prune Established and Neglected Trees?
Annual Maintenance Pruning
Once your tree's structure is established, annual pruning maintains health and productivity:
Remove dead, diseased, and damaged wood
Thin crossing and rubbing branches
Remove water sprouts and suckers
Thin to maintain light penetration (especially in tree center)
Head back overly long branches to maintain size
For peaches/nectarines: remove about 40 to 50% of last year's growth to stimulate new fruiting wood
Renovating Neglected Trees
Old, overgrown fruit trees can often be restored to productivity, though the process takes several years.
Assessment first:
Is the tree worth saving? Consider variety, location, and overall health.
Can you identify the graft union? If the tree has reverted to rootstock, the original variety is lost.
Is there significant trunk decay or structural damage?
Renovation approach:
Purdue Extension advises removing no more than 25 to 30% of live wood in any single season. Spread renovation over two to four years.
Year 1:
Remove all dead, diseased, and broken branches
Remove suckers and water sprouts
Lower height by cutting scaffold branches back to outward-facing laterals
Year 2:
Continue opening the canopy
Remove remaining crossing and crowded branches
Shape remaining scaffolds
Year 3 and beyond:
Fine-tune the structure
Begin normal annual maintenance
Severely neglected trees may produce many water sprouts in response to heavy pruning. Remove most of them, but consider keeping a few well-placed ones to become new scaffold branches if needed.
How Should You Prune by Fruit Type?
Stone Fruits (Peaches, Nectarines, Apricots, Plums)
Peaches and nectarines are the most demanding of annual pruning because they fruit only on one-year-old wood. The University of Georgia recommends removing about 40 to 50% of last year's growth annually to stimulate production of new fruiting wood.
Timing: Late winter for structural pruning; after harvest for size control. Some California growers prefer pruning apricots after harvest to reduce disease risk.
Key points:
Train to open vase shape
Head back long shoots to stimulate branching lower in the tree
Thin to maintain good light throughout the canopy
Summer prune to control size
Apples and Pears
These spur-bearing fruits need less aggressive pruning than stone fruits.
Timing: Late winter (January through February in Santa Cruz County)
Key points:
Preserve fruiting spurs (don't remove them)
Thin to improve light on existing spurs
Head back long whips to encourage spur development
Remove water sprouts
Cherries
Sweet cherries need minimal pruning. Sour cherries need moderate pruning similar to plums.
Timing: Late winter; avoid pruning in wet weather (disease risk)
Key points:
Sweet cherries: mainly thin for light penetration and shape
Sour cherries: moderate renewal pruning to encourage new fruiting wood
Figs
Figs are forgiving and need only light pruning.
Timing: Late winter for structural pruning; summer for size control
Key points:
Remove dead and crossing branches
Thin to maintain air circulation
Control size as needed
Figs fruit on both new growth and previous year's wood
Citrus
Citrus trees need minimal pruning compared to deciduous fruits.
Timing: Late winter to early spring (February through April), after frost danger passes
Key points:
Remove dead, diseased, and crossing branches
Thin interior for light and air circulation
Control size as needed
Avoid heavy pruning (exposes bark to sunburn)
Tools and Techniques
| Tool | Use | Notes |
|---|---|---|
| Bypass hand pruners | Branches up to ¾ inch | Essential everyday tool; invest in a high-quality, sharp pair. |
| Loppers | Branches ¾ to 2 inches | Long handles provide leverage for clean cuts without strain. |
| Pruning saw | Branches over 2 inches | Folding saws are convenient and safer for tight spaces. |
| Pole pruner | High or hard-to-reach branches | Useful for renovation work; less needed if trees are kept small. |
Tool care: Keep blades sharp and clean. Sanitize between trees (especially if disease is present) with rubbing alcohol or a dilute bleach solution.
Making Good Cuts
Cut just outside the branch collar for thinning cuts
Don't leave stubs (they invite decay)
Don't cut flush with the trunk (damages the branch collar)
For large limbs, use the three-cut method to prevent bark tearing:
Undercut partway through from below
Cut through from above, slightly farther out
Make final cut at the branch collar
UC ANR's "The Backyard Orchard" and OSU PNW 400 both recommend this three-cut technique for larger limbs.
Safety
Use sturdy ladders properly positioned (or keep trees small enough to prune from the ground)
Wear eye protection when working overhead
Be aware of power lines
Don't overreach; reposition the ladder instead
What Should Santa Cruz County Gardeners Know?
Timing Adjustments
Our mild winters mean trees may not be fully dormant in December. Wait until January or February for major pruning of deciduous trees, when buds are still dormant but spring growth is approaching.
Disease Considerations
Fire blight (affects apples and pears) can spread through pruning cuts. Prune during dry weather, sterilize tools between cuts on affected trees, and cut well below visible infection. Important: When removing fire blight, cut 8 to 12 inches below visible infection into healthy wood, and disinfect tools between each cut to prevent spreading the disease.
Brown rot (affects stone fruits) overwinters in mummified fruit and cankers. Remove affected material during winter pruning.
Bacterial canker (affects cherries) spreads in wet conditions. Prune cherries during dry weather.
Microclimate Effects
Coastal areas: Trees may stay semi-dormant all winter; prune in late winter before spring growth
Inland areas: Colder winters mean more definite dormancy; standard winter pruning timing works well
San Lorenzo Valley: Watch for late frosts after pruning stimulates early growth
Where Can You Find Local Pruning Resources?
Classes and demonstrations:
UC Master Gardeners of Monterey and Santa Cruz Counties. Pruning workshops, often in January/February
UCSC Farm & Garden. Occasional pruning demonstrations
Local nurseries often host pruning demonstrations in winter
Where to buy trees:
San Lorenzo Garden Center (Santa Cruz)
Mountain Feed & Farm Supply (Ben Lomond)
Sierra Azul Nursery (Watsonville)
Bay Laurel Nursery (ships bare-root trees)
More information:
Dave Wilson Nursery Backyard Orchard Culture. Excellent videos and articles on keeping trees small
Oregon State Extension PNW 400. Comprehensive pruning guide with diagrams
UC ANR "The Backyard Orchard". California-specific guidance
Frequently Asked Questions About Pruning Fruit Trees
When should I prune fruit trees in Santa Cruz County?
Late winter (January through February) is ideal for major structural pruning of deciduous fruit trees while they're dormant. You can see the branch structure clearly, and wounds heal quickly as spring growth begins. Summer pruning (May through August) is best for size control. Citrus and other evergreens should be pruned in late winter to early spring after frost danger passes.
How much can I prune without harming the tree?
As a general rule, remove no more than 25 to 30% of the tree's live canopy in a single year. For renovation of neglected trees, spread heavy pruning over two to four years. Young trees being trained can handle more aggressive heading cuts because you're establishing structure, not removing productive wood.
My fruit tree is too tall. How do I reduce its height?
Cut scaffold branches back to outward-facing lateral branches at the height you want. Don't simply "top" the tree by cutting branches straight across, which stimulates dense, weakly attached regrowth. For ongoing size control, adopt summer pruning: cut back new growth by half in late spring/early summer.
Should I seal pruning cuts?
No. Research shows that pruning wound sealers don't prevent decay and may actually interfere with natural callusing. Cut properly (at the branch collar) and let the tree heal itself.
What's the difference between heading cuts and thinning cuts?
Heading cuts remove part of a branch, stimulating dense regrowth below the cut. Thinning cuts remove an entire branch at its origin, opening the canopy without stimulating vigorous regrowth. Use heading to encourage branching on young trees; use thinning to open mature trees and remove unwanted growth.
Can I espalier any fruit tree?
Apples and pears are best for formal espalier patterns because their fruiting spurs last for years. Stone fruits (peaches, plums, cherries, apricots) work better as fans, which accommodate their need for regular renewal of fruiting wood. Figs work well for informal espalier. Choose trees on dwarfing rootstock for easier management.
How do I keep my fruit tree small?
Summer pruning is the key. In late spring or early summer, cut back all new growth by at least half. Repeat in late summer if needed. Choose a maximum height (8 feet is practical) and don't let the tree exceed it. This Backyard Orchard Culture approach works regardless of rootstock.
My tree produces lots of water sprouts after pruning. What should I do?
Water sprouts (vigorous vertical shoots) are the tree's response to heavy pruning. Remove most of them in summer while they're still soft and easy to snap off. In renovation situations, you might keep a few well-placed water sprouts to become new scaffold branches, but remove the rest to prevent crowding.
Where Can You Find Free Pruning Resources?
Seasonal Planting Calendar. Month-by-month guide including fruit tree care tasks.
Seasonal Tasks Checklist. Year-round garden maintenance including pruning timing.
Know Your Microclimate Worksheet. Assess your garden's conditions for better fruit tree selection.
Guide to Growing Fruit Trees in Santa Cruz County. Comprehensive variety recommendations for our climate.
Bare Root Fruit Trees Planting Guide. How to buy and plant bare-root trees, including initial pruning.
Ready to Shape Your Trees for Better Fruit?
Pruning and training might seem intimidating at first, but the fundamentals are straightforward: remove what's dead, diseased, or crossing; maintain good light penetration; and keep trees at a manageable size. You don't need to be perfect. Trees are resilient, and even imperfect pruning is better than neglect.
Start this winter with your dormant deciduous trees. Remove the obvious problems: dead wood, suckers, water sprouts, crossing branches. Open the center to let light in. If the tree is too tall, bring it down gradually over two to three years.
Add summer pruning to your routine: a session in June and another in August keeps trees compact and productive. Once you see how much easier it is to manage, spray, thin, and harvest a small tree, you'll never let one grow out of control again.
And if you're planting new trees, consider espalier or other trained forms. The investment in training during the first few years pays off in decades of beautiful, productive trees that fit perfectly in your garden.