

5 Garden Science Experiments Kids Can Do This Summer
A garden is a living science laboratory. Every seed that germinates, every insect that visits a flower, and every handful of soil teems with biology, chemistry, and physics in action. For kids, the garden is one of the best places to experience science as something real and tangible rather than abstract.
These five experiments are designed for kids ages 5 through 12 (with age-appropriate variations noted for each) and can all be done in a Santa Cruz County backyard, patio, or even a sunny windowsill. Each experiment uses the scientific method: ask a question, make a prediction, test it, observe what happens, and think about why. They require no special equipment beyond basic garden and kitchen supplies.
Each experiment also connects to real science. The "what is happening" sections explain the biology and ecology behind the results, so kids (and parents) learn something genuinely interesting rather than just following steps.
Key Takeaway: These experiments work best when kids drive the process. Let them choose variables, make their own predictions, and draw their own conclusions. The goal is not a perfect result but engagement with the scientific process.
Experiment 1: The Great Germination Race
Question: Do seeds germinate faster in warm conditions or cool conditions?
Ages: 5 and up
Time: 10 minutes to set up, 7 to 14 days to observe
What You Need
Bean seeds (lima beans or snap beans work best because they are large and germinate quickly)
4 small pots or cups with drainage holes
Potting soil
Water
A warm location (sunny windowsill, near a heater, or outdoors in a sheltered spot)
A cool location (north-facing window, shaded porch, or the coolest room in the house)
A notebook for recording observations
What to Do
Ask the question and predict. Before planting, ask your child: "Do you think seeds will sprout faster in a warm place or a cool place?" Write down the prediction.
Plant the seeds. Fill all 4 pots with moist potting soil. Plant 2 bean seeds in each pot, about 1 inch deep. Water gently.
Place the pots. Put 2 pots in the warm location and 2 pots in the cool location. (Two pots in each spot gives you a backup in case one fails.)
Observe daily. Check every day for signs of germination (the soil cracking, a stem emerging). Record the date each seed sprouts. Water as needed to keep soil moist but not soggy.
Compare results. After all seeds have sprouted (or after 14 days, whichever comes first), compare: which location sprouted first? How many days was the difference? Did the prediction match the result?
What Is Happening
Seeds need moisture, oxygen, and warmth to germinate. Warmth is especially important because it activates the enzymes inside the seed that break down stored food and fuel growth. According to UC ANR, most common vegetable seeds germinate fastest at soil temperatures between 70 and 85 degrees Fahrenheit. Below 50 degrees, many seeds germinate very slowly or not at all.
This is why Santa Cruz coastal gardeners start seeds indoors in spring. Our cool, foggy conditions keep outdoor soil temperatures below the ideal range for warm-season crops until May or later. This experiment demonstrates that challenge in miniature.
Extensions for Older Kids
Add a third location (dark closet at room temperature) to test whether light matters for germination. (Spoiler: most seeds do not need light to germinate, but some small-seeded species do.)
Use a soil thermometer to measure the actual temperature in each location and graph germination time against temperature.
Try different seed types (lettuce, radish, tomato) and compare which species germinate fastest at each temperature.
Experiment 2: Does Mulch Really Keep Soil Cooler?
Question: How does mulch affect soil temperature compared to bare soil?
Ages: 7 and up
Time: 15 minutes to set up, 3 to 5 days of measurements
What You Need
2 identical containers (large pots, buckets, or even plastic storage tubs) filled with garden soil
Mulch material (straw, wood chips, shredded leaves, or dried grass clippings)
A kitchen or soil thermometer
A notebook for recording temperatures
What to Do
Predict. Ask: "Will soil with mulch on top be warmer or cooler than bare soil on a sunny day? What about at night?"
Set up. Fill both containers with the same amount of soil. Leave one bare. Cover the other with 3 to 4 inches of mulch.
Place both containers in a sunny spot outdoors, side by side.
Measure and record. Push the thermometer 2 inches into the soil in each container. Record the temperature at the same three times each day: morning (before 9 AM), midday (noon to 1 PM), and evening (5 to 6 PM). Do this for at least 3 days.
Compare. Make a chart or graph of the temperatures. When is the biggest difference? Does mulch make soil warmer or cooler during the day? What about in the morning after a cool night?
What Is Happening
Mulch acts as insulation. During the day, it blocks direct sunlight from heating the soil surface, keeping mulched soil cooler than bare soil. At night, mulch slows heat loss, keeping mulched soil slightly warmer than bare soil. The net effect is that mulch moderates temperature extremes, creating more stable conditions for plant roots and soil organisms.
According to UC ANR research, mulch can reduce midday soil surface temperatures by 10 to 20 degrees compared to bare soil. This is one reason mulching is so important in Santa Cruz County gardens: it keeps roots cool during summer heat events and protects soil biology from temperature stress.
Extensions for Older Kids
Test different mulch materials (straw vs. wood chips vs. black plastic) and compare their insulating effects.
Add a soil moisture measurement (weigh the containers before and after 3 days without watering to see which dries out faster).
Research how mulch affects the soil food web and why soil organisms need stable temperatures.
Experiment 3: Building a Mini Worm Composting Bin
Question: Can worms turn kitchen scraps into soil?
Ages: 5 and up (with adult help for setup)
Time: 30 minutes to set up, weeks to months of ongoing observation
What You Need
A small, opaque plastic bin with a lid (a shoebox-sized storage container works well)
A drill or nail for making air holes (adult job)
Shredded newspaper or cardboard for bedding
A handful of garden soil
Red wiggler worms (Eisenia fetida), available at garden centers, bait shops, or online. About 50 worms is enough for a small bin.
Vegetable and fruit scraps from the kitchen (no meat, dairy, or oily foods)
What to Do
Prepare the bin. An adult drills or pokes 8 to 10 small holes in the lid and upper sides of the bin for air circulation. Do not make holes in the bottom (this bin stays contained).
Add bedding. Fill the bin about 3/4 full with shredded, moistened newspaper. It should feel like a wrung-out sponge. Add a small handful of garden soil (this introduces beneficial microorganisms).
Add worms. Place the worms on top of the bedding. They will burrow down within a few minutes to escape the light.
Feed the worms. Bury a small amount of kitchen scraps (a handful at a time) under the bedding. Start with soft foods: banana peels, lettuce leaves, apple cores, coffee grounds. Add more food only when the previous feeding has mostly disappeared.
Observe. Check the bin every few days. Record what you see: are the worms eating the food? What does the bedding look like over time? Can you find tiny worm eggs (small, lemon-shaped, yellowish capsules)?
Harvest. After 2 to 3 months, much of the bedding and food will have been converted into dark, crumbly worm castings (worm compost). Push all the material to one side of the bin, add fresh bedding and food to the empty side, and wait a week. The worms will migrate to the fresh side, and you can harvest the finished castings from the other side.
What Is Happening
Red wiggler worms are decomposers. They eat organic matter (decaying plant material, food scraps) and excrete castings, which are rich in nutrients that plants can use. Worm castings contain more available nitrogen, phosphorus, and potassium than the original material, plus beneficial microorganisms that improve soil health.
This process is called vermicomposting, and it is a form of biological recycling. The worms are not alone in the work: bacteria, fungi, and other microscopic organisms break down the food first, and the worms consume and further process this microbial community along with the food itself. According to UC ANR, vermicomposting is one of the most efficient ways to convert kitchen waste into high-quality soil amendment.
Extensions for Older Kids
Test whether plants grow better in soil with worm castings vs. plain potting soil. Set up two identical pots, one with castings mixed in, and grow the same plant in each. Measure and compare growth over several weeks.
Research the anatomy of an earthworm and the difference between red wigglers (composting worms) and the earthworms found in garden soil.
Calculate how much kitchen waste the bin diverts from the landfill over a month. Weigh the scraps before adding them.
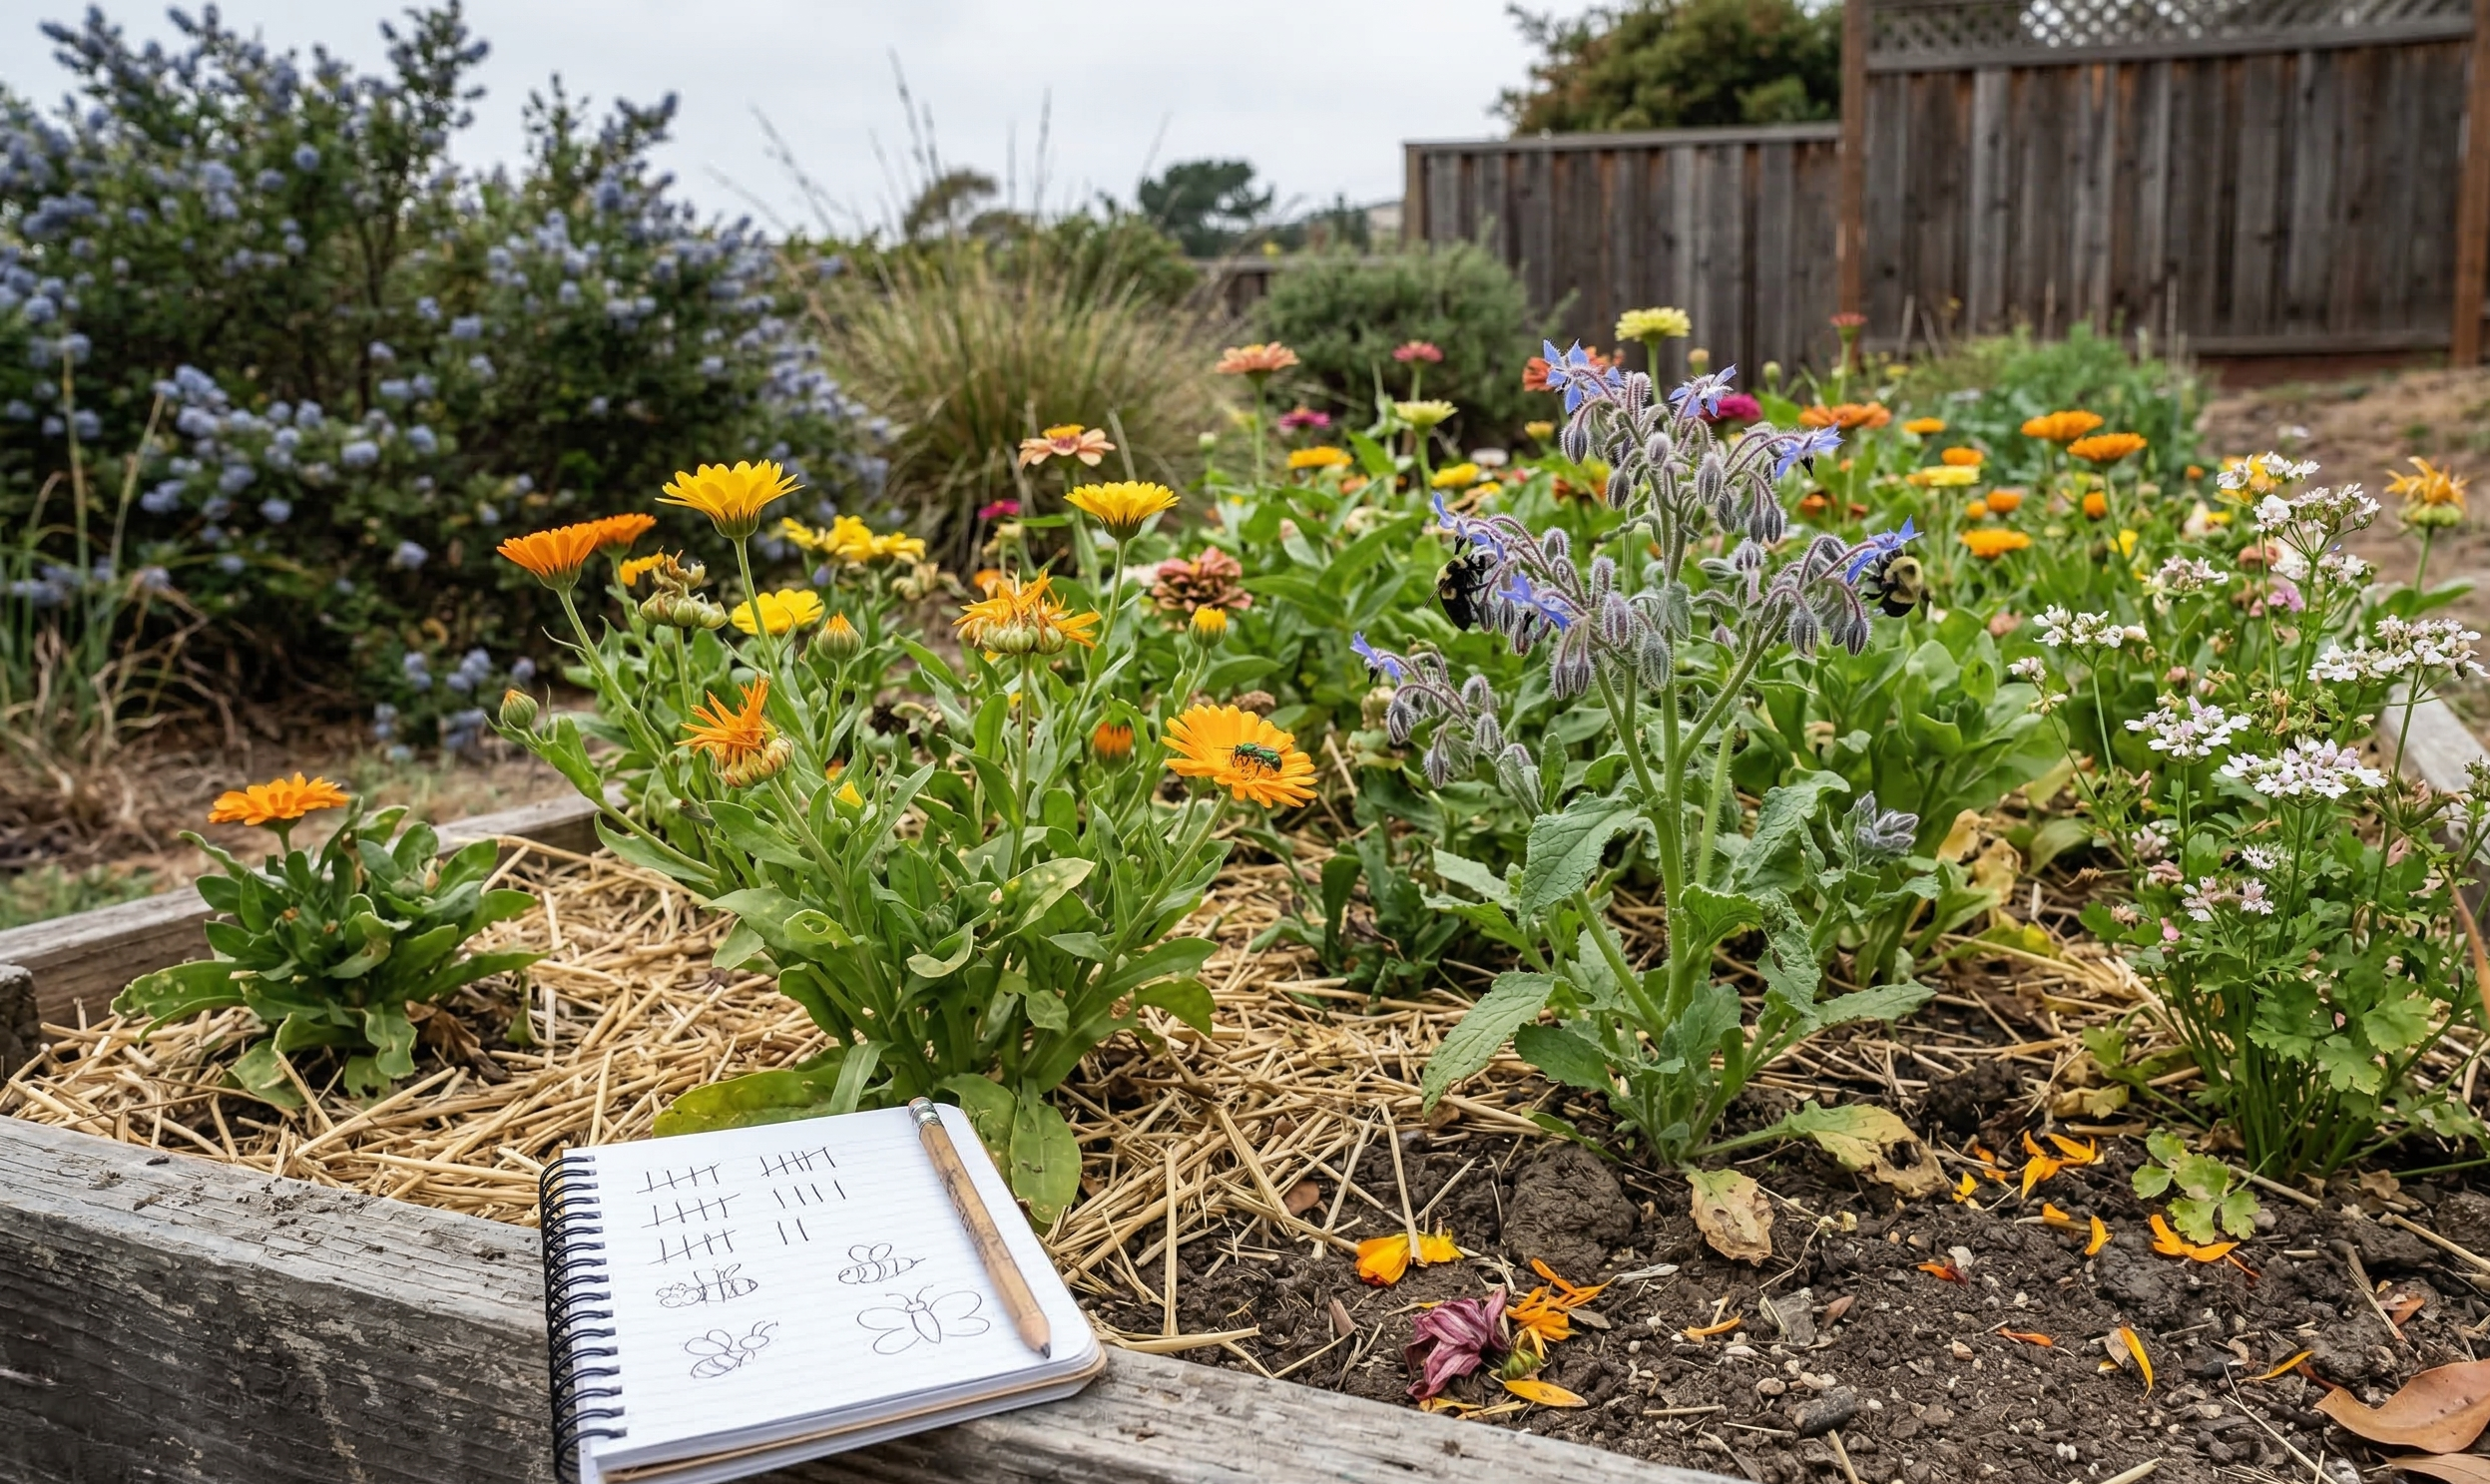
Experiment 4: The Pollinator Watch
Question: Which flowers in our garden attract the most pollinators?
Ages: 6 and up
Time: 15 to 20 minutes per observation session, repeated over several days
What You Need
A garden or yard with at least 3 to 4 different flowering plants (vegetable flowers, herbs, ornamentals, or wildflowers all count)
A notebook and pencil
A timer (phone or kitchen timer)
Optional: a magnifying glass for close-up observation
What to Do
Predict. Ask: "Which flower do you think will get the most visits from bees, butterflies, and other pollinators? Why?"
Choose observation stations. Select 3 to 4 different flowering plants in your garden. Give each one a name or number for your data sheet.
Observe and count. Sit or stand quietly near each plant for exactly 5 minutes. Count every pollinator visit you see: bees, butterflies, hoverflies, beetles, or any other insect visiting the flowers. Record the count for each plant. Try to note what type of pollinator you see (bumble bee, honeybee, small native bee, butterfly, hoverfly).
Repeat. Do the same observation at the same time of day for at least 3 different days. This gives you more reliable data.
Analyze. Which plant had the most total visits? Were certain pollinators attracted to certain flowers? Did the results match the prediction?
What Is Happening
Pollinators visit flowers to collect nectar (a sugary liquid that provides energy) and pollen (a protein-rich food source). Different pollinators prefer different flower shapes, colors, and sizes. Bees tend to prefer blue, purple, and yellow flowers with open shapes or tubular shapes they can crawl into. Butterflies prefer flat-topped clusters and bright colors. Hoverflies visit small, clustered flowers in the carrot family (like cilantro and dill).
According to UC Davis pollinator research, flower diversity in a garden directly correlates with pollinator diversity. Gardens with many different flower types attract more species of pollinators than gardens with just one or two flower types. This pollinator diversity improves fruit set on vegetable crops and supports the broader ecosystem.
In Santa Cruz County, common garden pollinators include honeybees, several species of bumble bees, small native sweat bees, carpenter bees, painted lady butterflies, monarch butterflies (seasonally), syrphid flies, and various beetles.
Extensions for Older Kids
Create a bar graph or pie chart showing pollinator visits by flower type.
Repeat the experiment at different times of day (morning, midday, late afternoon) and compare: when are pollinators most active?
Research one pollinator species you observed and create a "field guide page" with a drawing, description, and facts about its life cycle.
Compare pollinator activity on a foggy day vs. a sunny day (relevant for Santa Cruz coastal gardens).
Experiment 5: The Water and Soil Challenge
Question: Does water drain through all soils at the same speed?
Ages: 7 and up
Time: 20 minutes
What You Need
3 identical clear plastic cups or bottles (cut the bottom off a plastic bottle to make a funnel)
3 different soil types: sand, garden soil (or potting mix), and clay (dig some from a clay-heavy area, or buy modeling clay as a rough substitute)
Coffee filters or paper towels (to line the bottom of each cup so soil does not fall through)
3 collection containers (bowls or cups)
A measuring cup of water
A timer
What to Do
Predict. Ask: "Which soil will water drain through fastest? Which will be slowest? Why?"
Set up. Line the bottom of each cup with a coffee filter. Poke 3 to 4 small holes in the bottom for drainage. Fill each cup with the same amount of one soil type. Place each cup over a collection container.
Pour water. Measure the same amount of water (1/2 cup works well) and pour it into each soil cup at the same time. Start the timer.
Observe and time. Watch how quickly water drains through each soil type. Record how long it takes for water to start dripping out the bottom. After 5 minutes, measure how much water has collected in each container below.
Compare and discuss. Which soil drained fastest? Which held the most water? Which would be best for growing plants?
What Is Happening
Soil is made up of mineral particles of different sizes: sand (large particles, 0.05 to 2 mm), silt (medium particles, 0.002 to 0.05 mm), and clay (very tiny particles, less than 0.002 mm). The spaces between particles determine how quickly water moves through the soil.
Sand has large spaces between particles, so water drains through quickly. This means sandy soil dries out fast and does not hold nutrients well. Clay has tiny spaces that hold water tightly, draining very slowly. This means clay soil stays wet longer and can become waterlogged. The ideal garden soil (loam) is a mix of sand, silt, and clay that balances drainage and water retention.
According to UC Davis soil science, the Santa Cruz area has a variety of soil types. Coastal areas often have sandy loam (well-draining), while parts of the Pajaro Valley have heavier clay soils (slower drainage). Understanding your soil type helps you decide how often to water and what amendments to add. This is why the first step in starting a new garden is knowing what kind of soil you have.
Extensions for Older Kids
Add a fourth cup with garden soil mixed with compost. Does adding compost change how water moves through the soil?
After the experiment, feel each soil type and describe its texture. Introduce the "ribbon test" (squeeze moist soil between your fingers to estimate clay content).
Discuss how this connects to real gardening: why do sandy-soil gardeners water more often? Why do clay-soil gardeners use raised beds?
Explore what organic matter (compost) does to improve both sandy soil (helps hold water) and clay soil (improves drainage).
Tips for Parents, Teachers, and Garden Leaders
Let Them Lead
The most important thing you can do is step back and let kids run the experiments. Let them water the wrong amount, make messy observations, and draw unexpected conclusions. The process of inquiry is more valuable than getting the "right" answer.
Connect to the Real Garden
After each experiment, help kids connect what they learned to what they see in the garden. "Remember how the mulched soil stayed cooler? That is why we put straw around our tomato plants." These connections turn abstract knowledge into practical understanding.
Make a Science Journal
Give each child a notebook dedicated to their garden science observations. Encourage drawings, measurements, dates, and written thoughts. This is both a learning tool and a wonderful keepsake. UC Master Gardeners recommend garden journals for kids as a way to develop observation skills and scientific thinking.
Use Local Resources
Santa Cruz County has exceptional resources for kids interested in nature and science:
UCSC Arboretum and Botanic Garden offers family programs and tours.
UC Master Gardeners of Santa Cruz County sometimes host youth garden workshops and school garden support.
Natural Bridges State Beach and Wilder Ranch State Park offer guided nature walks.
Santa Cruz Museum of Natural History has hands-on exhibits and programs focused on local ecology.
Frequently Asked Questions
What age can kids start doing garden science experiments?
Children as young as 3 can participate with help from an adult (watering, observing, touching soil and plants). The experiments in this guide are designed for ages 5 through 12, but younger children enjoy being involved in the hands-on steps even if they do not fully understand the science. Older children can take on the extensions and deeper analysis independently.
My child does not have a long attention span. Will these experiments work?
Each experiment has a short setup time (10 to 30 minutes), which is the most hands-on part. The observation periods happen in small bursts (5 minutes at a time) over multiple days. This structure works well for kids who cannot sit still for long periods because the action is spread out rather than concentrated.
Can these experiments be done in containers or on a patio?
Yes. All five experiments can be adapted for container gardens, small patios, or even a sunny windowsill. The pollinator watch works wherever there are flowering plants (even a pot of blooming herbs on a balcony attracts some pollinators).
Are these experiments useful for school garden programs?
Absolutely. Each experiment aligns with Next Generation Science Standards (NGSS) for elementary science, covering life science (Experiments 1, 3, 4), earth science (Experiment 5), and physical science (Experiment 2). Teachers can use them as structured activities or as inspiration for student-designed experiments.
Where can I buy red wiggler worms locally?
In Santa Cruz County, check Mountain Feed and Farm Supply (Ben Lomond), local bait shops, or order online. Red wigglers are not the same species as the earthworms in your garden soil, so you need to buy them specifically. A small starter colony of 50 to 100 worms is enough for a kid-sized bin.
Keep the Garden Science Going
Get the Kids Garden Activity Pack
Related Reading
For free printable garden resources and family activity ideas, visit Your Garden Toolkit.