

How to Propagate Succulents | Leaves, Cuttings & Division Guide
How to Propagate Succulents: Leaves, Cuttings, and Division (A Santa Cruz Guide)
A few of the product links in this guide are affiliate links. If you buy through one, Ambitious Harvest may earn a small commission at no extra cost to you, which helps keep these guides free. We only point to gear we would use in our own Santa Cruz garden. As an Amazon Associate, we earn from Read our full disclosure.
Propagating succulents is one of the most satisfying skills a gardener can learn, and most methods require nothing more than a healthy parent plant, a dry surface, and patience. According to UC Master Gardener resources on vegetative propagation, succulents root more readily than almost any other plant group because their water-storing tissue sustains cuttings through the rooting process without supplemental moisture. In Santa Cruz County, spring through early summer (March through June) is the ideal propagation window, giving new plants months of warm, dry weather to establish roots before winter.
Whether you want to multiply your collection, share plants with friends, fill out a container arrangement, or replace losses in the garden, this guide covers every practical method for propagating succulents in our coastal California climate.
When Is the Best Time to Propagate Succulents in Santa Cruz?
Timing matters more on the coast than in drier climates because our fog and humidity increase rot risk for cuttings and leaves during the propagation process.
Best window: March through June. This period offers the ideal combination of warm temperatures, increasing daylight, and relatively low humidity. Most succulents are actively growing in spring, which means cuttings and leaves have the hormonal drive to produce new roots.
Acceptable window: September through early October. Early fall can work, especially for winter-growing species like Aeonium. Days are still warm, and you have a few weeks before the rainy season begins. The risk is that new roots have less time to establish before cool, wet conditions set in.
Avoid: November through February. Cool temperatures, high humidity, frequent rain, and reduced daylight make winter propagation difficult on the coast. Cuttings and leaves are much more likely to rot rather than root during these months. If you must propagate in winter, do it indoors under bright light with excellent ventilation.
Species-specific timing: - Aeonium: Propagate in fall (September through October) or early spring, when they are actively growing. Avoid summer, when Aeoniums are dormant. - Echeveria: Spring through early summer, when they are in active growth. - Sedum: Spring through early summer. Sedum is so vigorous that stem pieces laid on soil almost any time during the growing season will root. - Sempervivum: Spring through summer. Offsets are easiest to separate in spring. - Agave: Spring, when pups are actively growing. - Dudleya: Fall through early spring (their active growth period). Dudleya propagation is slower than most other succulents.
How Do You Propagate Succulents from Leaves?
Leaf propagation is the method most people associate with succulents. It is simple, requires no tools, and can produce dozens of new plants from a single parent. However, it does not work equally well for all genera.
Best candidates for leaf propagation: Echeveria (excellent), Sedum (many species), Graptoveria, Graptopetalum, Pachyphytum, and Crassula.
Poor candidates for leaf propagation: Aeonium (leaves rarely root successfully), Dudleya (unreliable), Agave (does not work), Sempervivum (offsets are far easier), Aloe (does not work from leaves).
Step-by-Step Leaf Propagation
Step 1: Select and remove leaves. Choose healthy, plump leaves from the middle or lower portion of the rosette (not the oldest, driest leaves and not the youngest at the center). Grasp the leaf firmly near the base and twist it gently away from the stem with a slight side-to-side rocking motion. The goal is a clean break that includes the entire leaf base, including the small growth point where the leaf attaches to the stem. If the leaf tears and leaves its base on the stem, it is unlikely to produce a new plant.
Step 2: Let leaves callus. Place the detached leaves on a dry surface (a paper towel, a dry tray, a piece of newspaper) in a bright location out of direct sun. Leave them undisturbed for 2 to 5 days until the wound end dries and forms a callus, a thin, slightly hardened skin over the moist tissue. According to UC Cooperative Extension guidance on propagation, this callusing step is critical because it prevents rot-causing pathogens from entering the moist tissue. In our coastal humidity, allow a day or two extra compared to arid-climate recommendations.
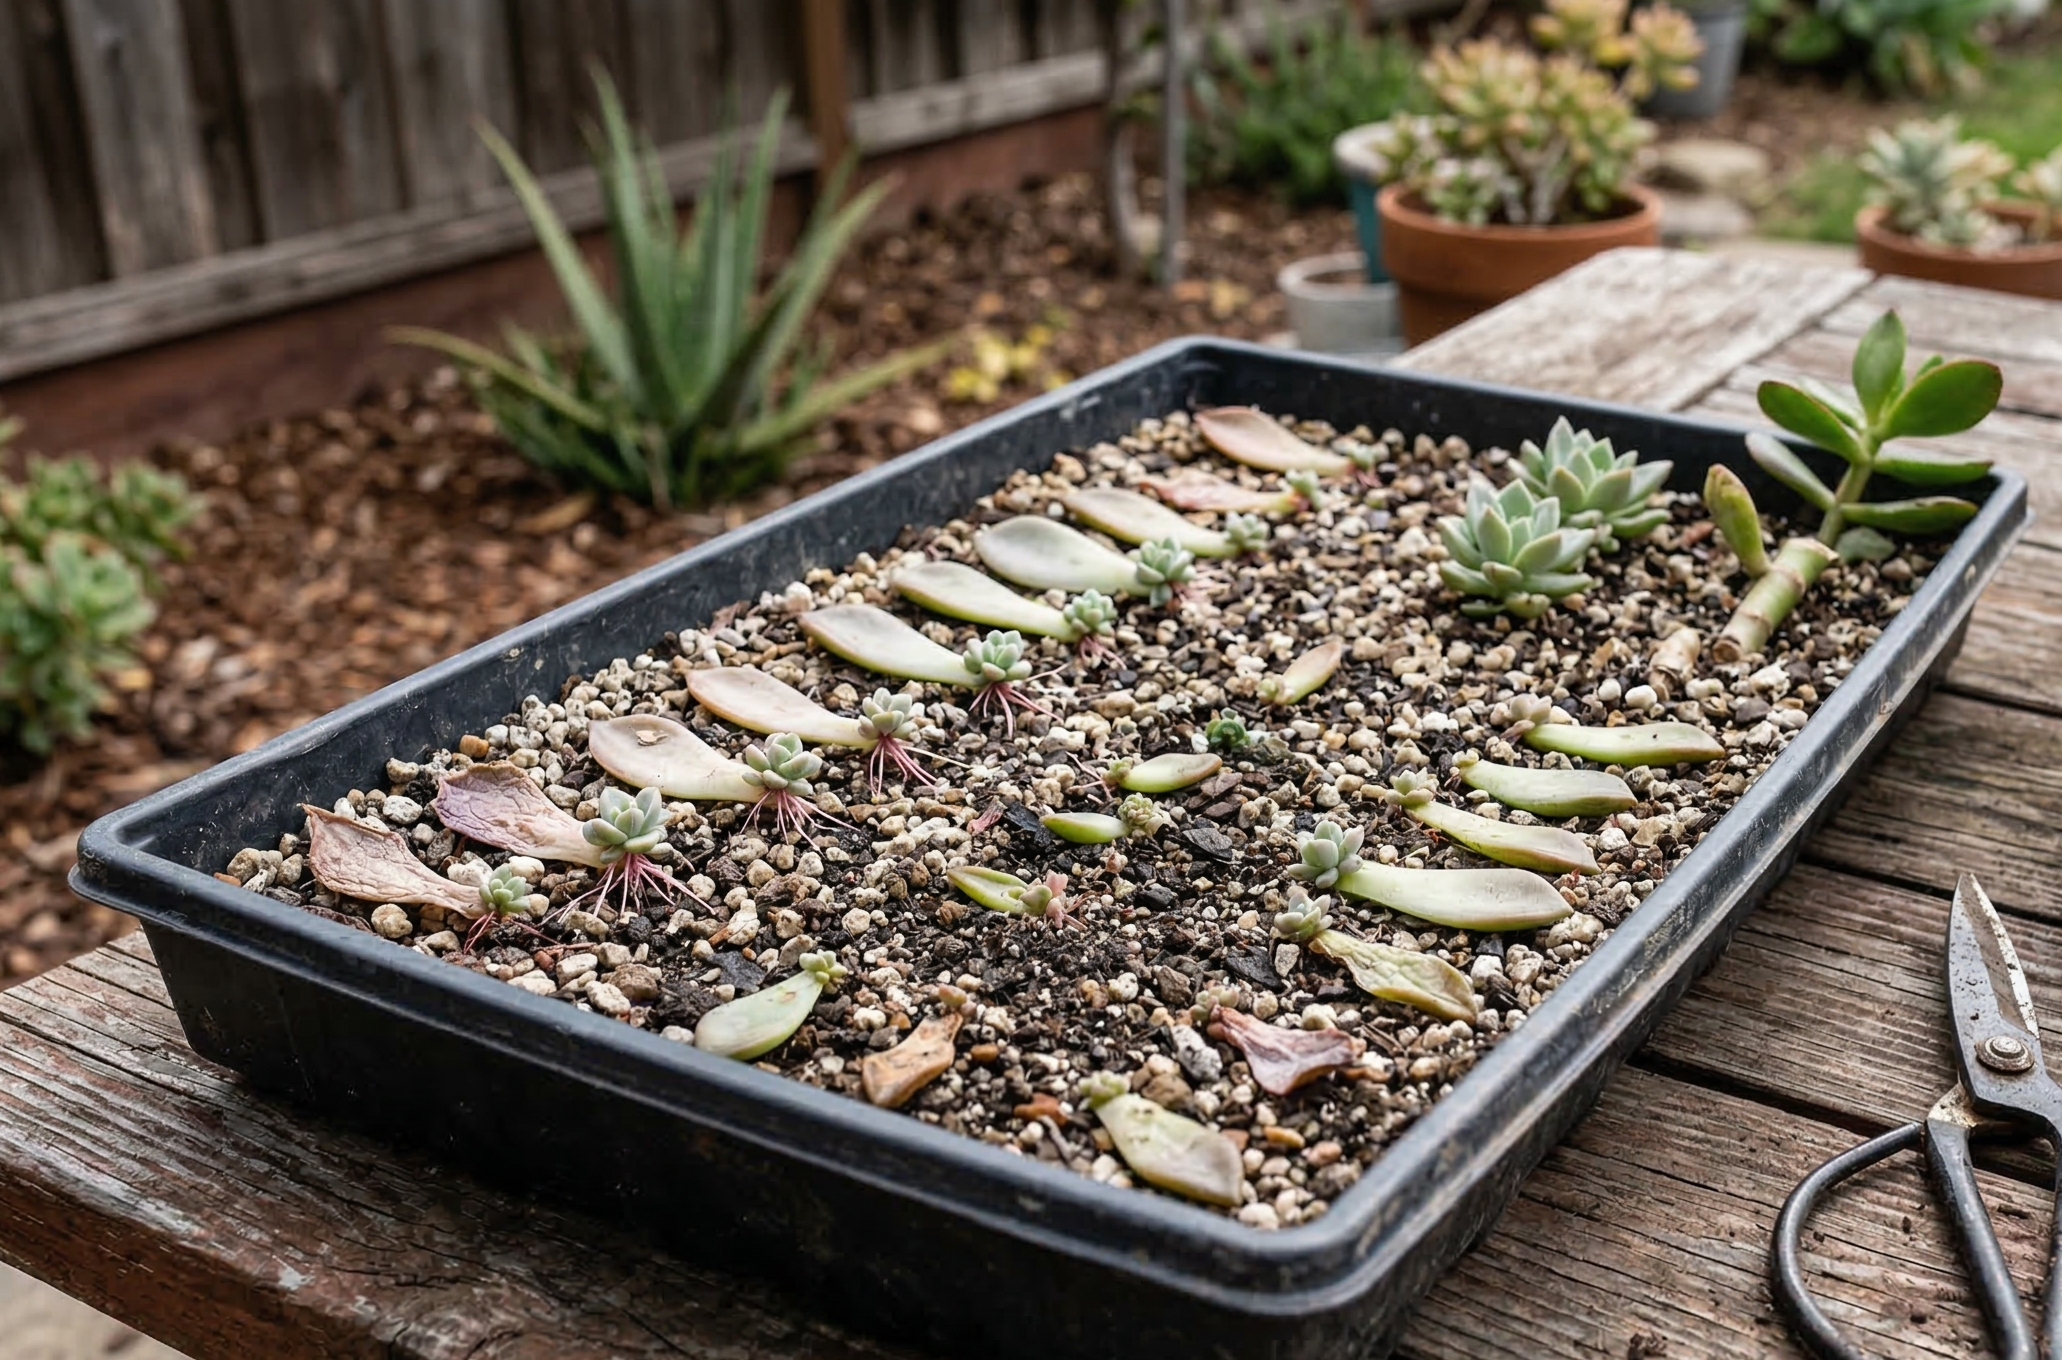
Step 3: Place on propagation medium. Set the callused leaves on the surface of a shallow tray filled with slightly moist propagation mix. A good mix is 50 percent perlite and 50 percent coconut coir, or straight pumice. Do NOT bury the leaves. Simply lay them on top of the medium with the callused end touching or barely resting on the surface.
Step 4: Provide light and minimal moisture. Place the tray in bright, indirect light (not harsh direct sun, which will dehydrate the leaves before they can root). Mist the soil surface lightly every 3 to 5 days, just enough to keep it barely damp, not wet. In Santa Cruz's coastal humidity, you may need to mist less frequently than guides written for drier climates suggest. Err on the side of too dry rather than too wet.
Step 5: Wait. This is the hard part. New roots typically appear from the callused end in 2 to 4 weeks. Tiny new rosettes emerge from the leaf base in 4 to 8 weeks. Some leaves root quickly, some take months, and some never produce a plant at all. A success rate of 50 to 70 percent is normal.
Step 6: Transition to individual pots. Once the new plantlet has developed its own root system and a visible rosette (even a tiny one), and the mother leaf has shriveled and dried, you can gently pot the plantlet into its own small container with succulent soil mix. Water sparingly and increase sun exposure gradually over the next few weeks.
How Do You Propagate Succulents from Stem Cuttings?
Stem cutting propagation is faster and more reliable than leaf propagation for many species, particularly those that form branching, multi-stemmed plants.
Best candidates for stem cuttings: Aeonium (the best method for this genus), Crassula ovata (jade plant), Sedum (upright types), Kalanchoe, Senecio, Portulacaria (elephant bush), and Euphorbia (with caution due to toxic sap).
Step-by-Step Stem Cutting Propagation
Step 1: Take the cutting. Using a clean, sharp knife or pruning shears, cut a stem section 3 to 6 inches long. For rosette-forming species like Aeonium, cut the stem below the rosette head, leaving 2 to 3 inches of bare stem below the leaf cluster. For branching species like jade plant, take a section with at least 2 to 3 leaf nodes.
Step 2: Remove lower leaves. Strip leaves from the bottom 1 to 2 inches of the stem to create a clear section for rooting. These removed leaves can be used for leaf propagation if the species responds to that method.
Step 3: Callus the cut end. Place the cutting upright in an empty container or jar (so the cut end is exposed to air, not touching any surface) in a bright, dry location out of direct sun. Allow the cut to callus for 3 to 7 days. In our coastal humidity, longer callusing times are safer. The cut surface should look dry and slightly sealed, not moist or green.
UC Master Gardener propagation guides stress that skipping the callusing step is the single most common reason succulent cuttings fail. In humid coastal conditions, uncallused cuts are an open invitation for Pythium, Phytophthora, and other water mold pathogens.
Step 4: Plant the cutting. Insert the callused stem end 1 to 2 inches deep into dry or barely moist succulent soil mix. The cutting should stand upright on its own. If it wobbles, insert it deeper or use a small stake for support.
Step 5: Wait before watering. Do not water for the first 7 to 10 days after planting. This gives the cutting time to begin producing root initials in dry conditions, which encourages downward root growth. After the initial dry period, begin watering sparingly, allowing the soil to dry completely between waterings.
Step 6: Monitor for rooting. New root growth typically begins in 2 to 4 weeks. You can check by gently tugging on the cutting; if you feel resistance, roots are forming. New leaf growth from the top of the cutting is another sign of successful rooting. Do not disturb the cutting unnecessarily.
Aeonium Propagation: A Special Case
Aeoniums are the stars of stem cutting propagation. Their thick, woody stems root so readily that the process is almost foolproof. In fact, Aeonium is one of the few genera where a bare stem (with the rosette removed) will often sprout multiple new rosettes from dormant buds along the stem, giving you both the original rosette cutting and new growth from the parent.
To propagate Aeonium: 1. Cut a rosette head with 3 to 4 inches of stem 2. Let it callus for 3 to 5 days 3. Push the stem into dry soil 4. Wait 10 days, then water lightly 5. Roots form in 2 to 3 weeks; new growth visible within a month
The beheaded parent stem will usually sprout 2 to 5 new rosette heads from buds just below the cut, resulting in a bushier, multi-headed plant. This is actually a recommended technique for improving the form of leggy Aeonium.
How Do You Propagate Succulents by Division?
Division is the process of separating a mature plant into two or more pieces, each with its own root system. It is the most reliable propagation method because each division is already a rooted, independent plant.
Best candidates for division: Agave (pups), Sempervivum (chicks), Aloe (offsets), some Dudleya (clustering species), Sedum (spreading types), and Haworthia (offsets).
Dividing Agave Pups
Agave produce offsets (pups) from underground rhizomes. These appear as small rosettes emerging from the soil near the base of the parent plant.
Wait until the pup is at least one-third the size of the parent (rushing this produces weak divisions)
Carefully dig around the pup to expose its connection to the parent
Use a sharp knife to cut the rhizome connecting the pup to the parent
Lift the pup, ideally with some roots intact
Let the cut surface callus for 3 to 5 days
Plant in well-drained soil at the same depth it was growing
Wait a week before watering, then water sparingly until new growth appears
Dividing Sempervivum Chicks
Sempervivum produce chicks (small rosettes) on short runners extending from the mother plant. These are among the easiest succulents to divide.
Wait until the chick has developed its own small root system (visible when you gently lift the runner)
Cut or snap the runner connecting the chick to the mother
Replant the chick immediately in well-drained soil, pressing it gently into the surface
Water lightly and keep in bright indirect light for a week
Sempervivum chicks establish quickly and can be treated as mature plants within a few weeks
Dividing Aloe Offsets
Aloe species (particularly Aloe arborescens and A. vera) produce abundant offsets around the base of the parent plant.
Wait until offsets are at least 4 to 6 inches tall with their own leaves
Remove the parent from its pot or dig around the offset in the ground
Separate the offset from the parent, cutting the connecting root if necessary
Let any cut surfaces callus for 2 to 3 days
Plant in succulent soil mix and water after one week
Aloe offsets root quickly and grow vigorously once established
Can You Grow Succulents from Seed?
Yes, but seed propagation is the slowest method and is primarily used by serious collectors and native plant nurseries. It is the only practical way to propagate species that do not produce offsets or root from cuttings (some Dudleya, certain rare species).
The basics of succulent seed propagation:
Sow seeds on the surface of a barely moist, fine-grained mineral mix (equal parts fine pumice and perlite works well)
Do not cover seeds, as most succulent seeds need light to germinate
Maintain consistent, light moisture (a clear plastic cover helps retain humidity during germination)
Provide bright indirect light and temperatures of 65 to 75 degrees Fahrenheit
Germination time varies wildly by species: some in 1 to 2 weeks, others in 2 to 3 months
Seedlings are tiny and grow very slowly, taking months to reach transplantable size
In coastal California, start seeds indoors or in a sheltered location to control moisture levels
Species worth growing from seed: Dudleya (if you want to propagate native species without disturbing wild populations), rare Echeveria and Agave varieties, and species not readily available as plants from nurseries.
Practical recommendation: Unless you specifically enjoy the challenge of growing from seed, stick with leaf, stem, and division methods. They are faster, more reliable, and produce garden-ready plants in a fraction of the time.
What Rooting Medium Works Best in Coastal California?
The choice of rooting medium matters more on the coast than in drier climates because our humidity slows evaporation and increases rot risk. For a deeper look at soil and drainage principles for established plants, see our succulent soil and drainage guide.
Recommended propagation media for coastal Santa Cruz:
Straight pumice: Excellent drainage, virtually no moisture retention, sterile. The best choice for species that are rot-prone (Echeveria, Dudleya). Water pooling is nearly impossible.
50/50 perlite and coconut coir: Good balance of drainage and slight moisture retention. Works well for most leaf and stem cuttings. Coconut coir is preferable to peat moss because it resists compaction and does not become hydrophobic when dry.
Coarse sand: Acceptable but heavier than pumice or perlite. Works well for larger cuttings and divisions that need stability.
Straight perlite: Very fast-draining but lightweight (blows around in wind and floats during watering). Best used in trays that are sheltered from wind.
What to avoid:
Standard potting soil (too moisture-retentive for propagation in humid conditions)
Fine sand (compacts and holds water)
Garden soil (unsterile, may contain pathogens)
Vermiculite (holds too much water)
How Do You Care for Newly Propagated Succulents?
The transition from cutting to established plant is the most vulnerable phase. Here is how to get through it successfully in our climate. Once your new plants are established, our drought-tolerant succulents guide covers long-term care for water-wise gardening.
Light: Bright, indirect light for the first 2 to 4 weeks. Direct sun can dehydrate cuttings and leaves before they have roots to replace lost moisture. After roots are established, gradually increase sun exposure over 1 to 2 weeks.
Water: Less than you think. For leaf propagation, light misting of the soil surface every 3 to 5 days is sufficient. For stem cuttings, no water for the first week to 10 days, then light watering when the soil is completely dry. For divisions with intact roots, water lightly after planting and then let the soil dry before watering again.
Temperature: 60 to 80 degrees Fahrenheit is ideal. Our spring and summer temperatures are generally perfect. Avoid propagating during cold snaps (below 50 degrees) or heat waves (above 90 degrees).
Air circulation: This is critical in our coastal humidity. Good airflow around propagation trays reduces fungal disease risk significantly. The UC IPM guide to houseplant problems cites poor air circulation and overwatering as leading causes of root rot in succulents. A sheltered outdoor location with a breeze is better than a stagnant indoor spot.
Fertilizer: Do not fertilize new propagations. Wait until the plant is well-rooted and showing active new growth (typically 2 to 3 months after the cutting or leaf was taken). Even then, use a very dilute fertilizer at one-quarter strength.
Potting up: Move newly rooted propagations into individual small pots (2 to 3 inch) when they have a visible root system and at least a few new leaves. Use the same fast-draining succulent soil mix you would use for mature plants. Gradually introduce them to their permanent garden location over the following weeks.
What Are Common Propagation Mistakes in Coastal California?
Watering too soon. This is the number one mistake. Cuttings and leaves need to callus and begin rooting in dry conditions. Watering before callusing introduces rot pathogens directly into open wounds.
Skipping the callusing step. Related to the above. In our humid coastal climate, callusing takes longer than in dry inland areas. Give cuttings an extra day or two beyond what most guides recommend. The callus should be visibly dry and firm before planting.
Using soil that is too moisture-retentive. Standard potting mix, even cactus mix from the garden center, holds too much water for propagation in fog-belt conditions. Switch to a mineral-heavy medium (pumice, perlite) for propagation.
Propagating in winter. Cool temperatures, high humidity, and low light make winter propagation frustrating on the coast. Wait for spring unless you have a warm, well-lit indoor space with good ventilation.
Taking cuttings from dormant plants. Propagation success drops significantly when the parent plant is dormant. Time your cuttings to the active growth period of each species: spring/summer for most, fall/winter for Aeonium and Dudleya.
Direct sun on cuttings. New cuttings and leaf propagations need bright light but not direct sun, which can burn and dehydrate them before roots form. Indirect light or morning-only sun is ideal during the rooting phase. If you notice signs of stress or disease on your plants, our succulent pests and diseases guide can help you identify and treat common problems.
Frequently Asked Questions
How long does it take to propagate succulents from leaves?
The full process from leaf removal to independent, potted plant typically takes 2 to 4 months. Roots usually appear in 2 to 4 weeks, tiny new rosettes in 4 to 8 weeks, and the mother leaf fully shrivels and detaches in 8 to 16 weeks. Some species are faster (Sedum can root in days), while others are slower (some Echeveria take several months). In our coastal climate, expect timelines on the longer end due to cooler temperatures and lower light levels compared to inland areas.
Why are my succulent leaf propagations rotting instead of rooting?
Rot during propagation in coastal California is almost always caused by too much moisture. Check three things: Are you watering too frequently (the soil should barely be damp, not wet)? Did you skip or shorten the callusing step (allow 3 to 5 days minimum in our humidity)? Is your propagation medium too moisture-retentive (switch to pumice or a perlite-heavy mix)? Also ensure good air circulation around your propagation tray.
Can I propagate succulents in water?
Water propagation (placing a cutting with its stem submerged in water) works for some species, particularly Crassula and some Sedum. However, it is generally less reliable than soil-based methods for most succulents, and the roots produced in water are different from soil roots and must adapt when the plant is eventually potted. In our humid coastal climate, the moisture-related risks of water propagation are amplified. Soil-based methods are recommended.
Do I need rooting hormone for succulent propagation?
No. Succulents produce their own root-initiating hormones in sufficient quantities for successful propagation without supplemental rooting hormone. UC Master Gardener resources confirm that rooting hormone is not necessary for most succulent propagation. It does no harm if you want to try it, but do not expect dramatically different results. The keys to success are proper callusing, appropriate moisture levels, and timing rather than hormone application.
Can I root Aeonium cuttings in summer when they are dormant?
It is possible but not ideal. Aeonium are dormant in summer and have less hormonal drive to produce new roots during this period. Cuttings taken in summer may sit for weeks without rooting, increasing the risk of desiccation or rot. For best results, take Aeonium cuttings in early fall (September) when they break dormancy and begin active growth, or in spring (March through April). If you must take a summer cutting (a branch broke, for example), callus it and place it in dry soil in a shaded spot until fall, when it will root more readily.
How many new plants can I get from one succulent?
It depends on the species and method. A large Echeveria rosette can yield 20 or more leaves for propagation (with a typical 50 to 70 percent success rate, that is 10 to 15 new plants). An Aeonium stem cutting produces one new plant, but the beheaded parent typically sprouts 2 to 5 new rosettes. A mature Sempervivum can produce a dozen or more chicks in a single season. Agave pups vary, with some species producing many offsets and others only a few over their lifetime.
Want to grow your skills along with your garden? Visit our Garden Toolkit for free how-to guides, seasonal reminders, and California-specific growing tips delivered to your inbox.