

Growing Radishes in Santa Cruz County: The Fastest Vegetable You Can Grow


A few of the product links in this guide are affiliate links. If you buy through one, Ambitious Harvest may earn a small commission at no extra cost to you, which helps keep these guides free. We only point to gear we would use in our own Santa Cruz garden. As an Amazon Associate, we earn from Read our full disclosure.
Radishes are the instant gratification of vegetable gardening. From seed to harvest in as little as three weeks, they're perfect for impatient gardeners, kids learning to grow food, and anyone who wants quick results while waiting for slower crops to mature. In Santa Cruz County's mild climate, you can grow radishes nearly year-round with a little timing know-how.
These crunchy, peppery roots ask very little: loose soil, consistent water, and cool weather. In return, they deliver fresh flavor that grocery store radishes can't match. A homegrown radish, pulled from the soil minutes before eating, has a crisp snap and bright, clean taste that fades quickly after harvest. Once you've grown your own, the rubbery specimens from the supermarket will never seem appealing again.
This guide covers everything you need to know to grow radishes successfully in Santa Cruz County, from variety selection and planting timing to troubleshooting common problems. Whether you're tucking them between slower crops or dedicating a bed to succession planting, radishes reward minimal effort with reliable harvests.
Why Do Radishes Grow So Well in Santa Cruz?
Santa Cruz County's Mediterranean climate suits radishes beautifully. Our mild winters allow fall-through-spring growing when radishes are at their best, and our coastal fog moderates summer temperatures enough that careful gardeners can grow them nearly year-round.
Radishes are cool-season crops that bolt (go to seed) in hot weather and develop harsh, woody roots when stressed by heat or drought. Our coastal influence gives us more radish-growing days than hotter inland California regions. Gardeners in Aptos, Capitola, and coastal Santa Cruz can often grow radishes through early summer, while inland gardeners in Watsonville and Scotts Valley should focus on spring and fall plantings.
The main challenge here isn't temperature but timing. Radishes mature so quickly that it's easy to plant too many at once and end up with more than you can eat before they become pithy. Succession planting (sowing small amounts every week or two) keeps harvests manageable and quality high.
What Are the Best Radish Varieties for Santa Cruz?
Radishes come in far more variety than the standard red globe at the grocery store. Different types vary in flavor, texture, size, and days to maturity, from quick spring radishes ready in three weeks to large storage radishes that take two months.
Quick Spring Radishes (20 to 30 days)
These fast-maturing varieties are ideal for succession planting and filling gaps between other crops.
Cherry Belle: The classic round red radish. Mild, crisp, and reliable. Ready in about 22 days. Excellent for beginners.
French Breakfast: Elongated red-and-white roots with mild flavor. Slightly slower than Cherry Belle (about 25 days) but less prone to becoming pithy. Elegant sliced on buttered bread.
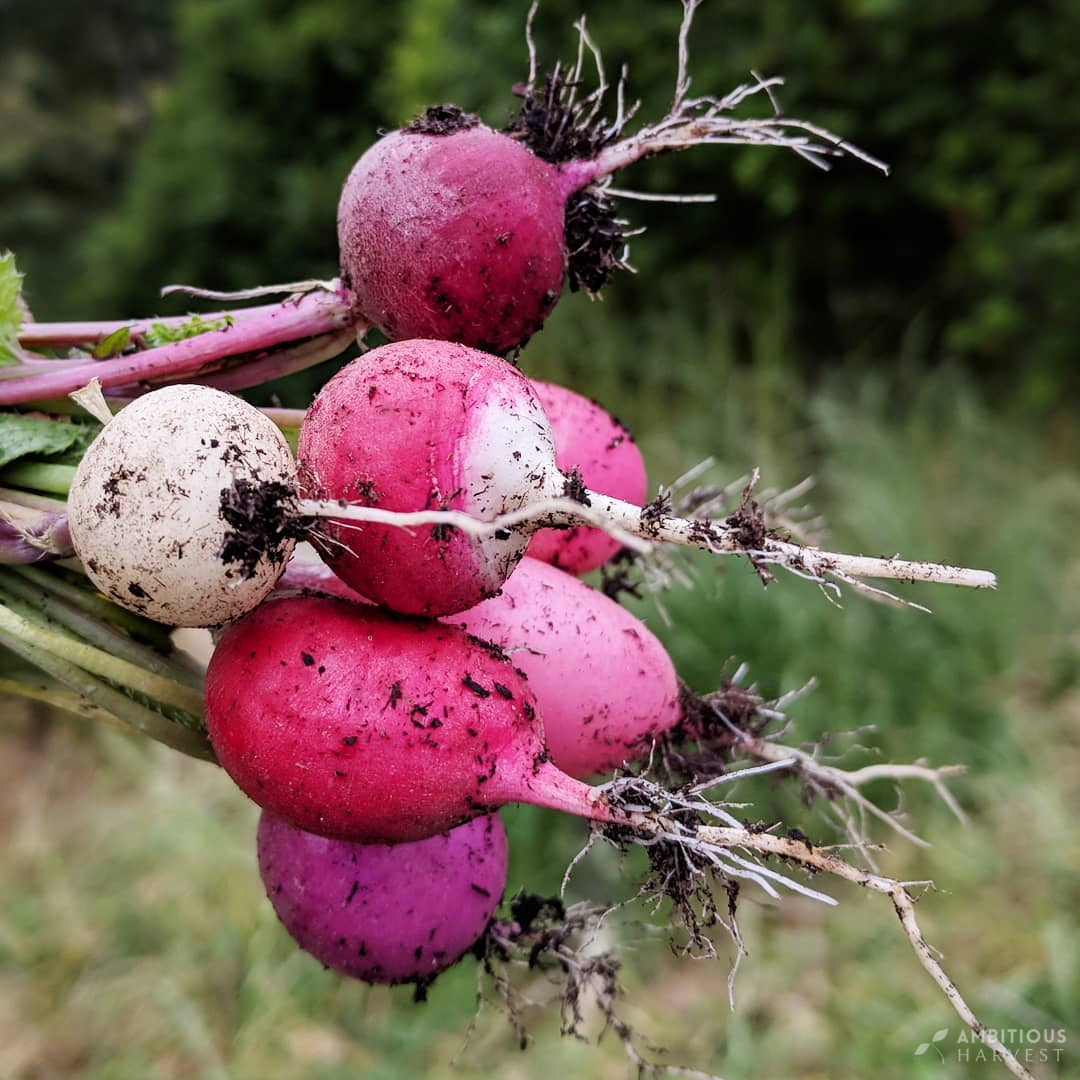
Easter Egg Mix: Produces radishes in white, pink, red, and purple from a single seed packet. Same growing requirements as other spring types. Fun for kids and beautiful in salads.
Sparkler: Red tops with white bottoms. Mild and crisp. About 25 days to maturity.
White Icicle: Long, tapered white roots rather than round. Milder flavor than red varieties. Takes slightly longer (about 30 days) and needs deeper loose soil.
Specialty and Storage Radishes (45 to 60+ days)
These larger radishes take longer but offer different flavors and extended storage.
Watermelon Radish: Green and white exterior hiding stunning magenta flesh inside. Mild, slightly sweet, with less bite than spring radishes. Takes 50 to 60 days. Best planted in fall for winter harvest. Slice thin to show off the color.
Black Spanish: Round or long roots with black skin and white flesh. Strong, peppery flavor. Good storage radish that keeps for months in the refrigerator. About 55 days.
Daikon: Large white Japanese radish used in Asian cooking. Milder than spring radishes, especially when cooked. Can grow 12 to 18 inches long. Needs deeply prepared soil. About 60 days. Excellent for fall planting.
Purple Plum: Purple skin, white flesh. Mild and crisp. About 25 to 30 days. Bridge between spring and storage types.
| Season | Best Varieties | Notes |
|---|---|---|
| Spring (Feb–Apr) | Cherry Belle, French Breakfast, Easter Egg | Fast-maturing varieties that perform well before weather warms |
| Summer (coastal only) | French Breakfast, White Icicle | Choose bolt-resistant types; plant in partial shade to reduce heat stress |
| Fall (Sept–Nov) | Watermelon, Daikon, Black Spanish, spring types | Best season for storage radishes; cooler soil improves flavor and texture |
| Winter (Dec–Jan) | Spring varieties in mild years | May need protection from heavy rain or prolonged cold snaps |
When Should You Plant Radishes in Santa Cruz?
Timing is everything with radishes. They need cool weather to develop good flavor and texture, but soil warm enough for germination.
| Planting Window | Best For | Notes |
|---|---|---|
| February through April | Spring radishes | Prime radish season across the county; most reliable results |
| May through June | Coastal gardens only | Choose bolt-resistant varieties; expect mixed results inland as heat builds |
| July through August | Not recommended | Too hot for consistent results even along the coast; wait for fall |
| September through November | All types, including storage radishes | Excellent fall planting window; best season for Watermelon and Daikon types |
| December through January | Spring varieties | Possible in mild winters; may require protection from heavy rain |
Coastal gardens (Aptos, Capitola, Santa Cruz): You have the longest radish season. Spring planting from February through May works well, and fall planting from September through November is excellent. Summer planting is possible in foggy microclimates with afternoon shade.
Inland gardens (Scotts Valley, Watsonville, San Lorenzo Valley): Focus on spring (February through April) and fall (September through October). Summer is generally too hot for quality radishes.
Succession Planting
The key to enjoying radishes without waste is succession planting: sowing small amounts frequently rather than everything at once.
How to succession plant radishes:
Plant a short row (2 to 3 feet) or a small block every 7 to 10 days
Stop planting when weather gets hot (typically May inland, June on coast)
Resume in early fall when temperatures cool
Harvest each planting when roots reach usable size (don't wait)
A single planting of radishes is ready for about one week before quality declines. Succession planting ensures you always have radishes at their prime without overwhelming harvests.
How Do You Plant Radishes?
Radishes are among the easiest vegetables to grow from seed. Direct sowing works best; they don't transplant well.
Soil Preparation
Radishes develop their best roots in loose, well-drained soil free of rocks and debris. Compacted or rocky soil causes forked, misshapen roots.
Preparation steps:
Loosen soil to 6 to 8 inches deep for round varieties, 10 to 12 inches for long types like Daikon
Remove rocks and debris that can obstruct root growth
Add compost if soil is very sandy or heavy clay, but don't over-amend (radishes don't need rich soil)
Rake smooth to create a fine seedbed
Avoid freshly manured soil or beds recently amended with high-nitrogen fertilizer. Too much nitrogen produces lush tops and puny roots.
Sowing Seeds
Spacing and depth:
Plant seeds 1/2 inch deep
Space seeds about 1 inch apart in rows
Space rows 6 to 12 inches apart, or broadcast in wide beds
For wide beds, aim for about 2 inches between seeds in all directions
Planting tips:
Water the bed before planting if soil is dry
Press seeds gently into soil and cover
Water lightly after planting to settle soil
Seeds germinate in 3 to 7 days in warm soil, longer in cold soil
Thinning
This is the step most gardeners skip, and it's why many end up with small, disappointing radishes. Crowded radishes compete for space and never develop proper roots.
When to thin: When seedlings have their first true leaves (the second set of leaves after the initial seed leaves)
How much space: Thin to 2 inches apart for small round varieties, 3 to 4 inches for larger types like Daikon
What to do with thinnings: Eat them. Radish thinnings make excellent microgreens for salads and sandwiches. The leaves and tiny roots are both edible and flavorful.
How Do You Care for Radishes After Planting?
Radishes need very little attention once planted, but consistent care during their short growing cycle ensures the best results.
Watering
Consistent moisture is critical for quality radishes. Uneven watering causes the most common problems: cracked roots, woody texture, and overly hot flavor.
Watering guidelines:
Keep soil consistently moist but not waterlogged
Water deeply when the top inch of soil dries
Don't let soil dry out completely, then flood it (causes cracking)
Mulch lightly to retain moisture in warm weather
Signs of watering problems:
Cracked or split roots: inconsistent moisture
Very hot, pungent flavor: drought stress
Soft, mushy roots: overwatering or poor drainage
Fertilizing
Radishes generally don't need fertilizer if planted in reasonably good soil. Their short growing cycle doesn't give them time to deplete soil nutrients.
When fertilizer helps:
Very poor, sandy soil with no organic matter
Successive plantings in the same bed all season
What to use: Light application of balanced fertilizer or compost tea. Avoid high-nitrogen fertilizers, which produce leafy tops at the expense of roots.
Mulching
Light mulch (1 to 2 inches of straw or shredded leaves) helps retain moisture and moderate soil temperature, especially important for spring and fall plantings when weather can swing between warm and cool.
Keep mulch light enough that emerging seedlings can push through. You can add mulch after seedlings are established if you didn't apply it at planting.
When and How Should You Harvest Radishes?
Harvest timing affects radish quality more than almost any other factor. Radishes are best picked young and eaten promptly.
When to Harvest
Spring radishes: Ready 20 to 30 days after planting, depending on variety. Harvest when roots are about 1 inch in diameter (smaller for some varieties). Check by gently brushing soil away from the top of a root to gauge size.
Storage radishes: Ready 45 to 60+ days after planting. These can stay in the ground longer without becoming woody, but harvest before hard frost.
Signs radishes are ready:
Root tops visible pushing up from soil
Shoulders feel firm when pressed
Test pull one to check size
Signs you've waited too long:
Cracked skin
Pithy, spongy texture (cut one open to check)
Flower stalk emerging from center (bolting)
Overly hot, harsh flavor
When in doubt, pull them younger rather than older. Small radishes are better than woody ones.
How to Harvest
Water the bed if soil is dry (makes pulling easier)
Grasp leaves near the root and pull straight up
Brush off loose soil
Twist or cut off greens promptly (they draw moisture from roots)
Rinse roots and refrigerate
Storage
Fresh radishes stored properly keep 1 to 2 weeks in the refrigerator:
Remove greens immediately after harvest
Rinse roots and dry thoroughly
Store in a plastic bag or container with a damp paper towel
Keep in the crisper drawer
Storage radishes (Watermelon, Black Spanish, Daikon) keep 2 to 3 months when stored properly in the refrigerator or a cool root cellar.
Radish greens are edible and nutritious. Use them within a day or two of harvest, sautéed like other greens or added raw to salads.
What Are Common Radish Problems?
| Problem | Likely Cause | Solution |
|---|---|---|
| All leaves, tiny roots | Excess nitrogen; too much shade; seedlings left crowded | Plant in leaner soil, provide full sun, and thin seedlings properly |
| Cracked or split roots | Inconsistent watering | Water consistently; avoid letting soil dry out completely and then flooding |
| Pithy or woody texture | Roots left in the ground too long; heat stress | Harvest promptly and prioritize planting during cooler seasons |
| Very hot, harsh flavor | Drought stress; heat stress; overmaturity | Water consistently, plant in cooler weather, and harvest at a younger stage |
| Forked or misshapen roots | Rocky soil; recent heavy amendments | Prepare soil deeply, remove rocks, and avoid chunky or undecomposed compost |
| Bolting (flower stalk) | Heat, long days, or general plant stress | Plant in cool seasons, succession sow, and maintain even moisture |
| Slow germination | Cold soil; old seed | Wait for warmer soil temperatures and use fresh seed |
Pests
Flea beetles: Tiny jumping beetles that chew small holes in leaves. Damage is usually cosmetic and doesn't affect roots. Row cover prevents damage. Healthy plants outgrow moderate damage.
Aphids: May cluster on leaves, especially in spring. Spray off with water. Rarely a serious problem for quick-maturing radishes.
Cabbage root maggots: Tunnel into roots, leaving brown scars. More common in some years than others. Rotate planting locations. Row cover at planting prevents egg-laying.
Slugs and snails: Feed on seedlings and leaves, especially in wet weather. Handpick, use iron phosphate bait, or trap with beer traps.
Diseases
Radishes grow so quickly that diseases rarely have time to become serious problems. Good drainage, crop rotation, and avoiding overhead watering prevent most issues.
Downy mildew: Yellow patches on leaves with grayish fuzz underneath. More common in cool, wet weather. Improve air circulation; avoid overhead watering.
Root rot: Soft, mushy roots. Caused by overwatering or poor drainage. Improve drainage; water appropriately.
What Should You Plant Alongside Radishes?
Radishes make excellent companions for other vegetables, serving multiple roles in the garden.
Radishes as Companions
Marker crop: Radishes germinate quickly and can mark rows of slower-germinating seeds like carrots and parsnips. By the time you harvest the radishes, the slow crops are established and visible.
Trap crop: Some gardeners plant radishes to attract flea beetles away from more valuable brassicas. The radishes take the damage while broccoli or cabbage grows unmolested.
Space fillers: Quick-maturing radishes can occupy space between transplants of slower crops. They're harvested before the main crop needs the room.
Good Companions for Radishes
Carrots: Classic pairing. Radishes mark the row and are harvested before carrots need space.
Lettuce: Similar growing conditions; radishes mature and clear out as lettuce expands.
Peas and beans: Radishes grow in the gaps while legumes establish.
Tomatoes and peppers: Plant radishes around transplants; harvested before main crops fill in.
What to Avoid
Other brassicas in the same spot repeatedly: Rotating away from the cabbage family prevents disease and pest buildup.
Hyssop: Often listed as a poor companion, though evidence is mostly anecdotal.
How Can You Use Radishes in the Kitchen?
Homegrown radishes are versatile beyond the typical salad garnish.
Fresh Uses
Sliced raw: Classic preparation for salads, tacos, and grain bowls. Slice thin for delicate texture or into wedges for crunch.
With butter and salt: A traditional French preparation. Spread good butter on fresh radishes, sprinkle with flaky salt. Simple and surprisingly satisfying.
Quick pickle: Slice radishes thin, cover with rice vinegar and a pinch of sugar and salt. Ready in 30 minutes. Excellent on sandwiches, tacos, and rice bowls.
Crudité: Serve whole or halved with dips. The peppery bite cuts through creamy dips.
Cooked Uses
Cooking transforms radishes, mellowing their pepperiness and bringing out unexpected sweetness.
Roasted: Halve or quarter radishes, toss with oil and salt, roast at 400°F until tender and slightly caramelized (about 20 minutes). They taste almost like roasted turnips.
Sautéed: Slice and sauté in butter until just tender. Finish with herbs. A quick side dish.
In soups and stews: Add sliced radishes to Asian-style soups or braises. Daikon is traditional in many Japanese and Korean dishes.
Braised with greens: Cook radishes and their greens together with garlic and a splash of broth. The greens wilt while the roots soften.
Using Radish Greens
Don't throw away the tops. Radish greens are edible, nutritious, and have a pleasant, slightly peppery flavor.
Add young leaves to salads
Sauté with garlic like other greens
Blend into pesto (mix with basil or use alone)
Add to soups and stir-fries
Use greens within a day or two of harvest while they're still fresh and crisp.
Where Can You Find Local Radish Growing Resources?
Seeds and supplies:
Renee's Garden Seeds (Felton): excellent radish variety selection bred for home gardens
Mountain Feed & Farm Supply (Ben Lomond): organic seeds and supplies
San Lorenzo Garden Center (Santa Cruz): seeds and transplants seasonally
Peaceful Valley Farm Supply: extensive seed selection online
Local growing advice:
UC Master Gardeners of Monterey and Santa Cruz Counties: free gardening advice
Check our Garden Events Calendar for seed swaps, workshops, and other gardening events.
Frequently Asked Questions About Growing Radishes
When is the best time to plant radishes in Santa Cruz County?
The best planting times are February through April (spring) and September through November (fall). Coastal gardeners can extend the season into May and sometimes early June. Winter planting is possible in mild years but may require protection from heavy rain. Summer planting (July through August) is generally not recommended as radishes bolt and become harsh-flavored in heat.
Why are my radishes all leaves and no roots?
This usually indicates too much nitrogen (from fresh manure or heavy fertilization), too little sun (radishes need full sun), or overcrowding (thin seedlings to 2 inches apart). Plant in leaner soil, ensure at least 6 hours of direct sun, and thin seedlings promptly.
Why are my radishes cracked or split?
Inconsistent watering causes cracking. When soil dries out and then receives heavy water, radishes grow rapidly and split. Keep soil consistently moist throughout the growing period. Mulch helps maintain even moisture.
How do I know when radishes are ready to harvest?
Most spring radishes are ready 20 to 30 days after planting when roots are about 1 inch in diameter. You can see the top of the root pushing up from the soil. Gently brush away soil to check size, or pull a test radish. Harvest promptly; waiting too long causes woody texture and harsh flavor.
Can I grow radishes in containers?
Yes, radishes do well in containers at least 6 inches deep (deeper for long varieties like Daikon). Use quality potting mix, keep consistently watered (containers dry faster than ground soil), and provide full sun. Quick-maturing varieties like Cherry Belle are ideal for containers.
Why do my radishes taste too hot or spicy?
Radishes develop harsh, overly peppery flavor from heat stress, drought stress, or being left in the ground too long. Plant in cool weather, water consistently, and harvest promptly when roots reach usable size. Younger radishes are generally milder than overmature ones.
What should I do with radish greens?
Eat them. Radish greens are nutritious and have a pleasant, slightly peppery flavor. Add young leaves to salads, sauté with garlic like other greens, or blend into pesto. Use within a day or two of harvest while still fresh.
How many radishes should I plant?
Start small and succession plant. A 3-foot row produces roughly 20 to 30 radishes, which is plenty for a week or two of eating. Plant a new short row every 7 to 10 days for continuous harvest. It's easy to plant too many at once and end up with more than you can use before quality declines.
Free Radish Growing Resources
Seasonal Planting Calendar: Month-by-month guide to planting vegetables in Santa Cruz County, including radish timing.
Vegetables by Season Chart: Quick reference for what to plant when in our climate.
Companion Planting Guide: Learn which plants grow well together.
Garden Troubleshooting Guide: Diagnose common vegetable garden problems.
Ready to Grow Your Own Radishes?
Radishes won't be the centerpiece of your harvest, but they might be the most satisfying. Three weeks from seed to table, minimal space required, almost foolproof in cool weather. They're the vegetable that makes you feel like a successful gardener while you're waiting for tomatoes to ripen.
Plant a short row this weekend. In a few weeks, you'll understand why homegrown radishes are worth the small effort. That first crisp, peppery bite, still cool from the soil, is a reminder of why we garden: to taste food at its best, grown in our own soil, harvested at its peak.
Then plant another row. And another. Once you discover the rhythm of succession planting radishes, you'll have fresh ones all season long.