

Drip Irrigation Setup for Santa Cruz County Gardens: A Complete Beginner's Guide
A few of the product links in this guide are affiliate links. If you buy through one, Ambitious Harvest may earn a small commission at no extra cost to you, which helps keep these guides free. We only point to gear we would use in our own Santa Cruz garden. As an Amazon Associate, we earn from Read our full disclosure.
If you're watering your Santa Cruz County vegetable garden with a hose or sprinkler, you're wasting water and making more work for yourself. Drip irrigation changes everything. It is one of the most impactful steps in water-wise gardening for California.
A well-designed drip system delivers water directly to plant roots, right where plants need it. No water lost to evaporation. No wet leaves inviting disease. No standing with a hose for twenty minutes every evening. Just efficient, consistent watering that keeps plants healthy through our long dry season.
Setting up drip irrigation sounds intimidating, but it's genuinely beginner-friendly. Most vegetable garden systems can be installed in an afternoon with basic tools. Once running, they require minimal maintenance and dramatically reduce your watering time and water bills.
This guide walks through everything you need to know: how drip irrigation works, what components you need, how to design and install a system, and how to adjust watering for Santa Cruz County's varied microclimates.
Why Does Drip Irrigation Make Sense in Santa Cruz County?
Water Efficiency
Drip irrigation uses 30 to 70 percent less water than sprinklers or hand watering. In a region with dry summers, periodic droughts, and increasing water costs, that efficiency matters.
Sprinkler systems and hand watering are only about 50-70% efficient, while drip irrigation can exceed 90% efficiency. The savings come from precision. Water goes directly to roots rather than spraying into the air (where much evaporates) or onto leaves and pathways (where it's wasted). You're watering plants, not weeds between rows.
Healthier Plants
Consistent, root-level watering produces healthier plants than the feast-or-famine cycle of hand watering. Plants stress less, grow more steadily, and produce better. Slow, steady watering at the root zone encourages deeper roots and less disease than frequent shallow watering from overhead sprinklers.
Keeping foliage dry also reduces disease. Powdery mildew, late blight, and other fungal problems thrive on wet leaves. Drip irrigation eliminates that issue entirely.
Time Savings
Once installed, drip irrigation runs itself. Add a timer (highly recommended) and you'll spend minutes per week on watering instead of hours. That time goes back to actually gardening: planting, harvesting, and enjoying your space.
Santa Cruz County Specifics
Our Mediterranean climate (wet winters, dry summers) makes drip irrigation particularly valuable. From roughly May through October, most gardens need regular irrigation. A drip system handles those months automatically while you adjust seasonally as rains return.
The varied microclimates across Santa Cruz County also mean watering needs differ significantly by location. A garden in foggy Aptos needs less water than one in sunny Boulder Creek. Drip irrigation with a timer lets you dial in exactly what your specific garden needs.
What Components Do You Need for Drip Irrigation?
Before buying anything, understand what the pieces do and how they fit together.
Water Source Connection
Your system starts at a water source, typically an outdoor faucet (hose bib).
Backflow preventer: Required by code in most areas. Prevents irrigation water from flowing backward into your drinking water supply. Install this first, directly on the faucet.
Filter: Screens out particles that would clog emitters. Essential for any drip system. Most filters have a mesh screen that needs periodic cleaning.
Pressure regulator: Reduces household water pressure (typically 40 to 80 psi) to the 20 to 30 psi that drip systems require. Without this, high pressure blows emitters off tubing and causes leaks. Most regulators are preset to 25 psi, which works well for vegetable gardens.
Timer (optional but highly recommended): Automates watering so you don't have to remember. Battery-operated timers attach directly to the faucet and cost $25 to $60. They're worth every penny.
Distribution Tubing
Mainline tubing (1/2 inch): The backbone of your system. Runs from the water source along or around your garden beds. Made of flexible polyethylene, typically black.
Drip tubing or drip tape: The tubing that actually waters plants. Has emitters built in at regular intervals (typically 6, 9, or 12 inches apart). Runs along plant rows.
1/4-inch tubing (micro tubing): Small-diameter tubing used to run water from mainline to individual plants or containers. Useful for irregular layouts.
Emitters
Emitters control how much water comes out at each point.
Inline emitters (built into drip tape/tubing): Pre-installed at regular intervals. Simplest option for vegetable rows. Common flow rates are 0.5, 1, or 2 gallons per hour (gph) per emitter. For most vegetable beds, low-flow emitters in the 0.5-1.0 gph range help water soak in instead of running off.
Point-source emitters: Individual emitters you punch into tubing wherever needed. Good for irregular spacing or plants with different water needs. Available in various flow rates.
Micro-sprayers and bubblers: Emit more water over a wider area. Useful for dense plantings or larger plants.
Fittings and Accessories
Connectors: Join tubing sections. Include straight connectors, elbows (90-degree turns), and tees (three-way splits).
End caps or figure-8 ends: Close off the end of tubing runs.
Hold-down stakes: Secure tubing to the ground.
Goof plugs: Seal holes if you punch one in the wrong place.
Punch tool: Makes clean holes in mainline tubing for inserting fittings or 1/4-inch tubing.
How Should You Choose a System: Kits vs. Custom?
Starter Kits
For beginners, a drip irrigation kit is the easiest starting point. Kits include compatible components sized to work together, eliminating guesswork about fittings and connections.
What to look for in a kit:
Backflow preventer, filter, and pressure regulator included
Enough mainline tubing for your garden size (measure first)
Drip tape or tubing with appropriate emitter spacing (6 to 12 inches for vegetables)
Assortment of fittings (tees, elbows, end caps)
Basic instructions
Kit limitations:
May not include a timer (worth adding)
Generic emitter spacing may not match your planting exactly
May need supplemental parts for complex layouts
Custom Systems
Once you understand the basics, assembling components individually offers more flexibility. You can choose exact emitter spacing, mix different emitter types, and design for irregular bed shapes.
Custom systems make sense for larger gardens, established layouts you know well, or specific needs like container irrigation or fruit trees.
Where Can You Buy Drip Irrigation Supplies in Santa Cruz County?
San Lorenzo Garden Center (235 River Street, Santa Cruz) carries drip irrigation kits and components. Staff can help with basic questions.
Mountain Feed & Farm Supply (9550 Highway 9, Ben Lomond) stocks irrigation supplies oriented toward small farms and serious home gardeners.
Hardware stores: Ace Hardware, Home Depot, and Lowe's carry basic drip irrigation kits and components. Selection varies by location.
Online: DripWorks (dripworks.com) and Drip Depot (dripdepot.com) offer extensive selections with detailed product information. Both ship quickly to California.
How Should You Design Your Drip System?
Good design makes installation easier and ensures even watering.
Sketch Your Garden
Draw your garden beds to approximate scale. Mark:
Location of water source (faucet)
Bed dimensions and shapes
Plant rows or planting areas
Any obstacles (paths, structures, trees)
Plan the Mainline Route
The mainline runs from your water source to your garden beds. Plan the most direct route that reaches all beds.
Key considerations:
Keep the mainline along bed edges or paths where it won't be disturbed
Plan for the mainline to loop around or run alongside beds, not through planting areas
Use elbows for turns and tees to branch to multiple beds
Bury the mainline 1 to 2 inches deep or secure with stakes to keep it in place
Plan Drip Lines Within Beds
Drip tubing or tape runs along plant rows within each bed.
Spacing guidelines for vegetables:
Wide rows or dense plantings (lettuce, greens, carrots, beets): Run drip lines 12 inches apart to cover the planting area.
Single rows (tomatoes, peppers, squash): One drip line per row, positioned 2 to 3 inches from plant stems.
Widely spaced plants (squash, melons): Individual emitters or short drip line sections at each plant.
| Soil type | Recommended emitter spacing | Notes |
|---|---|---|
| Sandy (drains quickly) | 6–9 inches between emitters | Water spreads less sideways; closer spacing provides more even moisture coverage |
| Loam | 9–12 inches between emitters | Good all-purpose spacing for most vegetable beds |
| Clay (holds water) | 12 inches or more | Water spreads farther; wider spacing helps avoid over-saturation |
Calculate Water Output
Understanding how much water your system delivers helps you set appropriate run times.
Example calculation:
A 20-foot drip line with 1 gph emitters spaced 12 inches apart has 20 emitters. Total output: 20 gallons per hour.
Running that line for 30 minutes delivers 10 gallons.
Compare this to your plants' needs to determine appropriate run times.
How Do You Install a Drip System Step by Step?
What You'll Need
Tools:
Scissors or tubing cutter
Punch tool (for mainline)
Screwdriver (for hose clamps, if used)
Measuring tape
Components:
Backflow preventer
Filter
Pressure regulator
Timer (recommended)
1/2-inch mainline tubing
Drip tape or 1/2-inch drip tubing with inline emitters
Fittings: connectors, elbows, tees as needed
End caps or figure-8 ends
Hold-down stakes
Goof plugs (for mistakes)
Step 1: Assemble the Head Assembly
Connect components to your faucet in this order:
Backflow preventer (attaches directly to faucet)
Timer (if using)
Filter
Pressure regulator
Adapter to connect to mainline tubing
Hand-tighten connections. Don't overtighten or you may crack plastic fittings. A small amount of Teflon tape on threads helps prevent leaks.
Step 2: Run the Mainline
Lay out the mainline tubing along your planned route. Don't cut yet. Let the tubing sit in the sun for 30 minutes to soften and straighten (cold tubing is stiff and coils).
Cut the mainline to length. Connect to the head assembly. Run along bed edges, using elbows for turns and tees where you need to branch.
Secure with hold-down stakes every 3 to 4 feet and at corners.
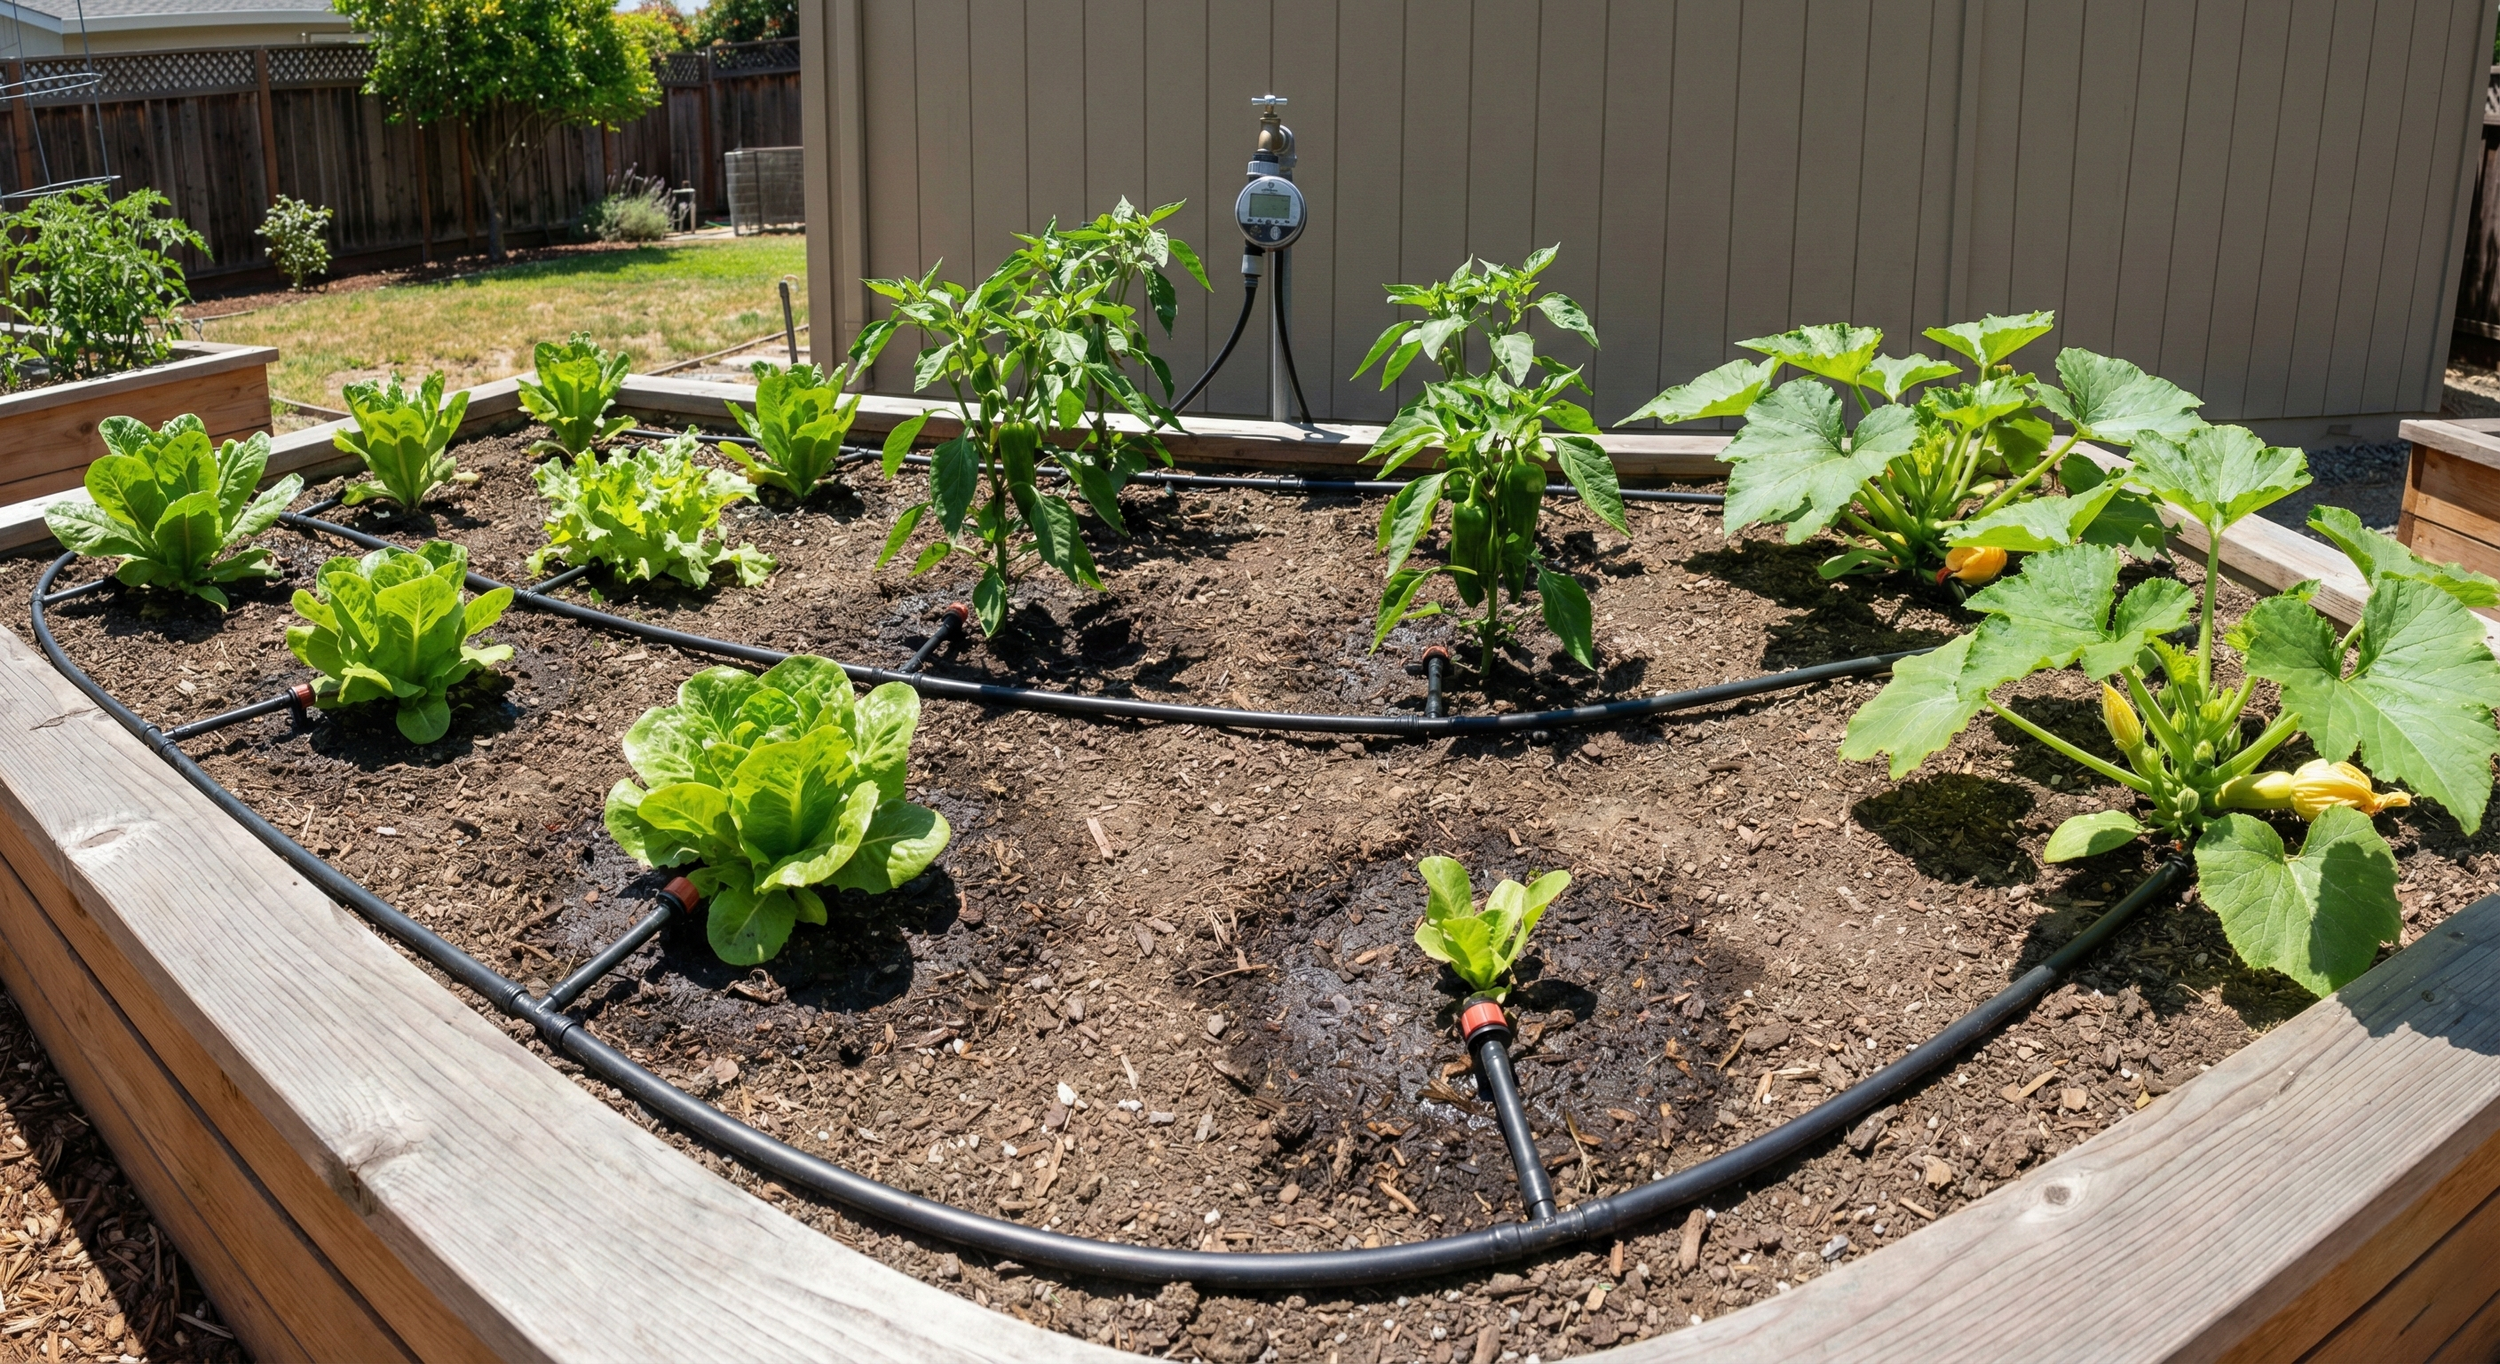
Step 3: Connect Drip Lines to Beds
At each bed, connect drip tubing or tape to the mainline.
For drip tape: Use a punch tool to make a hole in the mainline. Insert a barbed connector. Attach drip tape to the connector.
For 1/2-inch drip tubing with inline emitters: Use tee fittings to branch from the mainline, or punch and use barbed connectors.
Run drip lines along plant rows. Position emitters near plant stems but not directly against them (2 to 3 inches away is ideal).
Step 4: Close the Ends
Every drip line needs a closed end to maintain pressure.
End caps: Push onto the end of tubing. Permanent but can be removed for flushing.
Figure-8 ends: Fold the tubing end back on itself and secure with the figure-8 clip. Easy to open for flushing the system.
Step 5: Flush and Test
Before your first use, flush the system to clear any debris.
Open all end caps or figure-8 ends. Turn on the water. Let it run for 2 to 3 minutes until water runs clear from all lines.
Close the ends. Check every emitter to ensure water is flowing. Walk the system looking for:
Leaks at connections (tighten or add Teflon tape)
Emitters not flowing (may be clogged; replace or clean)
Dry spots where you need additional emitters
Wet spots indicating too much water in one area
Step 6: Secure and Mulch
Once the system works correctly:
Adjust tubing positions so emitters are near plant bases
Add additional stakes to secure tubing
Cover with 2 to 3 inches of mulch (hides tubing, reduces evaporation, protects plastic from UV degradation)
Leave end caps accessible for periodic flushing
How Should You Set Up Your Timer?
A timer transforms drip irrigation from convenient to effortless.
Basic Timer Programming
Most battery-operated timers allow you to set:
Start time(s): When watering begins. Early morning (5 to 7 AM) is ideal. Water has time to soak in before the heat of the day, and plants dry quickly, reducing disease risk.
Duration: How long the system runs. Start with the calculations from your design, then adjust based on plant response.
Frequency: How often the system runs. Daily, every other day, or specific days of the week.
| Season | Coastal beds (foggy) | Sunny mountains | Watsonville / sandy soils | Notes |
|---|---|---|---|---|
| Spring | Every 2–3 days, 20–30 min | Every 2 days, 25–35 min | Every 1–2 days, 20–30 min | Adjust based on soil checks; new transplants need more frequent watering |
| Summer | Every other day, 25–35 min | Daily, 35–45 min | Daily or twice daily, split 15–20 min cycles | Hot, dry weather and wind increase demand; coastal fog can significantly reduce it |
| Fall | Every 2–3 days, then weekly | Every 2–3 days with shorter runs | Every 2–3 days | Gradually reduce run times and frequency as seasonal rains return |
How Often Should You Water Based on Your Santa Cruz County Microclimate?
Our county's diverse conditions mean one watering schedule doesn't fit all. Use these guidelines as starting points, then adjust based on how your plants respond.
Coastal Areas (Aptos, Capitola, Live Oak, Santa Cruz)
Summer fog reduces evaporation and keeps temperatures moderate. Gardens here need less water than inland areas.
Summer schedule: Every other day, 25 to 35 minutes
Signs you're overwatering: Fungal problems, yellowing leaves, slow growth despite adequate fertility
Adjustment: Coastal gardens often do well with less frequent, longer waterings rather than daily short runs.
Sunny Mountain Areas (Boulder Creek, Ben Lomond Ridges, Bonny Doon)
Hot, dry conditions increase water needs significantly. These areas may need the most frequent irrigation in the county.
Summer schedule: Daily, 35 to 45 minutes
Signs you need more water: Wilting in afternoon heat (some wilting is normal; persistent wilting isn't), leaf curl, blossom drop
Adjustment: Consider running the system twice daily during heat waves (early morning and early evening) rather than one long run.
Under Redwoods and Shaded Areas
Shade and morning fog reduce evaporation. Gardens here need less water but may have soil drainage issues due to clay content.
Summer schedule: Every 2 to 3 days, 20 to 30 minutes
Adjustment: Check soil moisture before watering. Shaded areas stay moist longer. Overwatering in heavy soil leads to root rot. If your soil drains poorly, amending your California garden soil can improve both drainage and water retention.
Watsonville and Pajaro Valley
Warmer conditions and often sandier soils mean faster drainage and higher water needs.
Summer schedule: Daily, 30 to 40 minutes
Adjustment: Sandy soil benefits from more frequent, shorter waterings. Consider running twice daily for 15 to 20 minutes rather than once for 40 minutes.
General Adjustment Principles
Check soil moisture: Before assuming your schedule is right, check. Push your finger 2 to 3 inches into the soil. If it's moist, you don't need to water yet. If it's dry, you may need to increase frequency or duration.
Watch your plants: Wilting in early morning means the plant didn't recover overnight and needs more water. Wilting in afternoon heat is often normal and doesn't indicate a problem if the plant recovers by evening.
Adjust for weather: Hot spells and wind increase water needs. Cool, foggy periods decrease them. Override your timer as conditions change.
New transplants need more: Just-planted seedlings have small root systems and need more frequent watering until established (2 to 3 weeks). Consider hand-watering new transplants in addition to drip irrigation.
How Do You Maintain Your Drip System?
Drip irrigation is low-maintenance but not no-maintenance. A few seasonal tasks keep the system working efficiently.
Monthly During Growing Season
Check emitters: Walk your system while it's running. Look for:
Emitters not flowing (clogged)
Emitters spraying instead of dripping (damaged)
Wet spots indicating leaks
Dry spots indicating blocked lines
Clean the filter: Remove the filter screen and rinse under running water. If buildup is stubborn, soak in vinegar for an hour.
End of Season (Fall)
Flush the system: Open all end caps and run water through for 5 minutes to clear accumulated sediment.
Inspect tubing: Look for cracks, holes, or UV damage. Replace damaged sections.
Disconnect for winter: In Santa Cruz County, freeze damage is rare but possible in mountain areas. Disconnect the head assembly from the faucet and bring it indoors if you're in a frost-prone area.
Start of Season (Spring)
Reconnect and flush: Before planting, reconnect the system and flush all lines.
Check connections: Fittings can loosen over winter. Walk the system with water running and tighten any leaking connections.
Replace worn parts: Filters, pressure regulators, and tubing degrade over time. Replace as needed.
What Are the Most Common Drip Irrigation Problems?
No water at some emitters: Likely a clog. Try flushing the system. For individual clogged emitters, remove and soak in vinegar, or replace.
Uneven watering (some plants getting more than others): Check for elevation changes (water flows faster downhill). Consider pressure-compensating emitters for sloped gardens.
Leaks at connections: Tighten fittings. If still leaking, disconnect, add Teflon tape to threads, and reconnect. Replace cracked fittings.
Animals chewing tubing: Squirrels and other rodents sometimes chew drip tubing. Burying tubing under mulch helps. For persistent problems, consider using buried PVC for mainlines.
Tubing pops off fittings: This usually indicates excessive pressure. Check that your pressure regulator is working. Replace if pressure seems high.
What Else Should You Know About Drip Irrigation?
How much does a drip irrigation system cost?
A basic kit for a 100 to 200 square foot garden runs $50 to $100. Add $25 to $60 for a timer. Larger or custom systems cost more but are still reasonable: a comprehensive system for a 500 square foot garden might run $150 to $250 total. Compare this to the water savings and time savings, and most systems pay for themselves within a season or two.
Can I connect drip irrigation to my rain barrel?
Yes, with caveats. Rain barrels provide low pressure (gravity-fed), so you'll need to remove the pressure regulator. Choose emitters rated for low pressure (look for "gravity-fed compatible"). Flow rates will be lower than pressurized systems. Filter the water carefully since rain barrel water contains more debris.
How long do drip irrigation components last?
With proper care, mainline tubing lasts 10 to 15 years. Drip tape is less durable (3 to 7 years depending on sun exposure and water quality). Filters and pressure regulators may need replacement every 5 to 10 years. Timers vary by quality but typically last 3 to 7 years.
Can I use drip irrigation for containers?
Absolutely. Run 1/4-inch tubing from your mainline to each container. Use individual emitters rated for the container size. Containers dry out faster than ground beds, so they may need longer run times or twice-daily watering in summer.
Is drip irrigation worth it for a small garden?
Even small gardens benefit from drip irrigation. The time savings alone make it worthwhile. A 4x8 foot raised bed can be set up with drip irrigation for under $30 in parts, and you'll spend minutes per season on watering instead of daily hand watering.
How do I winterize my drip system in Santa Cruz County?
In most of the county, you don't need to fully winterize (freezing is rare). Simply turn off the system when regular rains arrive. In mountain areas where hard freezes occur, disconnect the head assembly (timer, filter, pressure regulator) and bring it indoors. Drain the mainline by opening end caps at the lowest point.
Can drip irrigation water lawns?
Drip irrigation isn't ideal for lawns (you'd need emitters every few inches). Use traditional sprinklers or consider replacing lawn with drought-tolerant alternatives. However, drip is excellent for watering trees and shrubs within a lawn area.
My water pressure is very low. Will drip irrigation still work?
Probably, but you'll need to plan for it. Low-pressure emitters work at 10 psi or less. Keep runs short to maintain pressure throughout. You may need to water sections separately if pressure is very low. Test your pressure with an inexpensive gauge before designing your system.
If you have heard that drip systems are wasteful, read why drip irrigation does not waste water.
Frequently Asked Questions
How much water does drip irrigation actually save?
Drip systems use roughly 30 to 70 percent less water than sprinklers or hand watering because the water goes straight to the roots. Keeping foliage dry also reduces disease and encourages deeper, healthier roots.
How should I set my schedule for my part of the county?
It depends on your microclimate. Coastal gardens often need watering only every other day for about 25 to 35 minutes thanks to the fog, while sunnier mountain and Watsonville sandy-soil gardens usually need a daily run of 30 to 45 minutes.
What maintenance keeps a drip system working well?
Clean the filter about once a month and flush the lines at the end of the season to clear sediment. With that simple care, components typically last anywhere from 5 to 15 years.
Where Can You Find Free Gardening Resources?
Water-Wise Gardening Guide - Comprehensive strategies for reducing water use including irrigation efficiency.
Seasonal Tasks Checklist - Year-round maintenance including seasonal drip system care.
Beginner Garden Setup Checklist - Complete setup guide including irrigation planning.
Know Your Microclimate Worksheet - Determine your local conditions to set appropriate watering schedules.
What Additional Resources Are Available?
Why Should You Get Started This Weekend?
Drip irrigation is one of the best investments you can make in your Santa Cruz County garden. The initial setup takes an afternoon. The ongoing maintenance takes minutes per month. And the benefits (water savings, healthier plants, time freedom) last for years.
Start with a basic kit for one bed. Once you see how it works, expand to cover your whole garden. By next summer, you'll wonder why you ever stood holding a hose.