

Keeping the Coop Dry: Mud, Mold, and Respiratory Health Through Santa Cruz Winters
Some links in this guide are affiliate links. If you buy through them, we may earn a small commission at no extra cost to you. Read our full disclosure.
Keeping the Coop Dry: Mud, Mold, and Respiratory Health Through Santa Cruz Winters
To keep a chicken coop dry through a Santa Cruz winter, focus on drainage and ventilation rather than sealing the coop tight. Slope and divert water away from the run, layer absorbent bedding, and keep high vents open year round. Damp bedding produces ammonia, and ammonia above roughly 25 ppm damages a bird's airways, so airflow matters more than warmth.
If you keep chickens, ducks, or geese anywhere along the Central Coast, the wet season is the single hardest stretch of the year for your coop. Our winters are not bitterly cold, which fools a lot of new flock keepers into thinking the cold-weather coop advice they read online does not apply here. It does, just in a different form. The problem on the coast is not freezing. It is water that can begin in October, settles in through November, and does not really leave until April, sitting on saturated ground that has nowhere to drain, under fog that keeps everything from drying out. A wet coop is a sick coop, and most of the winter health problems we see in backyard flocks here trace straight back to moisture you could have managed.
This guide walks through why our coastal winters are uniquely damp, the chain of problems that wet conditions set off, and the practical, buildable fixes for drainage, bedding, and ventilation. It pairs closely with our companion article on choosing between deep litter and sand bedding for a coastal California coop, so if you are still deciding what to put on the floor, read the two together.
Why are Santa Cruz County winters so hard on a coop?
Most of the chicken-keeping content online is written for places with a hard freeze and a dry summer. Our climate is close to the opposite. The challenge here is sustained, low-grade wetness rather than extreme cold, and that combination is harder on a coop than people expect.
Several local factors stack up against you from late fall through early spring:
- A long, sustained rainy season. Most of our annual rainfall lands between late fall and early spring, with the heaviest stretch from December through February, and the first storms often rolling in around October. It rarely comes as one dramatic storm and then clears. Instead it arrives in waves, day after day, with short breaks that are not long enough to dry anything out.
- Saturated ground with nowhere to go. By midwinter the soil profile is full. New rain cannot soak in, so it pools and runs across the surface. A run that drained fine in November can turn into standing mud by January even though the rainfall has not increased.
- Low evaporation. Short days, a low sun angle, and cool temperatures mean very little drying happens between storms. Water that lands tends to stay.
- Coastal fog and high humidity. Even on rain-free days, marine fog keeps the air near saturation, especially in the fog belt closer to the coast and up in the San Lorenzo Valley. Bedding that would air-dry in a drier climate simply does not here.
The result is a coop and run that stay wet for weeks at a time. That persistent dampness is the root cause of nearly every winter flock problem on this list, which is why getting ahead of the water is the most useful thing you can do for your birds' health.
What does a wet coop actually do to your flock?
It helps to see dampness not as one problem but as the first link in a chain. Once you understand the chain, the fixes make a lot more sense, because you are interrupting it rather than chasing symptoms.
Ammonia and respiratory damage
Wet litter allows ammonia to build and increases respiratory stress. Penn State Extension recommends a poultry-house goal below about 25 ppm and notes that elevated ammonia can damage the respiratory system and increase disease challenge. The page does not support a precise 10 ppm cilia-damage threshold, so use the extension target instead.
Odor is an unreliable alarm. Penn State says the human nose generally does not detect ammonia until about 20 to 30 ppm and people can become accustomed to the smell. Because that range overlaps or exceeds the goal below about 25 ppm, keep litter dry, maintain ventilation, and measure at bird height rather than waiting for eye irritation or a strong odor.
Bumblefoot and foot health
Bumblefoot is a bacterial infection of the footpad, usually involving Staphylococcus, that enters through a small cut, scrape, or break in the skin. Continuous exposure to wet bedding and muddy ground is one of the most common setups for it. Constant moisture softens and damages the footpads, mud and grit cause small abrasions, and the bacteria walk right in. A bird standing in a wet run all winter is far more likely to develop a foot infection than one with dry footing. Giving your flock a dry place to stand is genuine preventive medicine. For a fuller rundown of foot problems and other ailments, see our guide to common health issues in backyard chickens, ducks, and geese.
Mold and aspergillosis
Aspergillosis is a fungal infection, most often affecting the lungs and air sacs, caused by inhaling Aspergillus mold spores. The Merck Veterinary Manual notes that bedding which becomes wet and then dries is a particular hazard, because moisture lets the mold sporulate and the later drying releases a cloud of infectious spores into the air the birds breathe. Damp, poorly ventilated conditions and moldy feed raise the risk. This is exactly the wet-then-dry cycle our climate produces between storms, which is why discarding any bedding that has gone caked or musty, and storing feed somewhere genuinely dry, matters more here than in a drier region.
None of these are reasons to panic. They are reasons to keep the coop dry, and every one of them is largely preventable with drainage, bedding, and ventilation done right.
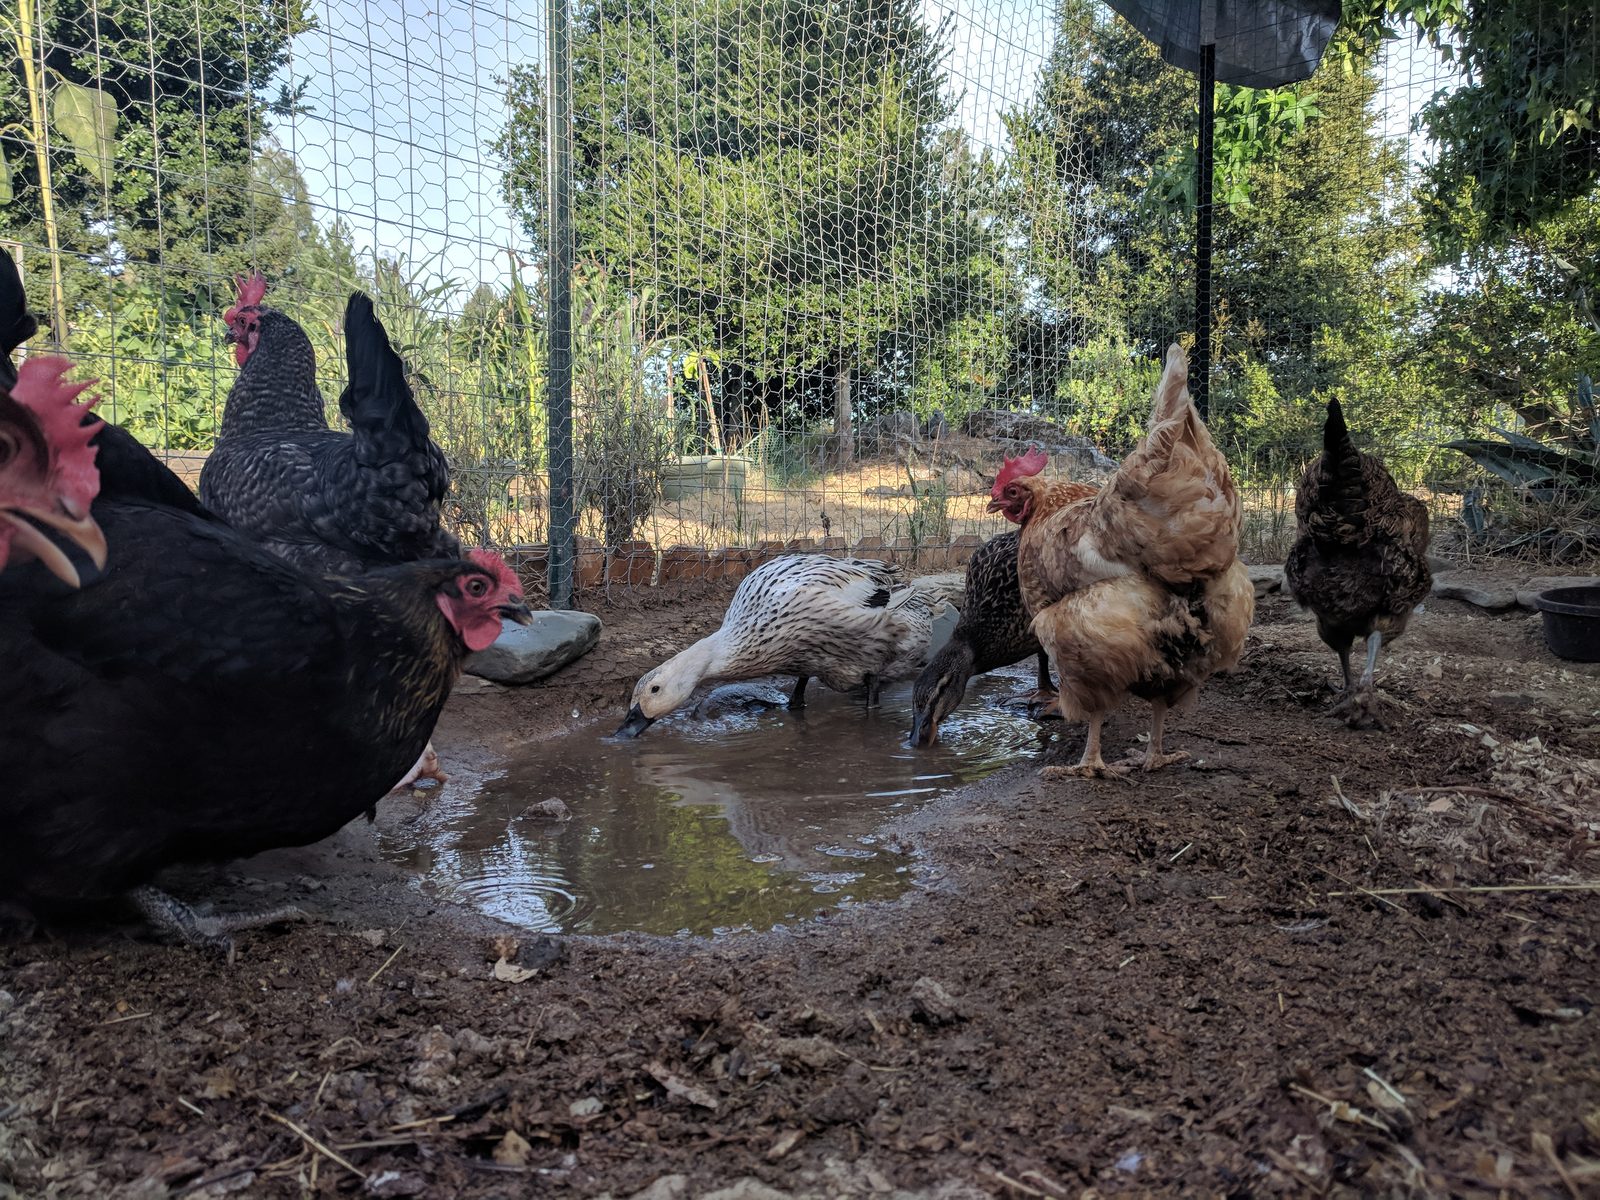
How do you drain and site a run that stays muddy?
The run is usually where the water battle is won or lost, because it has the most exposed ground and takes the most rain. The goal is simple to state and harder to achieve: get the water moving away from where your birds stand, and give them dry footing on top of whatever ground you have.
Start with where the water comes from
Before you build anything, watch your run during an actual storm. See where water enters, where it pools, and where it would naturally flow out if something were not blocking it. Most muddy runs are fed by water you can redirect.
- Redirect roof runoff. The single biggest source of run flooding is usually rain pouring off the coop roof or a nearby shed or fence onto the run. Add gutters and downspouts to the coop and any adjacent structure, and run the downspouts well away from the run, downhill, so that roof water never lands where the birds walk.
- Use slope. If you are still siting your coop and run, put it on higher ground or on a gentle slope so water sheds away rather than collecting. For an existing run on flat or low ground, you can build up the floor with gravel and footing so the birds stand above the water table rather than in it.
- Divert uphill water. If runoff flows downhill into the run from elsewhere on the property, a shallow swale or trench across the top edge can catch it and route it around.
French drain basics
Where water genuinely has nowhere to go, a French drain is the classic fix. The basic idea is a trench, sloped slightly along its length, lined with landscape fabric, holding a perforated pipe surrounded by gravel. Water collects in the gravel, enters the pipe, and is carried to a lower outlet away from the run. It does not need to be elaborate to help. Even a simple gravel-filled trench leading downhill will pull standing water off a problem spot. The key is that it must drain to somewhere genuinely lower, or it just becomes a buried puddle.
Deep wood-chip run footing
For the run surface itself, a deep layer of coarse wood chips is the most reliable footing for a wet climate. A thick bed of arborist-style chips, several inches deep and topped up as it breaks down, lifts the birds above the mud, absorbs water, and composts slowly in place. It drains far better than bare soil and is much kinder to feet than mud or fine sand that packs down and holds water. Many local feed and garden suppliers carry bulk chips, and tree services in the county will often drop a load. Avoid letting the chips sit sodden and packed; refresh the worst areas and keep the layer deep.
Cover part of the run
The most effective single upgrade for a coastal winter is roofing over at least part of the run. A covered section gives the flock somewhere dry to stand, dust bathe, eat, and wait out a storm, which dramatically cuts their exposure to mud and standing water. You do not need to roof the whole thing. Even covering the area around the feeder, waterer, and the coop door keeps the highest-traffic ground dry and makes everything downstream easier. A solid roof or clear corrugated panel sheds the rain; combine it with redirected gutters so the runoff from that new roof does not just create a new puddle at its edge.
Sand versus deep litter in a damp climate
Flock keepers ask constantly whether sand or deep litter is better for our conditions, and the answer is that each has a real trade-off here. Sand drains and dries quickly when it stays under cover and gets raked, which is a genuine advantage, but uncovered sand in a coastal winter tends to stay cold and wet and can pack down into something that holds water rather than shedding it. Deep litter, built up over the season, generates a little warmth as it composts and stays workable if you keep adding dry carbon, but it demands attention so it never tips into soggy and ammonia-heavy. There is no single right answer for every setup. Because this choice deserves its own full treatment, we wrote a dedicated comparison: deep litter or sand for a coastal California coop. Read it before you commit, especially if you are setting up a new coop this fall.
How do you ventilate a coop without making it cold and drafty?
This is where most coastal flock keepers go wrong, and it is worth getting right because it is counterintuitive. The instinct on a rainy, cool night is to close the coop up tight to keep the birds warm. In our climate that is almost always a mistake. A sealed coop traps the moisture from droppings and from the birds' own breathing, humidity climbs, ammonia accumulates, and the coop becomes wetter and more dangerous than the weather outside.
The key distinction is between ventilation and a draft. Ventilation moves humid, stale air up and out and gently draws fresh air in. A draft blows cold air directly across the birds where they sit. You want plenty of the first and none of the second.
In practice that means:
- Keep vents high, above roost level, and open year round. Warm, moist air rises, so openings near the roofline let it escape carrying the humidity and ammonia with it. Because these vents sit above where the birds perch, the moving air passes over their heads rather than across their bodies.
- Keep roost-level walls solid. The area right around the roost, where the birds sleep, should be free of direct air movement. Solid walls at that height block drafts while the high vents above keep the air exchanging.
- Do not seal it for winter. Resist the urge to cover every opening when the rains come. A dry, well-ventilated coop at a cool temperature is healthier than a warm, sealed, humid one. On the coast, our nights are mild enough that moisture, not cold, is the real threat.
This same principle protects against frostbite in the colder pockets of the county, such as up in the valley, even though hard freezes are uncommon. Frostbite is driven far more by trapped humidity than by temperature alone, so the dry coop is the safe coop. University extension guidance on cold-weather poultry care is consistent on this point: airflow that carries moisture out matters more than sealing warmth in.
If you keep birds up in the cooler, foggier reaches of the watershed, our guide to keeping a flock in the San Lorenzo Valley goes deeper on the specific challenges of that microclimate, where damp and shade linger longest.
How should you manage bedding through the wet months?
Bedding is the daily lever for moisture and ammonia control. Do not manage it by smell alone: the human detection range overlaps the recommended ceiling. Inspect on a schedule, remove wet or caked material, keep ventilation open, and use an ammonia meter or test strip at bird height when conditions are damp.
A workable rhythm for the wet season looks like this:
- Keep it deep. A generous layer of bedding gives droppings room to be absorbed and buried rather than caking on the surface. Thin bedding goes wet and foul fast.
- Stir and refresh. Turn the bedding regularly to bring damp material up to dry and break up packed spots. Scoop out and replace any patch that has gone genuinely wet or caked, especially under the roost where droppings concentrate overnight.
- Add dry carbon. When bedding starts to feel damp, add fresh dry material such as wood shavings, dry leaves, or straw to soak up moisture and rebalance the litter. In a deep-litter setup this is also what keeps the composting process healthy rather than anaerobic and smelly.
- Mind the waterer. Spilled and splashed water is a constant bedding-soaker. Site the waterer where drips will not soak the main bedding, ideally over a hard or draining surface, and outside under the covered run if you can.
- Throw out anything moldy. Bedding that has gone musty or shows mold goes straight out, not stirred back in. The same goes for any feed that has gotten damp. This is your direct defense against aspergillosis.
Ducks and geese deserve a special note here, because they make far more mess and moisture than chickens. Waterfowl splash, and they produce wetter droppings, so their bedding needs changing more often and their footing needs to drain even better. If your flock is mixed, plan your bedding routine around the messiest birds in it.
What does a winter maintenance rhythm look like?
Keeping a coop dry through six months of wet is less about one big project and more about a steady routine. Set it up before the rains and the in-season upkeep stays light.
In early fall, before the rains arrive, do the build-once work. Hang or clear the gutters and aim the downspouts well away from the run. Roof the high-traffic part of the run. Top up the run footing with a fresh deep layer of wood chips. Confirm your high vents are open and clear. If you are reworking drainage or adding a French drain, do it now while the ground is still workable.
Through the wet months, on a weekly cadence, stir the bedding and pull out any wet or caked spots, add dry carbon when the litter feels damp, scan footpads for early signs of bumblefoot, check that the waterer is not soaking the bedding, and discard anything musty. Take a moment to stand in the coop at bird height and notice the air. If it smells of ammonia, increase ventilation and refresh bedding immediately rather than waiting.
After each major storm, walk the run and see where new water is pooling or where runoff has found a new path. Mud problems shift through the season as the ground saturates, so a fix that worked in November may need adjusting in February.
This rhythm fits naturally into the broader seasonal care your flock needs. For the full picture of what changes as the days shorten, see our guide to seasonal flock care for fall and winter on the coast. And if you are still designing or upgrading the run itself, a dry run and a safe run go hand in hand, so it is worth reading our guide to designing a predator-proof run for your garden flock while you have the tools out.
Frequently asked questions
How much ventilation does a coop really need in winter?
More than most people think, and you almost cannot have too much as long as it is up high and not blowing across the roost. The job of ventilation is to carry out the moisture and ammonia your birds generate constantly. On the coast, where the threat is damp rather than deep cold, keep your high vents fully open through the entire rainy season. If you ever see condensation forming on the coop walls or windows, that is a clear sign you need more airflow, not less.
Should I use a heat lamp to keep my birds warm and dry?
For the mild coastal climate, heat lamps are generally unnecessary and carry a real fire risk in a wood-and-bedding coop. Healthy adult chickens handle our winter temperatures fine when they are dry and out of drafts. Your effort is far better spent on dryness and ventilation than on heat. A dry bird is a warm bird; a damp one stays cold no matter how warm the air is.
Can I just keep my birds inside the coop until the rain stops?
Keeping them shut in does more harm than good. A flock packed into a closed coop produces droppings, moisture, and ammonia faster than ever, and with the door shut and birds inside all day the air quality drops quickly. Birds also need activity and light. The better answer is a covered, dry section of the run where they can get outside, move around, and stay out of the mud even during a storm.
My run is already a mud pit. What is the fastest improvement?
Two moves give the quickest relief. First, find where roof water is pouring into the run and redirect it with a gutter and downspout aimed well away. Second, lay down a deep layer of coarse wood chips to lift your birds above the mud and absorb water. Those two together will transform a soggy run within a season. Drainage trenches and covered sections then make the fix more permanent.
One of my birds is sneezing or breathing with its mouth open. What should I do?
Treat respiratory symptoms seriously, because they can signal infection that spreads through a flock. Improve coop dryness and ventilation right away to remove ongoing irritation, and contact a veterinarian for any bird showing labored breathing, discharge, or persistent sneezing. This guide does not cover treatment or dosing; a vet should diagnose and direct care for a sick bird.
Pulling it together
A dry coop is the foundation of a healthy coastal flock through the long wet season, and almost every winter health problem we see, from respiratory infection to bumblefoot to mold, traces back to moisture you can manage. Get the water moving away from the run, give your birds dry footing and a covered place to stand, keep the bedding deep and turned, and keep those high vents open. Do not wait for the smell of ammonia or the sight of mud to tell you to act, because by then the damage has started. Build the dry-season setup once in early fall, keep a light weekly rhythm through the rains, and your flock will come through to spring in good shape.
If you want a single place to plan all of this, our garden toolkit gathers the seasonal resources, checklists, and guides we use to keep our own Santa Cruz County flock healthy through every kind of weather. And do not forget to read the companion piece on deep litter or sand bedding for a coastal coop so the floor under all this advice is the right one for your setup.